Hackaday In The Social Tangle

Like any other organization out there, we’re always trying to find new ways to reach our audience. Admittedly, we’re not the fastest when it comes to adopting a new social communication site. We’re working on it though, trying to be a bit more interactive … or just plain active.

So, if you’re looking for other ways to get your hacking fix, or see some interesting commentary, find us on facebook, twitter, our own forums, and now G+. We just signed up to G+ and our name is “Hackie Smith”. If you need an invite, email us at theofficialhackaday@gmail.com see below.   Sometimes there’s good discussion in those places that doesn’t end up here on the site.

You can also find several of us spattered across the web in sites like Reddit and Slashdot.

[Update: Our g+ page got shut down. Feel free to find any of the writers on g+. I’ll give out invites, look for “Caleb Kraft” or 60mango@gmail]

Beat707 LE: A Button Pad-based Standalone MIDI Sequencer

sparkfun_button_pad_midi_controller

[Guilherme] picked up a SparkFun Button Pad and was taking a closer look at the device when he noticed that it was based off the ATMega328 microcontroller. Since he loves working with MIDI, he thought that the Button Pad would make a slick yet compact standalone MIDI controller.

Since his ultimate goal was to create a completely standalone controller aside from the power plug and MIDI interface, it forced him to work quite closely with the ATMega chip. He and his partners spent a good deal of time working through some serial communications issues so as not to block the LEDs or MIDI block timer during operation. Ensuring that the Arduino doesn’t block any other functions is obviously important when you are building a MIDI timer, and it seems [Guilherme] was successful in his quest.

The MIDI controller works quite nicely as you can see in the videos below, great job!

Continue reading “Beat707 LE: A Button Pad-based Standalone MIDI Sequencer”

Hacking Your MacBook Air Restore Drive To Install OSX Lion

macbook_air_restore_media_unlocker

[Josh Wright] wrote in with a handy little hack just in time for today’s release of Mac OSX Lion. If you’re not familiar with the new version of the OS, Apple has decided to change things up this time around, completely eliminating physical distribution media.

In the event that you need to run a factory restore, this becomes an issue for some users. Computers with DVD drives can run a burned copy of the previously downloaded Lion installer, but MacBook Air owners are left hanging. Their restoration process is more time consuming, requiring a system restore and the download of OSX Lion, followed by the subsequent upgrade process. [Josh] thought it would be great if you skip the initial restore step and jump straight to installing Lion, so he hacked his USB restore media to do just that.

While copying the OS to a USB drive might sound trivial, the process is not as straightforward as it sounds – not surprisingly, Apple has put measures in place to prevent mere mortals from altering the contents of the drive. [Josh] put together an easy to follow tutorial that walks you through removing the drive’s protection and copying your brand new OSX Lion restore image to it.

While you might be asking, “Why jump through all these hoops when a normal flash drive would suffice?”, we think that his writeup is quite helpful. We see no reason to tie up a usable flash drive to store your restoration disc when you already have a perfectly good (albeit locked) drive at your disposal.

♦The only caveat to the process is that you need a Windows machine, virtual or otherwise, to complete the first step – a requirement that elicited a hearty chuckle from us.

RC Transmitter Does Everything

[Demetris] sent in a tip about a project he’s working on: an Open Source Remote Control transmitter. This is one of the most impressive looking RC transmitters we’ve ever seen. The OSRC could be great for a small UAV – just get the GPS position from the aircraft and map it with the transmitter’s screen. There’s also support for a video downlink so flying around New York City is possible with a single device.

Continue reading “RC Transmitter Does Everything”

Chilean Teen Builds Automatic Earthquake Alarm

chilean_teen_earthquake_alarm

When an earthquake is about to strike in Chile, who do you think is first to sound the alarm? You might be surprised that it’s not the government, but rather a 14 year old boy.

After living through an earthquake in 2010 and seeing the devastation this spring in Japan, Chilean teenager [Sebastian Alegria] decided that he wanted to construct something similar to Japan’s earthquake warning system. He purchased an off the shelf earthquake detector for less than $100, and connected it to his computer via an Arduino.

Now, whenever seismic activity is detected, his sensor tweets an alert letting his 29,000+ followers know that a perceptible earthquake is 5 to 30 seconds away. Apparently the Chilean government is working on a similar system that is still at least a year away, so in the meantime his fellow citizens rely on [Sebastian] instead.

While it might seem like a relatively easy hack to pull off compared to other earthquake detectors, we’re impressed by [Sebastian’s] creativity, and his will to help others. He’s been pounding away at computers since he was about 4 years old and has several other popular Twitter-based projects under his belt already, so we won’t be surprised if we hear from him again in the future.

Obstacle Avoiding Hexapod From Reused Parts


[Rob] built this hexapod one day when he had some free time after work. Just like the last hexapod we saw, he based the build on the Pololu design which uses three servo motors for surprisingly reliable movement.

The hardware is very straight forward. A Dorkboard serves as the brain. It’s a PCB that is wider on each side by the width of one female pin-header than a standard AVR 28-pin microcontroller. This gives easy access to all of the pins on the Arduino chip while making it small and light. You can see that a four-pack of batteries hangs below the servo motors to provide power.

Protruding above the 6-legger is a PING ultrasonic rangefinder. This adds autonomy to the little robot, which you can see running some obstacle avoidance routines in the video after the break. We’ve asked [Rob] if is able to share his code and will update this post if we hear back from him.

Update: Here’s a link to the sketch, and we’ve updated the picture with one that [Rob] sent to us.

Continue reading “Obstacle Avoiding Hexapod From Reused Parts”

One Really Big Quadcopter That Is Following In The Steps Of The Spruce Goose

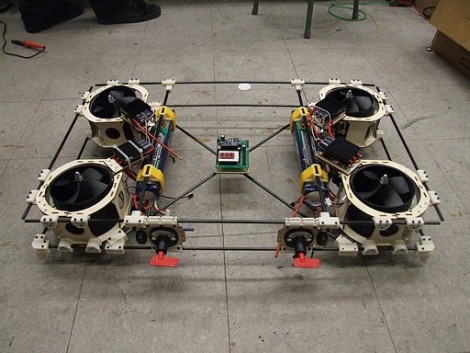
Behold the Land-Bear-Shark, a quadcopter on a rather grand scale. At a full eight kilograms it’s an easy target to compare the [Howard Hughes] behemoth, but in addition to the weight, this still has yet to make its first flight.

To give you some scale to the image above, the board at the center is an Arduino. It controls the beast, along with the help of a SparkFun IMU board which rides atop. Really, if any quadcopter of this size has a chance of working, this should be the one. The construction is beautiful, making use of carbon fiber rod along with 3D-printed connectors to assemble the frame. A lot of thought has gone into small things like conserving weight used on the landing gear, which are incorporated into the bottom corner brackets. The batteries are connected in a manner that makes them easy to adjust, acting as ballast for balancing the craft.

We’re keeping our fingers crossed that this will be more than the tongue-in-cheek title of the post which calls it a Quadrotor-shaped sculpture.

[via Adafruit]