Pyxis 3 Hits Beta; Rebranded As Gadgetos

The beta version of Pyxis 3 is now available. Skewworks continues to develop the ARM operating system, and with the transition to version 3 they’ve given it a new name: Gadgetos. One big difference from Pyxis 2 is that the new kernal is closed source. But they’ve taken steps to ensure that the OS is still hardware independent. This is done by reworking the kernel to allow driver loading at run time from an SD card.

The user interface has also changed a bit. Gadgetos relies entirely on a context-based menu system. The minimum input hardware requires a touchscreen LCD and one tactile button. By holding that button, a menu pops up in the center of the screen. This menu is different based on where it is called (this is where context comes in). If you’re at the desktop screen, you get options to load programs, etc. If you pull up the menu while running an application you’ll see the options available for that app. To see more about the new navigation system check out the video after the break.

Continue reading “Pyxis 3 Hits Beta; Rebranded As Gadgetos”

Lighted Fan Pull Saves You From Flailing Around In The Dark

lighted-fan-pull

Like many people, [yardleydobon] had a hard time locating his ceiling fan’s pull chain at night when his room is completely dark. Rather than continue to flail around blindly grasping for the chain, he decided to find a way to illuminate it instead.

He started off by disassembling a solar garden light, retaining the solar cell, photoresistor, and batteries. After paring down the electronics to the bare essentials, he mounted them inside a plastic battery storage case which he attached to the outside of the fan’s lamp. [yardleydobon] then ran a pair of wires from the electronics box down to end of the chain, where he added an LED and a translucent pull to diffuse the light.

He admits that it’s not the nicest looking modification around, but it does the job in a pinch. He has some ideas that he may put into play if he has the time to revise the design, and we bet that many of you do as well. If so, be sure to share them in the comments.

Continue reading “Lighted Fan Pull Saves You From Flailing Around In The Dark”

Buzzer Project For Classroom Team Games

Want to host a Jeopardy tournament with your friends? Looking to add a bit more fairness to your school’s knowledge bowl? Perhaps you should build some buzz-in hardware of your own.

Here you can see [Matt Hanson’s] take on this idea. He used one Arduino to gather not just buzzer info, but also keypad data from four satellite controllers. Each has an RJ45 jack, allowing it to connect tot he base unit with an Ethernet patch cable. We like the color coding that [Matt] chose, which matches the color of the arcade button to the keystone jack on the base. And of course the fantastic look of the water-jet cut cases isn’t lost on us either.

You may wonder why he included a key pad on each controller? It looks like he and a few others worked together to develop a team-based math game for use in school.

Tiny Audio Switcher Eliminates Repetitive Plug Swapping

usb-audio-switcher

[Phil] uses both his computer’s speakers and a set of headphones while working at his desk, but he was growing tired of constantly having to remove the headset from his sound card in order to insert the speaker plug. He’s been meaning to rig something up to make it easier to switch outputs, but never seemed to get around to it until he recently saw this LAN-enabled audio switcher we featured.

His USB-controlled switch features a single audio input and two audio outputs, which he mounted on a nicely done homemade double-sided PCB. The switch can be toggled using any terminal program, sending commands to the on-board ATtiny13A via an FT232R USB to serial UART chip.

The switch’s operation is really quite simple, merely requiring [Phil] to type in the desired audio channel into the terminal. The ATiny and a small relay do the rest, directing the audio to the proper output.

Follow Up: Star Wars Tree Gets An Upgrade

star-wars-tree-sound

We asked, and [Zach] listened.

Earlier this week, we featured a circuit he built which allowed his tiny Star Wars Christmas tree to visually replicate the series’ theme song. Several of you, along with myself, thought it would be far cooler if the tree also played the music to accompany the light show, so [Zach] set off to add that functionality.

Worried that the music would get annoying if it played along with the lights constantly, he tweaked his circuit design to incorporate a piezo buzzer that could be easily switched on and off. After wiring it to the MSP430 driving the light show, he tweaked the program to output signals to both the light string and buzzer simultaneously.

While the light show accurately represented the song, he initially ignored flat and sharp notes as they would be indistinguishable to the eye. In audio form however, the missing notes would be glaringly obvious, so he re-transcribed the sheet music resulting in the video you see below.

If you happened to follow [Zach’s] lead and put one of these together in your own house, be sure to swing by his site and grab the latest code, complete with audio track.

Continue reading “Follow Up: Star Wars Tree Gets An Upgrade”

Rebuilding Dried Out Capacitors

If you’ve ever torn into very old equipment for a little refurbishment, you’ve seen ancient capacitors among tube sockets and carbon resistors. These caps are long past their life expectancy and are dried out. Putting a brand-new metal can cap in a piece of equipment from the 40s just seems wrong, though. Luckily, [unixslave] posted a nice cap rebuilding tutorial on the Hack a Day forum.

To get inside, [unixslave] melted the resin and wax plug at the base of an old cap with a soldering iron. After cleaning out 70-year-old goo with the tip of a flathead screwdriver, he drilled a hole through the core of the cap.

[unixslave] took the old wax-pressed tube of the old cap and put some modern electrolytics inside. The result reminds us of a shady practice happening in a cap factory somewhere, but [unixslave] is keeping everything on the level. The repaired cap has the same value as what’s on the label, just enough to get that old tube amp working.

Color Sensing With An RGB LED And Photoresistor

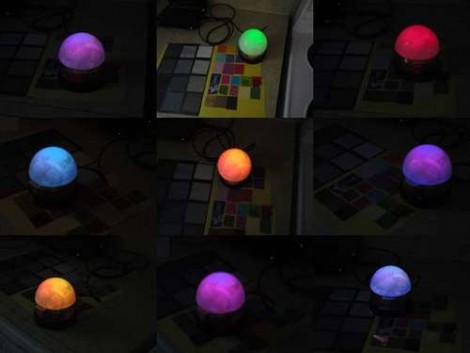
[Fjord Carver] brings together an RGB LED and CdS Photoresistor to make a color sensor. Those Cadmium Sulfide lights sensors usually have a very wide swing of resistance when exposed to varying levels of light sensitivity. That makes for great resolution when reading them using the ADC of a microcontroller. The LED comes into play by shining known wavelengths of light on the surface being measured. Three separate readings are taken with each of the LED’s different colors, then used to extrapolate the RGB value of the test material. We saw the very same method used a couple of years back. This time around it’s an Arduino doing the measuring instead of a PIC.

So why isn’t that sensor shown in this picture? It’s because we appreciate the application which [Fjord] is using for this sensor. He built a lamp that shines the same color as the surface on which it is placed.