Beginner Concepts: 595 Shift Register Simulator

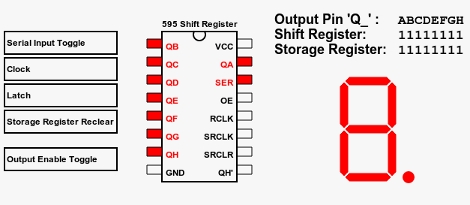
[Aaron] just finished building an online 595 shift register simulator. These inexpensive chips let you extend the number of devices that can be controlled by a single microcontroller. You see them in quite a few LED multiplexing projects, included the Ping Pong Clock that we recently built. But they can be a bit tricky to fully grasp if you’re not familiar with the hardware.

This simulator gives you a point-and-click interface for the five possible control lines on a 595 shift register. There are three pins that must be manipulated to use the device; the serial in, clock, and latch pins. The other two are for clearing the register, and enabling output and can be considered optional. You can choose to control these with a microcontroller in your own projects for more flexibility, but often they are tied to either VCC or GND (depending on the chip) when these features are unnecessary. Give this simulator a try and then take what you learned over to a solderless breadboard and see if you can write some firmware to produce the same results. If you’re still having trouble you can take a look at this 595 tutorial for further information.

Commandeering Public Video Screens: Real Or Fake?

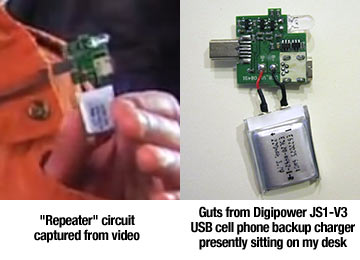
It’s time for everyone’s favorite comment thread game: Real or Fake? This week’s edition comes in from a tip that [Phil] sent about a way to take over video screens in Times Square. Watch the video after the break to see the hackers using a two-part solution to rebroadcast video from an iPhone onto a screen in the busy urban setting. The first part is a transmitter that plugs into the iPhone, the second is a signal repeater that, when held close to a video screen, overrides the clip currently being displayed with the video from the handheld. The image above shows the repeater being floated up to the big screen using a giant red balloon which you can make out in the black bar to the left of the replayed video.

Our first thought is that someone just watched Tron: Legacy and wanted to have a little Sci-Fi fun with the Internets. We can’t imagine a hardware solution that would actually make this work, but please do share your thoughts about that in the comments. We’d suspect this is more of a video hack that uses After Effects, similar to how the stopped motion candle video of the eyelid shutter glasses videos were faked. But apparently there is a follow-up video on the way that will show how the prototype was made so we could be wrong.

update: [Phil Burgess] points out that the “repeater” looks awfully familiar.

Fake for a variety of already-stated reasons (e.g. video out the headphone jack?). But the smoking gun, watching the 720P video on YouTube, is that I plainly recognize the hardware they’re using as the “repeater”: it’s simply the internals from a Digipower JS1-V3 cell phone USB boost charger (having torn apart a few myself):

Continue reading “Commandeering Public Video Screens: Real Or Fake?”

Frequency Counter For $10 Worth Of Parts

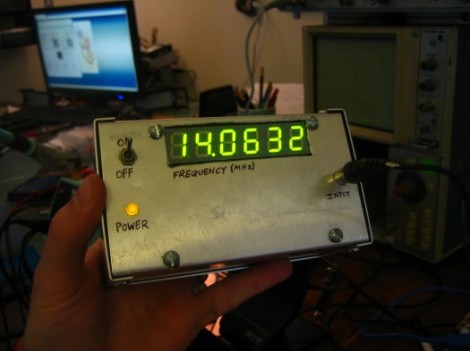
[Scott] built this frequency counter using less than $10 in parts. It’s set up to meter frequencies in megahertz which is fitting since he’s planning to use it with his radio hardware experimentation. But we would find it useful too because our cheap multimeter only reads up to around 4 MHz.

He’s using an ATmega16 that he had on hand but it has features way beyond the specs for the device. He speculates that an ATtiny2313 would easily work in its place. The microcontroller is mostly used to drive the multiplexed 7-segment display after reading the frequency values from the 74LV8154 counter chip that he is using. He doesn’t have a full schematic for the device, but there is a hand drawn diagram for using the frequency counter; the rest should be easy to piece together. Looking at that circuit we don’t think it would be too hard to make this a manual-ranging frequency counter to give you more use out of the dedicated device. Check out [Scott’s] demonstration video which is embedded below the fold.

Continue reading “Frequency Counter For $10 Worth Of Parts”

CNC Etch-a-Sketch Draws On Itself

cnc_etchasketch

Having never been any good with an Etch-a-Sketch, [Ben] decided it was time to tame the children’s toy that had taunted him for so long. He received one in a gift exchange a few years back and hung onto it, recently digging it out again to fit it with some CNC components.

Using his RepRap, he printed a set of mounting plates and gears to drive the Etch-a-Sketch’s dials. He installed a pair of Airpax steppers to the gears and wired them up to an ATmega AT90 USB board he had sitting around. He installed RepRap firmware on the microcontroller, since it has a built-in gcode interpreter, making it easy for him to upload any gcode file to the Etch-a-Sketch for drawing.

You can see a quick demonstration of the device in action below. He converted a spiral image to gcode, then uploaded it to the Etch-a-Sketch – the machine does the rest. It draws pretty quickly as well – [Ben] even suggests that he could probably get it moving fast enough to melt the stylus!

It would be great to see the Etch-a-Sketch configured to support an online interface. That way he could allow people to upload images to the device, later showing off the artwork in a web gallery not unlike the LOL Shield Theatre we featured last week.

[via Make]

Continue reading “CNC Etch-a-Sketch Draws On Itself”

3D Modeling Out Of Thin Air

kinect_3d_modeling

It seems that with each passing day, the Kinect hacks that we see become exponentially more impressive. Take for instance this little number that was sent to us today.

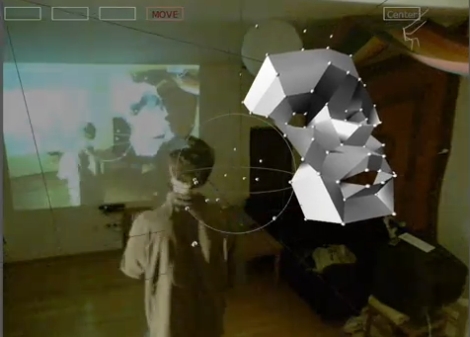
[sonsofsol] has combined several open source software packages and a little electronics know-how to create one of the more useful Kinect hacks we have seen lately. His project enables him to manipulate 3D models in GEM simply by moving his hands about in front of his Kinect sensor. Using OpenNI and Ubuntu, all of his actions are tracked by the computer and translated into actions within the GEM 3D engine.

To make things easier on himself, he also constructed a pair of electronic gloves that interface with the system. Using an Arduino, the gloves send different complex commands to the 3D modeling software, just by touching different pairs of fingers together.

You really need to take a look at the video embedded below to get a feel for how complex [sonsofsol’s] “simple” mesh modeler really is.

Looking for more Kinect fun? Check out these previously featured stories.

[Thanks, Jared]

Continue reading “3D Modeling Out Of Thin Air”

Control Your Home Theater From Anywhere In The World

ether_ir

Using IR repeaters for larger home theater setups is not uncommon, but they usually are quite simple. A series of IR receivers are placed throughout a home, all wired to repeat the signals in a central closet where all of the AV equipment is located. [Bill] constructed a solution that works much like a standard IR repeater setup, however his requires no receivers, and it can be used anywhere in the world, provided you have Internet access.

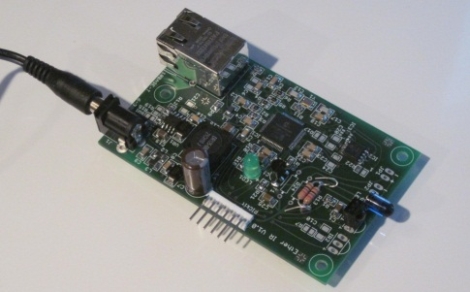
His project, called Ether IR, is an Internet-enabled IR repeater. It consists of an Ethernet-connected module with an IR LED mounted on it, capable of controlling your AV equipment. The board is hooked up to your LAN, and relays commands to your home theater via a simple web page. The equipment can then be controlled from any Internet-connected device, such as a mobile phone or tablet PC.

The entire project is open-source, so [Bill] has included schematics, instructions, and a bill of materials so that you can construct your own. The only issue at this point is the software portion of the project. The software is free, but the distribution method is in question – once things are sorted out, he will ensure that you can obtain the software for your Either-IR from him or directly from the Ethernet chip’s manufacturer.

Mini SATA Power Adapter Does Away With HDD Docking Stations

sata_power_adapter

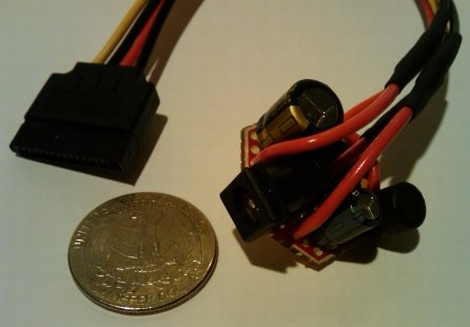
[Marc] is pretty unsatisfied with hard drive docking stations as a whole. He says they are typically slow and unreliable, causing him all sorts of grief while he is troubleshooting a questionable hard drive. He decided to take some of the mystery out of the troubleshooting equation and built a standalone SATA power module.

Aware that SATA drives require 5v and 12v for operation, he disassembled one of his docking stations to see how it provided both voltages. He discovered that it used a simple PWM buck converter and decided to replicate it in the smallest space possible. His plan was to use a standard 12v wall wart to power the circuit, passing that 12v straight to the drive. A simple voltage step-down circuit would be built to provide the required 5v.

[Marc] reports that the power adapter is performing nicely, and he is quite happy with the size as well. He says that one major benefit of this sort of adapter is that it can be used to power any SATA drive, not just hard drives. He does mention that if he built another one, he might consider regulating the 12v output as well, so that he can power the adapter with a laptop power supply instead of a separate dedicated wall wart.