Coilgun With Laser Sights Built In An Airsoft Rifle Housing

This coilgun started as a stock Airsoft rifle. The stock weapon cost about 40€ (just over $50), but we think it was well worth it since it provides plenty of room for all the coilgun components and solves most of the mechanical issues of the build like a body that is comfortable to hold, a trigger, etc.

The clear tube which serves as the barrel (the same setup as we saw in this coilgun guide) is protected by three stainless steel barrels which surround it. They each host a laser diode which results in a Predator-style aiming mechanism that is shown off in the video after the break. There’s even a night vision system that uses IR leds and a viewfinder attached to the stock.

A camera flash is scrapped for the transformer inside. This acts as the voltage generator, charging up a few capacitors. It seems to have no problem generating enough juice to work well, despite the fact that it’s only being powered from two AA batteries mounted in the magazine.

Continue reading “Coilgun With Laser Sights Built In An Airsoft Rifle Housing”

Testing 30 Brands Of Batteries

Batteries come packaged in bright blister packs emblazoned with vague guarantees such as “45% more pictures” and “five times longer lasting.” During his internship at BitBox this summer, [Thomas] decided to put those statements to the test. He tested thirty brands of batteries on a homebrew rig to find the batteries with the most power and the most bang for your buck.

The hardware [Thomas] used an STM32 microcontroller to perform two different tests: a high drain and a low drain condition. For the high drain, 1000 mA were sucked out of the batteries until the voltage reached 0.8 V. For the low drain, 200 mA were used. Data including milliwatt-hours, milliamp-hours, joules, voltage, current, power, and effective load resistance were all logged for both conditions for all 30 batteries.

Generalizing the results for both low and high drain conditions, lithium batteries were better than alkaline, which were both better than zinc AA cells. Perhaps unsurprisingly, batteries marketed as ‘long life’ and ‘extended power’ were the worst batteries for the money, but a brand-name battery – the Kodak Xtralife cells – were actually the best value for the money.

RC Car Upgraded To Bluetooth Control

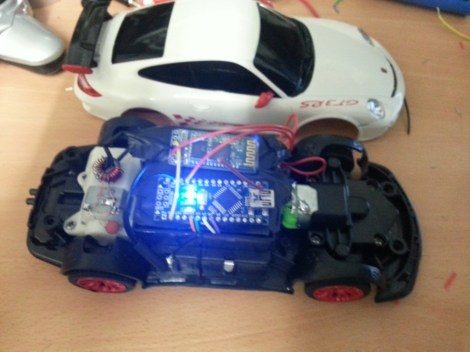
[Chet] is showing off the Bluetooth controller upgrade for this RC car. The donor vehicle is a rather inexpensive Porche which he purchased to make sure he didn’t start hacking up his more expensive toys.

He took a bit different route than the IOIO RC truck we saw earlier in the week, but the concept is basically the same. That build used an IOIO board with a USB Bluetooth dongle. This one uses an Arduino Mini with a serial Bluetooth module. He patched into the motor driver circuits on the original PCB. While he was at it he also soldered in some LEDs to use as switchable headlights.

There was one issue which he had to overcome. The current draw from the motor starting up would sometimes dip the voltage low enough to reset the Arduino. He tried using a bigger capacitor to feed the board, but in the end opted to add a boost converter.

Checking Out Mount Olympus From 38 Km

The image above shows Mount Olympus in the center, with a tiny bit of the western suburbs of Thessaloniki, the second largest city in Greece, in the lower right hand corner. These two points are 70 kilometers apart, but we’re not seeing a picture taken from the International Space Station. This is a picture from the SlaRos project, a high altitude balloon launched last summer that ascended to 38 kilometers above Greece.

On SlaRos’ project page (Facebook warning), the team covers the hardware that went in to lofting a camera high above the cruising altitude of commercial airplanes. A GPS module tracked the balloon in real time and relayed this to a GSM module to the mobile command and tracking team.

There are a ton of high altitude pictures of Greece over on the project’s Facebook page as well as a time lapse video of the Grecian wilderness after the SlaRos payload landed. The payload spent a full night in a field before it was recovered, but we’re very glad the team was able to recover these awesome pictures.

Making Plastic Filament At Home

There’s one problem with the popularity of plastic-extruding 3D printers such as the RepRap and Makerbot; since they’ve become so popular, the price of plastic filament has skyrocketed over the past few years. Without a way to produce filament at a hackerspace or home lab, the price of 3D printed objects will remain fairly high. Project Spaghetti hopes to rectify that by building a machine to make plastic filament for 3D printers.

The folks behind Project Spaghetti – a loose amalgamation of makers going under the title of Open Source Printing, LLC – have successfully built a machine that is able to produce short lengths of plastic filament.

Early machines used a plunger to press small pellets of ABS plastic through a heated steel pipe to produce filament. There are a few problems with this approach, especially when the temperature is set to 480F, but the team was able to make a bit of filament with this design.

Although the team is using a piston to force melted plastic out of a nozzle, they do have a screw-drive ‘plan B’ in the works. This design should allow for continuous extrusion for theoretically endless reels of plastic filament, every RepRappers dream and a neat way to win 40 grand. Continue reading “Making Plastic Filament At Home”

IOS Terminal Debugging Tool

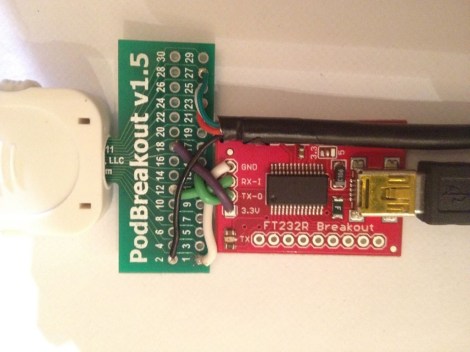
This is a simple iOS debugging tool that will take no time to solder together. There’s even a chance that you already have everything you need on hand. The hack simply connects an RS232-to-USB converter to a breakout board for an iPod connector.

The hardware is aimed not at stock iOS systems, but as an aid to those who wish to run alternative operating systems on them. When the OpeniBoot package is run on an iPod Touch or iPhone it enables a serial terminal on pins 12 and 13. The FTDI breakout board takes these as RX and TX and makes them available to your terminal program of choice via USB. Speaking of USB, you may already have noticed the black cable leaving the right side of the image. Using the terminal doesn’t limit your ability to use the device’s USB functions.

Art Controller: Relay Board With Switches For Timing

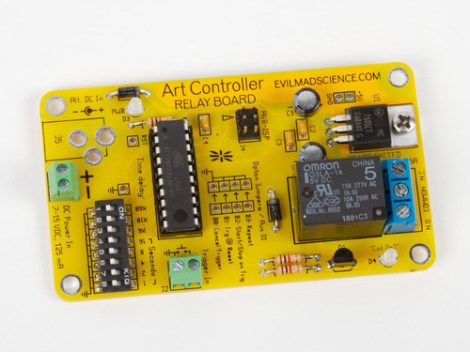
Meet the Art Controller, a new dev board available over at Evil Mad Scientist Laboratories. It provides a drop-in solution for switching higher voltage loads (but not mains). The thing we like most about it is the ability to alter a switching delay without reprogramming the firmware.

The board uses an ATtiny2313 for control. It’s fed regulated 5V power from the on-board 7805 linear regulator. The relay can handle a 24V DC or 40V AC load, which is targeted at an audience that needs electronic switching for art-related devices but doesn’t want the hassle of designing a circuit every time. This offers a single shot, or repeat action, with that bank of DIP switches selecting a delay from once every second, to every 31 hours. It can get its initial trigger from anything that can pull a pin low, like a button, or a coin acceptor.

Keep this in mind. The open source nature of the project means it could come in handy as a reference design.