Hydroponic Strawberries Sweeten Up Winter Dolldrums

Add some fruit to your indoor bounty with this hydroponic strawberry farm. [Dino] whipped this up as his 45th hack a week episode (getting pretty close to his year-long goal). He used parts you probably already have sitting around the house somewhere. But even if you bought everything and used it once you still wouldn’t be out much.

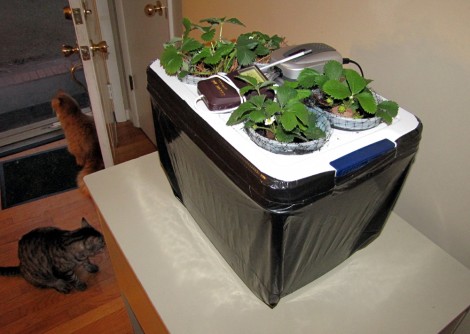
A plastic storage container serves as the base. [Dino] also grabbed four identical plastic containers (large yogurt containers would work here) to host the plants. He cut off the bottom half and inserted some netting to keep the plant from falling through. After tracing the size of the container on the enclosure’s lid he cut out holes which will host each plant. This provides a way to dangle the roots into the nutrient solution which is kept oxygen rich with an aquarium pump and two air stones. It certainly deserves a place next to that salad farm you threw together. Don’t miss [Dino’s] build video after the break.

Continue reading “Hydroponic Strawberries Sweeten Up Winter Dolldrums”

Yet Another 3D Printer

What would you do if you wanted to demonstrate a linear bearing system? If you’re like [Bart] the obvious solution is building a tiny little 3D printer. [Bart]’s Quantum ORD Bot is constructed out of a previous project of his, the MakerSlide linear bearing system.

The idea of a printer made out of MakerSlide materials came from [Bart]’s invitation to ORD Camp. The fact that this build went together in about 5 hours speaks volumes about the simplicity of the MakerSlide system. Right now, the printer is designed for NEMA 14 motors, but for larger builds there’s plenty of room for the larger NEMA 17 stepper motors. [Bart] put up a build log for his printer up on the buildlog.net forums.

The MakerSlide system has already been used in an open source laser cutter project, but [Bart] really just wanted something to demonstrate his linear bearing system. We like the bot anyway; not enough stuff is made out of aluminum extrusion these days.

[Bart] is going to be showing off his bot at the Chicago hackerspace Pumping Station: One tonight, February 8th. Stop by and check it out. Snap a few pictures for us and we’ll put them up.

EDIT: [gigawatts121] was kind enough to send in a picture of the printer at Pumping Station: One. There’s also a video of a calibration cube being printed courtesy of [David] in the comments. Check that out after the break.

Continue reading “Yet Another 3D Printer”

DIY Solid State Tesla Coil

Tesla Coils are always a blast to see and are relativity simple to build. While there are plenty of sites on the subject, [Michael’s] newest instructable breaks building a solid state Tesla Coil down to 12 easy steps.

Items that should be familiar to anyone who has even looked at a Tesla Coil include PVC pipe, Aluminum ducting, and wire … lots of wire. The PVC pipe is cut to length and a flange is attached to help form a base. From there the pipe is wound with about ¾ of a pound of 30 AWG enameled wire, which takes some time by hand to make sure you don’t overlap or get space between the coils.

Aluminum ducting is then wrapped around the outside of a second flange. Some stovepipe wire is ran though the ducting and twisted to close up the 2 ends, and hot glue is used to attach the two ends together. The assembly is screwed to the top of the pipe now containing the secondary of the massive transformer. All that is left is to attach a primary, which is made out of a few turns of 16 AWG wire, and the control circuitry.

Join us after the break for a shocking video!

Continue reading “DIY Solid State Tesla Coil”

Bring Your Own Name Badge

It used to be that the contents of your pocket protector directly mirrored your geek level. But that just doesn’t cut it in our fast-paced digital age. We think [Jonathan] is headed down the right track though, by creating a scrolling LED name badge which he takes to conventions with him. With the right enclosure this could reach the same geek level as Woz’s watch. There’s a lot packed into the little device, but readability at close range doesn’t look like one the features so make sure you glance at the tag before you approach him for a conversation.

As you can see, the PCB for the project is the same form factor as a landscape ID card. It hosts an 8×5 LED matrix, which meshes nicely with the registers of the MSP430 chip which runs it. He admits that the hardware may not last very long as the chip is multiplexing the display directly, with no resistors or LED drivers for current protection. But there is potential in the design. It uses a rechargeable battery (which we like) and he included a QR code in the board artwork for easy exchange of contact information. We’ve embedded his description of the project after the break. Continue reading “Bring Your Own Name Badge”

WiFi Experiments With ATtiny Microcontrollers

[Quinn Dunki] got some free stuff from Element14 to evaluate, including this Mircrochip WiFi module. It’s been used as the centerpiece of an Arduino shield in the past, and she grabbed a copy of that library to see if it would play nicely with an ATtiny chip. What follows is a struggle to de-Arduino the code so that it’s portable for all AVR controllers.

This module is one of the least expensive ways to add WiFi to a project, coming in at around $23. But it’s not really an all-in-one solution as there’s still a huge software hurdle to cross. The hardware provides access to to radio functions needed to communicate with the network, but you need to supply the TCP/IP stack and everything that supports it. Hence the re-use of the Arduino library.

Battling adversity [Quinn] fought the good fight with this one. Switching from an ATtiny to the ATmega168, compiling more code, and troubleshooting the process. She used a single LED as feedback, and can get some connectivity with her hotspot. But to this point she hasn’t gotten everything up and running.

We’re hot for an AVR WiFi solution that is cheap and easy to use. But as we see here, the software is complex and perhaps best left up to beefier hardware like the ARM controllers. What do you think?

Build Your Own 4-channel Logic Analyzer

If you’re just getting into hobby electronics chances are there are lots of tools you’d like to get you hands on but can’t yet justify the purchases. Why not build some of the simpler ones? Here’s a great example of a 4-channel logic analyzer that can be your next project and will add to your arsenal for future endeavors.

As you can see, [Vassilis’] creation uses a cellphone-sized LCD screen as the output. It is powered by four rechargeable batteries and driven by an ATmega8 microcontroller. He’s designed the tool without power regulation, relying on the ATmega’s rather wide range of operating voltages, and a few diodes to step down that voltage for the LCD screen.

As you can see in the clip after the break, alligator leads can be used to connect the test circuit to the inputs (don’t forget the ground reference!). Thee buttons at the bottom let you navigate the captured data by panning and zooming. Perhaps the best design feature is the single-sided circuit board which should be quite easy to reproduce at home.

Continue reading “Build Your Own 4-channel Logic Analyzer”

Web Game Bot Coded With Python

We find the programming challenge of game-playing bots to be fascinating. Take a look at this Python bot which plays Burrito Bison all the way through (video after the break). This is a totally pedantic exercise which has no purpose, other than to hone your mastery of a certain programming problem. And to that we say Bravo!

We looked in on a similar project which used some C# code to dominate the game Bejeweled Blitz. We’re not fantastic at C# and that code was never made public. But [Audionatics] has released this code through Github, and it’s written in Python which is a language in which we’re well versed.

The script monitors pixel locations to use as an input, which [Audionautics] admits is very error-prone. But if everything is setup just right it works like a charm. He’s also using the PyWin package which we believe is what lets the script move the cursor and register button clicks. We think this is really fun, but it make us wonder about the black-hat possibilities. What are the chances this could be turned into a gambling bot? Scary thought, huh?

Continue reading “Web Game Bot Coded With Python”