Four Steppers Make A Four-Voice MIDI Instrument

Any owner of a budget 3D printer will tell you that they can be pretty noisy devices, due to their combinations of stepper motors and drives chosen for cost rather than quiet. But what if the noise were an asset, could the annoying stepper sound be used as a musical instrument? It’s a question [David Scholten] has answered with the Stepper Synth, a device that takes an Arduino Uno and four stepper motors to create a four-voice MIDI synthesiser.

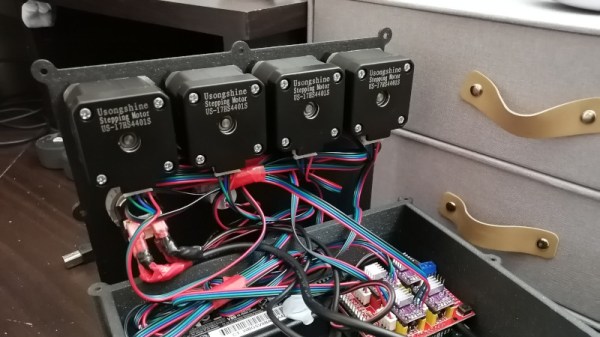
Hardware-wise it’s as simple as you’d expect, a box with four stepper motors each with a red 3D-printed flag on its shaft to show rotation. Underneath there is the Arduino, plus a robot control shield and a set of stepper driver boards. On the software side it uses MIDI-over-serial, so as a Windows user his instructions for the host are for that operating system only. The Arduino makes use of the Arduino MIDI library, and he shares tips on disabling the unused motors to stop overheating.

You can hear it in action in the video below the break, and we’re surprised to say it doesn’t sound too bad. There’s something almost reminiscent of a church organ in there somewhere, it would be interesting to refine it with an acoustic enclosure of some kind.

This isn’t the first such instrument we’ve brought you, for a particularly impressive example take a look at the Floppotron.

Continue reading “Four Steppers Make A Four-Voice MIDI Instrument”

Forgotten Rock Band Drum Controller As A MIDI Instrument

Happen to have an old Rock Band drum controller collecting dust in your living room? If you also have a spare Arduino and don’t mind parting with that plastic college memento then you’ve got the bulk of what could potentially be your new percussive MIDI instrument. In his project video [Evan Kale] outlines the steps necessary to turn that unloved plastic into a capable instrument for recording.

The whole process as outlined by [Evan] in under seven minutes. This looks like a great weekend endeavor for those of us just starting out with MIDI. After cracking the back of the Guitar Hero drum kit controller open, the main board within is easily replaced with a standard sized Ardunio (which matches the present mounting holes exactly). About 4:50 into the video [Evan] explains how to add a basic perf-board shield over the Arduino which connects the piezo sensors in each of the drum pads to the analog pins of the micro-controller. The MIDI jack that comes built into the back of the kit can also be reused as MIDI out when wired to the Arduino’s serial out pin. By adjusting [Evan’s] example code you can dial in the instrument’s feedback to match the intensity of each hit.

The video with all of the details is after the jump. Or you can check out a MIDI hack that goes the other way and uses a drum kit as a Guitar Hero or Rock Band controller instead

Continue reading “Forgotten Rock Band Drum Controller As A MIDI Instrument”

Guitar Hero As An Instrument Or Midi Controller

[youtube=http://www.youtube.com/watch?v=azfgasnWtW0]

[Robert] wrote a program using Max/MSP that lets him make music with his guitar hero controller. There’s another video after the break where he walks through the various features but here’s the gist of it. This works on Mac and Windows and allows a sort of ‘live play’ or midi mapping mode. In the midi mode each key can be configured to do your bidding. His example uses the pick bar to scroll through different samples and the green button the play them or the red button to stop.

The live mode us much more involved. In the software you choose the type of scale and the key you’d like to play in. This makes up for the controller’s lack of enough frets to make it a chromatic instrument and these settings can be adjust from the controller. There is an up-pick offset that makes the upward movement of the pick bar a different note than the downward movement. The motion control can also be used as an input. He demonstrates pitch bending and cutoff using that method.

This looks like a lot of fun. He needs to team up with [Joran] to add drums to the mix, forming a much more creative rock band than you can buy in the store.

Continue reading “Guitar Hero As An Instrument Or Midi Controller”

Ancient Instrument Goes Digital: The Digi-Gurdy

The hurdy-gurdy is a fascinating string instrument dating from sometime around the 10th century. There is an active community of modern enthusiasts, but one can’t simply walk into a music shop and buy one. That’s where [XenonJohn] and the Digi-Gurdy come in, bringing some nice features while maintaining all the important elements of the original.

The mechanical keys and crank of the Hurdy-Gurdy are preserved in this modern digital incarnation.

The hurdy-gurdy works by droning strings with a rotating wheel, and the player applies pressure to those strings via keys to play combinations of notes. Here’s a video demonstrating what it sounds like to play one, and one can see a conceptual resemblance to bagpipes, among other things.

The Digi-Gurdy is a modern electronic version that maintains the mechanical elements while sending MIDI signals over USB. It has options for line-out or headphone output. A thriving online community has shaped its development since its inception years ago.

We hope this leaves you wanting to know more because [XenonJohn] has loads of details to share. The main website at digigurdy.com is jam-packed with information about this instrument and its construction, and the project page on Hackaday.io has more nitty-gritty design details and source files for those who crave hardware specifics.

If [XenonJohn]’s name sounds familiar, it’s because we’ve admired his work on DIY self-balancing vehicles over the years. He also submitted an earlier version as an entry into the Hackaday Prize. His careful attention to detail shines through. Check out the two videos (embedded just below the page break): the first demonstrates the Digi-Gurdy, and the second shows off the construction and insides. You’d think a MIDI hurdy-gurdy would be unique, but, actually, we’ve seen more than one.

Continue reading “Ancient Instrument Goes Digital: The Digi-Gurdy”

Thumbs Up To This Pico MIDI Kalimba

The kalimba, or thumb piano, is an easy way to make some music even if you have next to no idea what you’re doing. The only real downside is that they are limited to the twinkly sounds of metal tines being plucked by thumbs.

[Jeremy Cook] broke the sonic possibilities wide open by converting a couple of kalimbas into capacitive-touch MIDI instruments using the Raspberry Pi Pico. He started with a small one that is curiously made of solid wood. Usually these instruments are at least partially hollow to allow air to resonate inside the body.

After soldering up all the 1 MΩ resistors necessary to utilize the capacitive touch capabilities of the Pico, [Jeremy] found it a bit difficult to play individual notes on such a small instrument, so he made version two out of a much larger specimen.

This time, [Jeremy] cooked up a custom PCB which he is calling the Pico Touch 2, which adds the necessary resistors at the SMD level for capacitive touch sensing and in turn cleans up the wiring a bit. Be sure to check it out in action after the break.

Okay, so you don’t have an iota of musical talent. You could always build a kalimba that plays itself.

Continue reading “Thumbs Up To This Pico MIDI Kalimba”

TuneShroom Is An Artistic Mushroom-Themed MIDI Controller

Most MIDI controllers are modelled after traditional instruments, like pianos, flutes, or guitars. [Oliver Child] went in a different direction for the TuneShroom, instead modelling his DIY controller after the terrifying, unclassifiable living organism we call the mushroom.

The project was a fun way for [Oliver] to try creating a project with an artistic PCB design, and it worked out well in that regard. He penned a circuit board in the shape of a toadstool, with conductive pads serving as capacitive touch points to activate various notes.

The design is based around the Sparkfun Pro Micro, but it’s not programmed in Arduino. [Oliver] wanted to make full use of the ATmega32U4 microcontroller and have freedom to use the pins at will, so instead the project was programmed with a patched version of LUFA to handle the USB side of things. MIDI data is naturally piped out over this interface to an attached computer.

Files are on Github for the curious. Alternatively, contemplate turning an entire saxophone into a MIDI controller in your spare time. Video after the break.

Continue reading “TuneShroom Is An Artistic Mushroom-Themed MIDI Controller”

High-Resolution MIDI Controller

For an older standard, MIDI has remarkable staying power in the music industry. It remains the de facto digital interface between computers and instruments thanks to its open nature, but its age does show a little bit. Sending control change (CC) messages, for example, was originally designed to fit within seven bits, which doesn’t give particularly fine resolution compared to more capable modern computers. To work around that, a fourteen-bit message is possible, doubling the resolution, and this MIDI interface uses this larger amount of data to send these high-resolution CC messages.

The 14-bit messages are actually fairly well documented but are a bit obscure, with very limited hardware support. To that end, [Gero] set about building this control interface to solve that problem. It’s made up of only eight knobs, each of which is mapped one-to-one to a parameter on the computer, allowing the interface to feel more like an analog device where the knob corresponds directly to a change in an aspect of the sound. The platform is built around a Teensy 4.0 and some multiplexers to handle all of the knobs, with the open source software available for anyone to use to modify their actions. [Gero] was aiming for high fidelity for all aspects of this controller, not just the improved digital resolution, and made a number of other improvements to it as well like re-greasing the potentiometer knobs and a custom 3D printed enclosure.

All of the software is available for use, as well as the files to print the case. [Gero] is also working on a PCB to make the construction of the device a little more streamlined, but for now, it requires a bit of soldering off-the-shelf parts together. The MIDI standard is open as well, which allows for a lot of innovation in the creation of musical instruments from unique hardware. This project builds a MIDI synthesizer with parts from a Sega Genesis.