Oscilloscope Clock Made Possible By Dumpster Diving

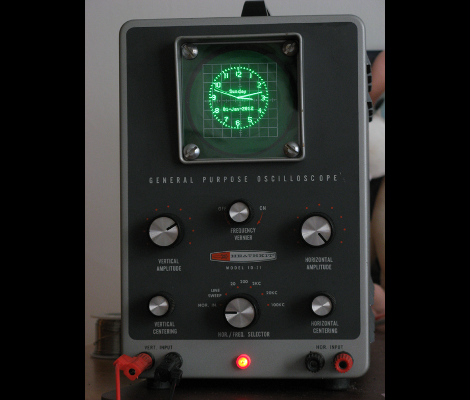
We see people driving around the night before trash collection and reclaiming items doomed to the land fill (or on their way to recycling… who knows). We’re beginning to think we need to join those ranks. Case in point is this vintage oscilloscope which [Bob Alexander] plucked from the curb in the nick of time. Here’s the kicker, when he got it home he found it still worked! He couldn’t let this opportunity go to waste, so he figured out how to turn it into a clock without losing the ability to use it as a scope.

You probably already know that it’s possible to display your own graphics on an oscilloscope. In fact, you can buy a board from Sparkfun which will turn the scope into an analog clock, and that’s exactly what [Bob] did. But he was met with two problems, the X-axis was flipped and he didn’t have an easy way to power the board.

He struggled with the voltage supply, frying his first attempt at boosting the internal 6.3V supply to use with a linear 5V regulator. His second attempt worked though, soldering a 12V regulator to the transformer. He was then on to the X-axis correction, using a rail-to-rail op-amp to invert the signal. The project finishes by adding toggle controls and buttons on the back of the case to switch between scope and clock modes, and to set the time.

Hellduino: Hellschreiber Radio Transmissions From An Arduino Board

[Mark VandeWettering] was experimenting with a simple transmitting circuit and an Arduino. The circuit in the project was designed by [Steve Weber] to broadcast temperature and telemetry data using Morse Code. But [Mark] wanted to step beyond that protocol and set out to write a sketch that broadcasts using the Hellschreiber protocol.

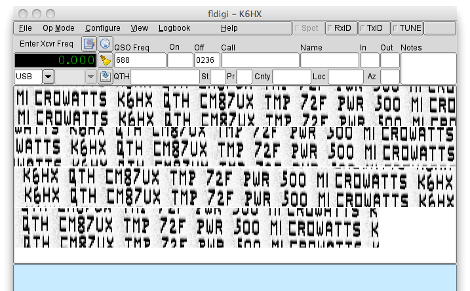
This protocol transmits glyph images, which are decoded as you see above. For some reason we can’t help but think this is like Captcha for radio enthusiasts. We have seen Hellschreiber used with AVR microcontrollers before, but this is the first Arduino implementation that we’ve come across. [Mark] does a great job of demonstrating his project in the video after the break. He mentions that the transmitter has no antenna, but is still being picked up by his receiving antenna mounted behind his house.

Since [Mark] doesn’t really cover the hardware he used, you will need to look back at [Steve’s] original design schematics for more information.

Continue reading “Hellduino: Hellschreiber Radio Transmissions From An Arduino Board”

Fully Loaded Electronics Lab Makes Your Projects A Breeze

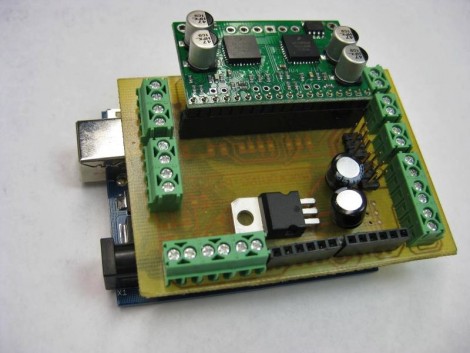
There’s really nothing special about this hack. [Craig Hollabaugh] needed an Arduino shield for hosting a Pololu motor driver and making connections to external hardware. What really caused us to spend way too much time reviewing his posts is that [Craig’s] narrative style of documenting the project is delightful, and we’re envious of his electronics lab. That link points to the first of four project pages. The next page is linked at the bottom of each page, or you can find the collection after the break.

[Craig] starts by designing a single-sided shield in Eagle. It’s been years since he made his own PCB, and it takes him about four tries to get the toner transfer right (we’ve also been victim to the wrong mirroring of the resist!). When it comes time to drill for the pin headers [Craig] uses his 3D printer to make a bracket allowing the Dremel to mount to the drill press. There’s a good tip here about buying carbide bits from Harbor Freight; we thought eBay was the only place to get these. Many of us would need to put in a parts order, but this workshop has a well-organized stock of everything he needs. He also has the solder paste and PID outfitted toaster oven to reflow the board. Oh, and when he forgets to add a resistor it’s off the rework station to add one.

See what we mean… one can never have too many tools.

Continue reading “Fully Loaded Electronics Lab Makes Your Projects A Breeze”

Fixing The Control Scheme For An Aftermarket Headlight Assembly

The headlight enclosures on [Bill Porter’s] 2004 Passat had yellowed with age and were not outputting the kind of light they should. He decided to replace them with some aftermarket modules that also incorporated LED strips. When they arrived he was surprised at how easy there were to drop into place. But when testing he was certainly not satisfied with how they worked. The day-driving mode used the HID bulbs at full power, where the factory assembly had dimmed them during the day. He set out to alter the electronics to work as he prefers.

Always the mad scientist, [Bill] started off by making a truth table showing how the lights reacted to the various states of the ignition and headlight switches. What he came up with is an AND gate built from a relay and diode. It allows him to have the LEDs on as the running lights (without the HIDs on at all), and leaves the rest of the functionality unaffected.

Robot Takes Voice Commands Via Open Source CSR

This is Chippu, a robot that [Achu] has been working on for some time. His most recent addition was to give the robot the ability to respond to voice commands. This is accomplished using a variation of the open source Continuous Speech Recognition package called Julius.

The package depends on two main parts, a set of acoustic models which let it match incoming sounds and a reference library of grammar which is built from those sounds. [Achu] published another post which goes into detail about using Julius on a Linux box. It seems like this is possible with less robust hardware (ie: on an embedded system) if you narrow down the number of acoustic and grammer models that need to be matched.

For now, Chippu is getting commands from a computer that runs the CSR. But this was only used as a proof-of-concept and [Achu] plans to transition the bot over to smaller hardware like the BeagleBoard.

Check out the demonstration of Chippu responding to voice commands in the video after the break.

Continue reading “Robot Takes Voice Commands Via Open Source CSR”

DHT11 Humidity And Temperature Sensor Package

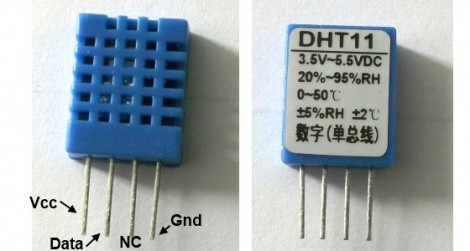
Temperature and humidity measurements are a nice addition to many hobby projects. But [Rajendra Bhatt] makes the point that many of these sensors have a price tag that is well above what most hobbiests are willing to spend. He decided to take an in-depth look at the DHT11 sensor; which you can get your hands on for under $3 if you know where to look.

The four-pin device uses a 1-wire protocol. [Rajendra] discusses the ins and outs of the communications, demonstrating the part using a PIC 16F628. It’s a snap to connect to your project, requiring VCC, GND, and a pull-up resistor on the single data line. We’ve already seen it used on at least one project, and hope to see more of this little guy in your own hacks.

Now we found this part listed on eBay for less than $3 (buy it now price including shipping… how can they do that?). But Octopart didn’t come up with any options. If you know how to get this through traditional parts suppliers let us know in the comments.

Adjustable Rapid Fire For Xbox 360 Controller

[Shawn] wrote in to share his post outlining the addition of rapid fire to an Xbox 360 controller. He’s going all out with this mod by including a pretty beefy microcontroller. But you get a lot of functionality for that. You can just make out the trimpot below and to the right of the green A button. This tweaks the speed at which your right trigger repeats. Next to the trimmer is an amber LED which indicates whether the hack is enabled or not. The switch to the left of the D-pad simply patches the add-on circuit into the right trigger hardware.

Some might raise an eyebrow when we call the ATtiny85 used here beefy. But considering the job at hand, we’re sure a lot of the lower end of the ATtiny family will work just as well. [Shawn] soldered everything up on a piece of protoboard and removed one of the rumble motors to make room inside the controller. The video after the break is pretty shaky and out of focus, but you can clearly hear him explain how the hack works.

If you’re looking for a rapid fire mod that doesn’t require programming a chip, perhaps you could just repurpose the PWM from the LED. Continue reading “Adjustable Rapid Fire For Xbox 360 Controller”