8-bit Computer Project Lands In A Philco Radio Case

We’ve enjoyed seeing the development progress of Veronica, [Quinn Dunki’s] 8-bit computer project. It started out on a breadboard, then moved to edge-connected PCBs, and now [Quinn] has given Veronica a body of her own.

The donor is a Philco Model 42-327T and was produced in 1942. It was chosen because it is non-functional and missing several pieces. We wonder about the collector’s value of the piece but since [Quinn] snagged it from eBay there can’t be in huge demand right now. The teardown images are priceless. There seems to be no reasoning behind component placement for the beast. It looks more like a junk drawer packed full of relic components than something that actually worked once upon a time.

But we digress. After gutting the retro wooden case [Quinn] set out to fabricate her own face plate. Since she’s comfortable working with copper clad, she whipped up a negative design and etched the dashboard seen above. It mounts in the original dial opening, and hosts all of the controls she needs to work with the 8-bit computer. Just below is where the present buttons used to be located. You can just see the hexout display for reading data from the registers mounted in that void.

Loading Programs Onto A TRS-80 Model 100

We’d guess that you don’t have a TRS-80 Model 100 computer sitting around. But we’ve heard that the decades-old hardware is built like a tank so if you search around you can probably get your hands on a working unit. The Model 100 boasted some nice features, one of which was a 300 baud modem allowing you to transfer data onto the device. [MS3FGX] wanted to give it a try but had to do some work to get the Model 100 to communicate with modern hardware.

This could have been a much more involved process, but since the Model 100’s modem uses common communications standards it’s really just a matter of hooking it up and choosing the right COM port settings on a computer. In this example a Linux box is used with the program Minicom. It is configured to communicate at 300 baud 8N1 (8 data bits, no parity bit, and one stop bit).

With software in place you’ll need to make your own cable. [MS3FGX] does this using a DB-25 connector for the Model 100 side, and a DB-9 connector for the serial port on the Linux box. He’s got a pin-out for the cable on the second page of his guide. It sounds like it should be no problem to use a USB-serial converter if you don’t have a serial port.

Once everything is in place you’ll be able to transfer BASIC programs from your computer to the Model 100.

oscope-reverse-engineering

Reverse Engineering An Oscilloscope Circumvents Vendor Crippleware

The crew over at the Hungarian Autonomous Center for Knowledge (H.A.C.K.) say they aren’t the most well-funded organization out there, so they were stoked when they found they could afford to bring a slightly used UNI-T UT2025B digital oscilloscope into the shop. As they started to tinker with it, the scope revealed one major shortcoming – screenshots were only accessible via a USB connection to a Windows computer.

Since they didn’t have any Windows boxes in house, [András Veres-Szentkirályi] decided he would try reverse-engineering the protocol so they could get access to this useful feature.

He set up a Windows VM, and using Wireshark on the host Linux box, [András] sniffed the data passing over the scope’s USB interface. He was able to identify what looked like image packets being sent to the VM, which he was able to decode using a small Python script. The resultant images were monochrome and they didn’t look quite right, but it was a start. As he dug further [András] found that he was overlooking some of the color data packed into the images, and after a bit of fiddling he got the sharp, colorful image you see above.

It turns out that while the scope has a monochrome LCD, it sends 16-bit color images over the USB interface – images that the Windows’ client degrades before displaying them on the screen. So in the end, he was not only able to get the scope working on any OS with the ability to run Python, he was able to grab far better images than the manufacturer ever intended – A very nice hack if we do say so.

Be sure to swing by the H.A.C.K. wiki as well as the project’s github repository if you have one of these scopes and are looking to wring some better images out of the hardware.

SpeechJammer Puts An End To Annoying Speakers

If you’ve ever had to deal with people disturbing your peace and quiet by yammering on with their cell phones, you might be interested in the SpeechJammer.

The idea behind the SpeechJammer is fairly simple: It’s very hard to speak if your words are recorded and played back to you a fraction of a second later. This is a real psychological phenomenon known as delayed audio feedback that also has a beneficial effect on stuttering.

According to the researcher’s writeup (PDF warning), the SpeechJammer works by measuring the distance to the ‘target’ with an ultrasonic distance sensor and records the speaker’s voice with a shotgun mic. The recording of the spearker’s voice is delayed for about a fifth of a second and then played on a speaker on the front of the gun.

The researchers tested two conditions: ‘reading news aloud’ and a ”spontaneous monologue.’ Subjects who were reading news aloud had their speech jammed more often than those with the monologue, but the results look fairly promising. There’s only one video of the SpeechJammer in action (available after the break), so we’d like to see a few Hackaday readers build their own ‘shut up gun’ and send in a demo with an annoying talker to validate the results.

Continue reading “SpeechJammer Puts An End To Annoying Speakers”

Resetting The Page Count On A Laser Printer

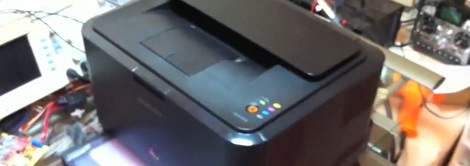
[Brian] really liked his Samsung color laser printer right up until it was time to replace the toner cartridges. A full set of toner cartridges sell for about the same price as the printer itself, so [Brian] figured he could simply refill the toner in the cartridges he already has. The printer sends out the ‘low toner’ warning  based on page count and won’t print if the page count is too high, negating the economy of a toner refill kit. Luckily, [Brian] figured out a dead simple way to reset the page count so he can use those third-party refill kits.

All the configuration settings and page counts for the printer are stored on an I2C EEPROM. After dumping the data held on this EEPROM with an Arduino and sniffing everything going into the EEPROM with a Bus Pirate, [Brian] was nearly at his wit’s end. Thankfully, serendipity intervened. When [Brian] restarted the printer with the Bus Pirate attached, he noticed it took much longer to initialize. Printing a configuration report, he was trilled to see that all page counts have been zeroed.

The final hack that allows [Brian] to reset the page count and used refilled toner cartridges is a simple wire that ties the SDA line of the EEPROM to ground on boot. [Brian] used a momentary switch, but given this is a once-every-few-months operation, a simple wire would suffice. Check out [Brian]’s page reset demo after the break.

Continue reading “Resetting The Page Count On A Laser Printer”

Pop-up Dragonfly Robot Could Be The Future Of Business Cards

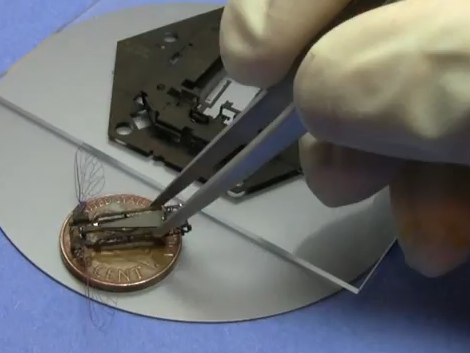
Engineers trying to be memorable at a job interview would be wise to pull one of these pop-up robots out of a wallet. This marvel of engineering uses a laminate construction technique to build a robot as a pop-up assembly. You can see the base used during the process, it’s a hexagon that serves as a scaffolding during the laminating process, and includes mechanical linkages that facilitate assembly.

The design calls for multiple layers of materials to be laser-cut to exacting specifications. Once all parts are completed, they are stacked using rods to align them, then fused together. One more trip through the laser cutter finishes the milling and the machine is ready for assembly. But with parts this small, you’ll want a solid method for putting everything together. The linkages we mentioned before allow for this when two parts of the scaffolding are separated. The only thing that makes this impossible as a business card is the need for a trip through the solder bath to cement the pieces in place. But perhaps some type of clasping mechanism could remove this need in the future.

Don’t miss the video after the break that explains the entire process. You’ll even get to see the little guy flap his wings. That’s all that it does for now, there isn’t any steering mechanism available as of yet.

Continue reading “Pop-up Dragonfly Robot Could Be The Future Of Business Cards”

Control Your PC With A Remote

Because his computer is gradually turning into an all-inclusive media display device, [Shawn] figured a remote to control the volume and a video playlist would be a reasonable addition. TV remotes for computers have been around for years, but [Shawn] decided to go the DIY route and build his own computer remote.

For the build, [Shawn] used a Teensy dev board with an IR receiver module and the requisite infrared remote library. To translate infrared signals to keyboard commands,[Shawn] decided to base his project off a previous build that used a small program called AutoHotKey.

Right now the build can cycle through a pre-defined YouTube and Shoutcast playlist and change the volume of the currently playing track. There’s also support for moving the mouse with directional buttons on the remote, but we’re wondering if a better implementation would be using the Windows multimedia keyboard scan codes that should be supported by [Shawn]’s laptop.

Still, [Shawn] managed a very nice build that would fit into our computer battlestations quite nicely. Check out the demo of the remote in action after the break.

Continue reading “Control Your PC With A Remote”