Dead NES Controller Used As A Makey Makey Shield

[Guillermo Amaral’s] NES controller was in great shape. Well, except for the fact that it didn’t work. Upon closer inspection it seems the shift register — which is the only IC on these ancient peripherals — had given up the ghost. But he made it usable again by making the NES controller into a MaKey MaKey shield.

You should remember the MaKey MaKey. It’s a little board that lets you create controllers out of just about anything — bananas being one of the more popular examples. All he needed to do is wire up the controller’s buttons to the board. For the task he chose to use extra long pin headers. To find the location for holes in the case he applied red ink to the top of each pin, then held the PCB up to the outside of the controller. After drilling at each red mark he glued the pin headers in place and started in on the controller’s original circuit board. Once all the point-to-point wiring was done he had a working controller. See for yourself in the clip after the jump.

Continue reading “Dead NES Controller Used As A Makey Makey Shield”

Kitchen Island Monitors And Distributes Home Brew Beer

This piece of furniture actually resides in [Matt Pratt’s] livingroom but we think it would make a perfect kitchen island. The base is a chest freezer modified to keep the beer inside at just the right temperature. But this doesn’t just dispense the beer, the system is designed to tell you how many pints are left in each keg.

The freezer offers enough room for four five-gallon Cornelius kegs. [Matt] salvaged the weight sensors from some cheap bathroom scales and rigged them up with some plywood discs to serve as the base for each keg. After working out the electronics to reliably read from the sensors (which was no small job) he hooked them up to a microcontroller and a touch screen. As you can see in the video after the break, the system calculates the number of pints left in each keg based on its weight. This can be easily calibrated using the touch screen.

He didn’t talk all that much about the control hardware, but having see his post about ARM LCD dev boards we’d bet that’s what he’s using here.

Continue reading “Kitchen Island Monitors And Distributes Home Brew Beer”

Boiling Acid Used To See Chip Die

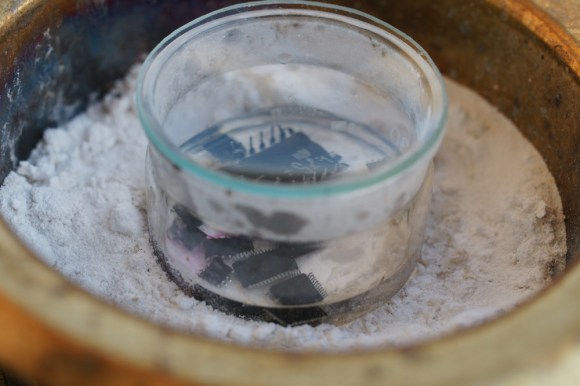
When a project starts off by heating acid to its boiling point we say no thanks. But then again we’re more for the projects that use ones and zeros or a hot soldering iron. If you’re comfortable with the chemistry like [Michail] this might be right up your alley. He used boiling acid to expose and photograph the die from several integrated circuits.

The title of our feature is a play on words. In this case, die refers to the silicone on which the IC has been etched. To protect it the hardware manufacturer first attaches the metal pins to the die, then encapsulates it in plastic. [Michail] removes that plastic case by heating sulfuric acid to about 300 degrees Celsius (that’s 572 Fahrenheit) then submerges the chips in the acid inside of a sealed container for about forty minutes. Some of the larger packages require multiple trips through the acid bath. After this he takes detailed pictures of the die and uses post processing to color enhance them.

This isn’t the only way to get to the guts of a chip. We’ve seen nitric acid and even tree sap (in the form of bow rosin) do the trick.

Update On [James’] Bipedal Robot

From the looks of the latest update [James] has made quite a bit of progress on his bipedal robot. He added to the top of the post just a few days ago, but didn’t include the video link which you’ll find embedded after the break. There’s about ten minutes of explanation before he gets down to demonstrating the static and dynamic balance which can be chosen using the buttons on a TV remote.

We looked in on the project about one year ago. The most notable change is the control electronics anchored in the torso of the robot. At first it makes us a bit nervous that he hasn’t built a protective cage around the components. But after seeing the latest stability demonstration we guess it’s because this thing is fantastic at staying upright. The torso is connected at the hips in such a way that no matter where each leg is it will always remain upright. All together the thing stands twenty-six inches tall, but that will grow when he gets around to building a head for it.

Continue reading “Update On [James’] Bipedal Robot”

Giving Siri Control Of Some Smart Bulbs

After getting his hands on the Philips Hue smart lightbulb [Brandon Evans] cracked open some of the hardware to see what is inside. He also spent time working out the software tricks necessary to use Siri to control light bulbs from iOS.

If you haven’t heard of the Hue product before it’s an LED bulb that fits in a standard medium base whose color and intensity can be controlled wirelessly. Included in each unit is Zigbee compatible hardware that lets the bulbs form their own mesh network. [Brandon] didn’t crack open the bulb since these things cost a pretty penny and disassembly requires cutting. But he did point us to this post where [Michael Herf] shows what the bulb’s case is hiding. We do get to see the other piece of the puzzle as [Brandon] exposes the internals on the base unit that bridges the mesh network to your home network via Ethernet. An STM32 chip is responsible for controlling the base unit.

Aside from a look at the guts [Brandon] hacked Siri (Apple’s voice activated virtual assistant) to control the system. You can see a demonstration of that in the clip after the break. The details are found in the second half of his post which is linked at the top. The code is found in his siriproxy-hue repository.

Continue reading “Giving Siri Control Of Some Smart Bulbs”

Automated Resistor Sorter Puts Them Into Small Plastic Tubes

This one might be an oldie, but it’s certainly a goodie.

Way back in 2005, [David] and [Charles] needed a project for one of their engineering courses. With so many loose resistors scattered over the lab, they decided to build an automated resistor sorter (PDF warning) to separate these resistors and put resistors of the same value together in the same bin.

The electrical and programming portion of this build is relatively simple – just a PIC microcontroller reading the value of a resistor. The mechanical portion of this build is where it really shines. Resistors are sorted when they pass through small plastic tubes mounted to a wooden frame.

There are several levels of these tubes in [David] and [Charles]’ sorter that move back and forth. The process of actually sorting these resistors is a lot like going down a binary tree; at each level, the tube can go right or left with the help of a solenoid moving that level of the frame back or forth.

[David] and [Charles]’ project wasn’t entirely complete by the end of the class; to do so would require  8 levels and 128 different tubes on the bottom layer. Still, it worked as a proof of concept. We just wish there was a video of this machine in action.

Tip ‘o the hat to [Alexander] for finding this one and sending it in.

Let The 3d Printing Patent Wars Begin!


If you and your friends were gathering a pool of bets together as to when the first patent case would happen in 3d printing, someone just won the pot. 3D systems has filed suit against formlabs for possible patent infringement.

In a press release by 3D systems, they state that not only are they going after form labs, but also Kickstarter for selling the device.

Although Formlabs has publicly stated that certain patents have expired, 3D Systems believes the Form 1 3D printer infringes at least one of our patents, and we intend to enforce our patent rights

It is worth noting that the “cube” printer that Make magazine recently named the most reliable and easiest to use, happens to be made by 3D systems. Note that this one appears to be a typical rep-rap derivative.

[via Adafruit]