DIY NES Controller Makes No Changes To The Design

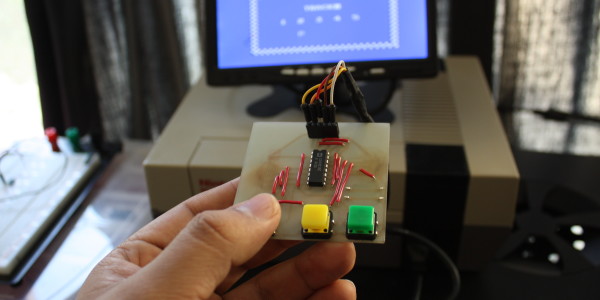
We like this project for its sheer simplicity. After all, recreating the hardware in the controller for a modern gaming system is next to impossible. [Guillermo A. Amaral B.] had a bunch of parts sitting around and decided to try his hand at recreating an original Nintendo Entertainment System controller.

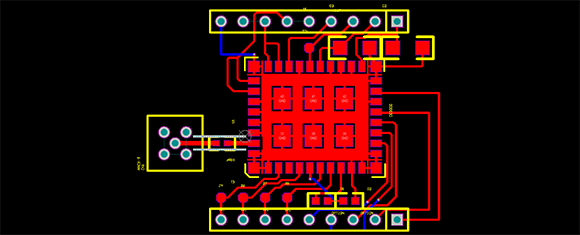
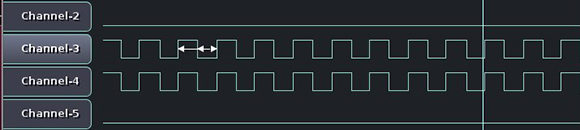
If you’re not familiar with the electronics inside this brand of retro gaming hardware you might be surprised to find that there’s barely any logic hardware at all. The chip in the middle of the board is a 4021 parallel to serial shift register. It connects to the buttons and uses the clock signal coming through the cable to pulse out the button states over a serial wire. So all that [Guillermo] did was lay out the chip with connects for each button.

In the image above his thumb is obscuring the 5-way switch used for directional control and select (center click). The yellow and green buttons serve as A and B, with the start button on the opposite side of the board due to a mistake in his board layout. He does have some future plans for this. He’s working on a Raspberry Pi project that will monitor and record the controller serial data so that you can play it back. It sounds like a player piano for video games.

Want to see a really small version of this? The same hardware in a smaller package was put together a couple of months ago to build the world’s smallest NES controller.

[via Adafruit]

Great Antenna For Software Defined Radio Is Really Easy To Make

The University of Kent’s hackerspace, TinkerSoc, recently had a talk on software-defined radio using an incredibly inexpensive USB TV tuner. Of course this is nothing new to Hackaday readers, but they did manage to build one of the best antennas for their TV dongle. It’s a discone antenna, and is perfectly suited for tuning into a whole bunch of really cool things such as weather balloons and aircraft transponders.

The idea discone antenna looks exactly like its namesake; a metal disk attached to a metal cone. Of course with the frequencies the RTL software-defined radio deals with, it’s rarely necessary to build antennas out of sheet metal. The team at TinkerSoc built their discone out of galvanized garden wire and attached it to the input of their TV tuner.

All the dimensions for their discone antenna were gleaned from [ve3sqb]’s antenna design programs. Since TinkerSoc designed their antenna for 110 MHz, it ended up being pretty large. For higher frequencies, though, a discone antenna become fairly small and more than portable enough for a mobile rig.

Reverse Engineering The Furby

Furby

Furby teardowns are a favorite of ours, and there’s nothing quite like flaying open a creepy talking deformed animatronic owl/hell beast. There’s a lot you can do with a set of screwdrivers and a pair of scissors, but it takes a real clever person to reverse engineer a Furby without any disassembly (Russian, here’s the translation).

The new Furby comes with an iOS and Android app that allows children to interact with the Furby by feeding it, giving it commands, and even translating the Furbish into English. These apps work by playing a WAV file encoded with commands that give the Furby something to eat, or tell it to dance a merry jig.

Commands are delivered with these WAV files by means of a 4-digit, 4-bit code, complete with checksums. There are ten bits the Furby actually responds on, meaning there are potentially 1024 different commands the Furby can accept.

[iafan] wrote a Perl script to listen in on the audio generated by the Android Furby app and correlated all the possible commands with actions taken by the Furby. Everything is up on a git, allowing anyone to play an audio file and control the Furby’s mood and actions.

With this it should be possible to remotely control a Furby, letting it dance whenever you receive an email, or making it angry whenever someone retweets you. It’s a lot more clever than just putting a Furby through a wood chipper, but considering how creepy these things are, we’re not going to say it’s better.

Raspberry Pi Becomes A Guitar Effects Processor

One of the more interesting use cases for the Raspberry Pi is exploiting its DSP capabilities in interesting ways. There’s a lot of horsepower inside the Raspberry Pi, more than enough to do some very interesting things with audio, all while being powered by a small wall wart adapter. [Pierre] over on the Pure Data mailing list has a proof-of-concept working that uses the Raspi as a guitar effects processor. The results are very encouraging – [Pierre] is able to use his Raspi as a delay, pitch shifter, and of course a classic flanger, phaser, and chorus with a latency of about 16 ms.

There are a few steps necessary to get low latency with the Raspi’s audio interface. [Pierre] is running his Pi headless, and allocated more RAM to the CPU.

If you’d like to try this out for yourself, [Pierre] has a tutorial for setting up Pure Data with the Raspberry Pi. He’ll be updating his blog soon with more tutorials and verified USB audio interfaces later.

Check out the processor in action after the break.

Continue reading “Raspberry Pi Becomes A Guitar Effects Processor”

A Breakout Board For A Tiny WiFi Chip

A few weeks ago, we caught wind of a very tiny, very inexpensive WiFi chip  TI is producing. Everything required of an Internet connection – TCP/IP stack, configuration utilities, and your WEP, WPA, and WPA2 security tools is included in a single tiny chip, making this a very cool device for an Internet-connected microcontroller project. There’s only one problem: TI put this chip in a really, really weird package, and there aren’t any breakout boards for it.

That is, until now. [Vince] was convinced to spend some time in Altium to design a breakout board for this tiny WiFi chip. Now, if you can get your hands on a sample of the CC3000 from TI, you can breadboard out a circuit with the help of [Vince]’s design.

Included in [Vince]’s git are the board files for this breakout board, schematics, and the necessary parts if anyone has the inclination to make an Eagle library. If anyone wants to spin a few of these boards and put them up on a Tindie Fundraiser, that’d be fine by us, and [Vince] would probably appreciate that as well.

Turning The Stellaris Launchpad Into A Logic Analyzer

acquisition

If you have a Stellaris Launchpad sitting around, have a go at using it as a logic analyzer

The Stellaris logic analyzer is based upon this earlier build that took code from a SUMP comparable Arduino logic analyzer and ported it to the much faster and more capable Stellaris Launchpad with an ARM Cortex 4F processor.

This build turns the Launchpad into a 10 MHz, 8-channel logic analyzer with a 16 kB  buffer comparable with just about every piece of software thanks to the SUMP protocol. Even though the ARM chip in the Launchpad isn’t 5 Volt tolerant, only pins 0 and 1 on Port B are limited to 3.6 Volts. All the other pins on Port B are 5 Volt tolerant.

Not a bad piece of work to turn a Launchpad that has been sitting on your workbench into a useful tool.

Extracting Data With USB HID

sd_adaptor

High security workstations have some pretty peculiar ways of securing data. One of these is disabling any USB flash drives that may find their way into a system’s USB port. Security is a cat and mouse game, so of course there’s a way around these measures. [d3ad0ne] came up with a way of dumping files onto an SD card by using the USB HID protocol.

We’ve seen this sort of thing before where a microcontroller carries an executable to extract data. Previously, the best method was to blink the Caps Lock LED on a keyboard, sending one bit at a time to a micocontroller. [d3ad0ne]’s build exploits the USB HID protocol, but instead of 1 bit per second, he’s getting about 10kBps.

To extract data from a system, [ d3ad0ne] connects a Teensy microcontroller to the USB port. After opening up Notepad, [ d3ad0ne] mashes the Caps Lock key to force the Teensy to type out a script that can be made into an executable. This executable is a bare-bones application that can send any file back over the USB cable to the Teensy where it’s stored on an SD card. Short of filling the USB ports in a workstation with epoxy, there’s really no way to prevent secure files from leaking out of a computer.