Solar Clock Uses Capacitors For Style And Function

solar-clock-uses-storage-capacitors-and-batteries

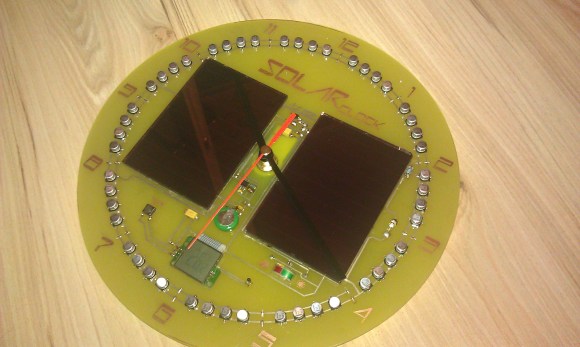
This solar clock was built using a lot of salvaged parts. We find it interesting that [Nereus] combined a ring of storage capacitors with a power cell (translated) to create a hybrid energy storage setup.

The machine translation makes it a bit rough to understand how this works, but the schematic helps quite a bit. The pair of solar cells, which were pulled from some cheap solar cellphone chargers, feed the bank of capacitors encircling the clock face. If placed in a room that gets plenty of sunlight the cells will top off the capacitors which then feed an ICL7663 regulator. We’d love to hear comments on this part choice, as it’s our experience that linear regulators are rather inefficient. But anyway, the regulated power feeds both the energy cell as well as the clock motor. When output from the regulator dips the battery picks up the slack. The project also includes a voltometer and thermometer which can be displayed on the tiny LCD screen just about the six o’clock tick mark.

Now if you want something completely battery-free you’ll have to check out [Jack Buffington’s] take on solar clock.

[Thanks Manekinen]

Hacked Auxiliary Port For A Car Stereo

hacked-auxiliary-port-car-stereo
We’re not sure if [Apachem25] is just lucky, or if installing Auxiliary ports on most car stereos is this easy. The dealership wanted $95 to put one in, but he managed to add a 3.5mm audio-in port to his car stereo for just a couple of bucks.

The connector on the back of his head unit is a 2×4 set of pins recessed in a protective plastic ring. It turns out that the audio connector cable for a PC CD-ROM drive has a 1×4 socket that is perfect for this. [Apachem25] simply clipped one of those cables in half and used both ends to interface with the Aux port. He found the pin-out for his particular model on the Internet. He needed a specific resistance value between two of the pins to get the deck to let him use the input. All that he needed was a quick bit of soldering. The left, right, and ground are brought around the side and soldered to an audio jack he added in the face plate of the unit.

If you’re still rockin’ the cassette deck our favorite automotive Bluetooth solution is still this one for a classic Beetle.

[via Reddit]

Diamond Ore Wall Lamp Brings Minecraft Into Your Home

diamond-ore-lamp

We were surprised to see all of the Christmas gifts that revolved around Minecraft. Seems like there’s a lot of stuff for sale, but we still like the DIY spirit that comes with making your own. [Thacrudd] recently finished this project. It’s a wall lamp that looks like Minecraft’s diamond ore.

The enclosure is a wood box that used to contain chocolates. After studying the pixel art texture for the game’s diamond ore blocks he marked out the pattern and headed over to the scroll to rough them out before finishing with files and a rasp. Next came paint, which was sourced as a sample from the home store. This left him with one shade of gray, but the variations were easy to add by mixing it with white or black.

A strip of white LEDs gives the lamp its inner glow. The openings have been covered with blue acrylic which keep the dust out while providing the appropriate hue.

[via Reddit]

Rusty Old Table Saw Turned Into A Workstation Worthy Of A Master Craftsman

rusty-old-table-saw-turned-pro-workstation

Okay, first of all: holy crap! Even if you didn’t know this started as a rusty table saw, the workstation that came out of this project is just phenomenal. It really makes us wish we had looked around for a used model with a cast iron top instead of going for the cheap stamped metal one that was ready to use.

[Simon Leblanc] started with a Delta contractor’s saw that was rusty inside and out. The refurbishment began by removing the table and everything from the inside. The rods and gears were all cleaned up before he began to sand away the rust on the table itself. But obviously he didn’t stop with getting the saw to be functional again. He built a small set of cabinets to serve as the base for the saw. They went inside of this larger assembly that combines an MDF table top with an Accusquare rip fence to greatly increase the working surface of the tool.

Now he needs to start in on an extra fancy CNC jig for the thing.

[via Reddit]

LEGO Stylus Solves Ruzzle Tablet Game

mindstorm-ruzzle-solver

This grid of letters is a puzzle game for tablet devices called Ruzzle. The contraption attached is an automated solver which uses LEGO Mindstorm parts to input the solutions on the screen. [Alberto Sarullo] is the mastermind behind the project. As you can seen in his demo video after the break he has a flair for the cinematic. But he makes you work a little bit to discover the details of his project.

His post gives a general overview of how this works. A Linux box takes a screenshot of the Ruzzle board. After processing the graphics with Imagemagick he uses Tesseract — an Optical Character Recognition program — to figure out which letter is on each square of the playing area. From there NodeJS is used to discover all possible words with the help of a dictionary file. The final solutions are pushed to the LEGO parts to be traced out on the touch screen with a stylus. The nice thing is that he published all of his code, so you can drill much deeper into the project by pawing through his repository.

Continue reading “LEGO Stylus Solves Ruzzle Tablet Game”

Impressive Dev Boards For Your STM32 Dev Boards

stm32-discovery-breakout-boards

It seems there are a lot of people who have the same complaint about the STM32 Discovery boards; it can be difficult to add external hardware to them. Don’t get us wrong, we appreciate all of the pins being broken out (as opposed to the Stellaris Launchpad which we think has too few available). Here’s [Scot Kornak’s] solution to the problem. He created three different baseboards which the STM32 Discovery plugs into. Each is for a different model of dev board: the VL, F3, and F4. But he also thinks the baseboard we saw in this other project is a good choice for an F4 solution.

These large PCB add-ons bring functionality in two different ways. The first is by using expandable ports for drop in modules like serial communications connectors or Analog/SPI/I2C modules. For us, the second method is the most desirable. He routes each GPIO port to a 2×8 header and uses IDC cables (rainbow cable in these images) to connect them to a breadboard. Seeing this makes us wish STM had used discreet clusters of 16 pins instead of those super long dual pin headers.

OpenSCAD Is For Use With 2D Machine, Not Just 3D Printing

openscad-for-2d-machining

Here’s an enclosure which was designed with OpenSCAD and cut out on a CNC router. [Matthew Venn] wrote about the project because he sees tons of 3D printing hacks that use the software, but almost never hears about it as a tool for laser cutting or CNC router/mill work. When we read that we thought we must have seen a lot of 2D hacks but a search of Hackaday’s previous offerings proved us wrong. Just this week we heard about the software in use with the Makerbot. Or you could go back about a year and read about creating 3D molds. But nothing on 2D work.

His post is a quick read and shows off the bare bones of the case designs he’s been working with for a few years. By referencing the code itself, and playing with how it changes the render in OpenSCAD he makes a strong case for quick and easy enclosure design. If you use this technique make sure to document your experience because we want to hear about it!