Simple Looking Antique Internet Radio Has A Lot Under The Hood

rpi-internet-radio
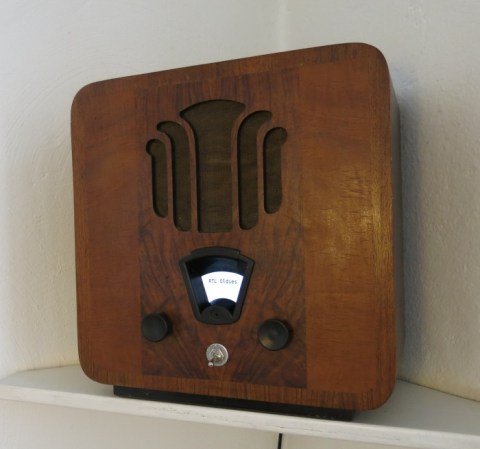
At first glance you might not even notice that this 1934 radio has been altered. But close study of the tuning dial will tip you off that changes have been made. It still scrolls through stations just like the original. But it’s not a wheel with some numbers on it. The rotary motion is an effect produced by an LCD screen.

This is the second time we’ve seen one of [Florian Amrhein’s] Internet radio projects. The first used guts from a Laptop paired with an Arduino to pull everything together. This time he’s chosen to wield a Raspberry Pi board. It feeds a USB sound card for a bit better quality. A small amplifier board us used to power one large speaker behind the original grill of the radio.

Check out the demo video to see that radio dial in action. It’s delightful that he went to the trouble to emulate a rotating disc to keep with the theme of the project.

Continue reading “Simple Looking Antique Internet Radio Has A Lot Under The Hood”

DIY Airbag, Explosions Included

AnAirbagSavedMyLife

Your car’s airbag is one of the major engineering accomplishments of the auto industry. In an accident, a whole host of processes must take place in sequence to keep your face from slamming into the steering wheel, and  everything must happen in just a fraction of a second. [Steve] over at Make thought it would be a cool idea to discover what actually goes in to saving a life with an airbag and decided to build his own.

The electronics of the build consisted of an accelerometer and an Arduino. A lot of research, development, and experimentation has gone into the algorithms that trigger airbags, but [Steve] decided to keep things simple: when a sudden acceleration is detected, set off a small charge of black powder.

The airbag itself is ripstop nylon reinforced with canvas, contained in a small wooded box fitted with hinged doors. All these components are put on wheeled aluminum test rig, manned with a honeydew melon crash test dummy, and pulled into a short wall at a few miles per hour.

Despite [Steve] not putting hundreds of thousands of man hours into the development of his airbag – unlike the ones you’ll find in your steering column – his device actually worked pretty well. While not a complete success, he did manage to come up with something that both looks and acts like the familiar device that has saved countless lives.

A Love Note In 14 Segments

14

[Terry] wanted to come up with a little electronics project for his kids, and also came up with something to keep the wife happy. It’s an adorable 14-segment love letter, pieced together with some leftover LED displays and a bit of solder.

There isn’t a microcontroller anywhere to be seen in this project – all the illuminated segments are tied to a switch, and aside from a few resistors there isn’t much to this circuit. The simplicity means it’s a great way for [Terry] to get his kids involved in electronics.

If you’re wondering why [Terry] didn’t throw multiple Arduinos, shift registers, or LED drivers into the build, consider this: sometimes segment displays can be static. The time circuit prop from Back to the Future (but not this modern recreation) was wired up in a similar manner, as only a few specific dates needed to be displayed. Either way, we’re thinking good on [Terry] for introducing his kids to a soldering iron and doing something special for his lady friend.

Resistance Decade Box Using DIP Switches

resistance-decade-box

Here’s a simple piece of equipment which you’ll be proud to display on your electronics bench. It’s a resistance decade box. The concept has been around forever — it offers the ability to tune a wide range of resistance values just by adjusting the controls. We especially like the clean look of this one, and think the use of DIP switches is a nice touch.

Check out the toggle switch at the top. It lets you disconnect the resistance values from the output in order to test them with your meter. It may not seem like much, but fudging your switch settings could end up smoking your target project. The value of that feature isn’t lost on us.

The DIP switches are mounted to some Radio Shack breakout boards which work perfectly for hosting the resistors as well. This keeps the inside of the enclosure nice and tidy. The final touch is the printed face plate applied to the cover of the box.

Like we’ve said, this one is nice but our favorite is still this one that uses thumbwheel switches to dial in a value.

Making PCBs And Waffles

waffle

The toner transfer method of fabricating PCBs is a staple in every maker’s toolbox. Usually, tutorials for this method of making PCBs rely on a clothes iron or laminating machine. They work perfectly well, but with both of these methods (sans high-end laminators), you’re only heating one side of the board at a time, making perfect double-sided PCBs somewhat of a challenge.

[Mark] just came up with an interesting solution to this problem. A waffle iron PCB press. Technically, [Mark] is using his ‘grill and waffle baker’ as a two-sided griddle, with a few aluminum plates sandwiching the copper board for good thermal conduction.

After a whole lot of trial and error, [Mark] eventually got a good transfer onto a piece of copper clad board. Now that he has the process dialed in, it should be a snap to replicate his results with a new project and a new PCB design.

Adafruit Builds The Back To The Future Time Circuit Display

back-to-the-future-time-circuit-clock

If you were growing up in the ’80s this display panel will be instantly recognizable. It’s the time circuit display which [Doc Brown] built into his 88 mph per hour DeLoren time machine. If this still doesn’t jog your memory (or if — *gasp* — you’ve never seen the movie Back to the Future) take a gander at the montage video below.

The thing is, if you look really closely you’ll find this isn’t an exact match. Hackaday alum [Phil Burgess] put together a guide for Adafruit that shows how to build this version. But the movie actually cheated when it came to the month display. In production the month was displayed as alpha characters by painting glass slides. To make that happen here you would need some sixteen segment modules (like in this project). But we don’t mind the change one bit. The nostalgic look stands on its own even if it’s not an exact replica.

We’re sure you’ve figured out by now that this is backed by a dead-accurate real time clock (chronodot) and powered by a Teensy microcontroller board. Which means you can use it for just about any of your timekeeping needs.

Continue reading “Adafruit Builds The Back To The Future Time Circuit Display”

No Nonsense Guide For Patching Into A Gaming Controller

patching-into-a-gaming-controller

Here a straight-forward guide for tapping into the buttons on most gaming controllers. Why do something like this? Well there’s always the goal of conquering Mario through machine learning. But we hope this will further motivate hackers to donate their time and expertise developing specialized controllers for the disabled.

In this example a generic NES knock-off controller gets a breakout header for all of the controls. Upon close inspection of the PCB inside it’s clear that the buttons simply short out a trace to ground. By soldering a jumper between the active trace for each button and a female header the controller can still be used as normal, or can have button presses injected by a microcontroller.

The Arduino seen above simulates button presses by driving a pin low. From here you can develop larger buttons, foot pedals, or maybe even some software commands based on head movement or another adaptive technology.

Continue reading “No Nonsense Guide For Patching Into A Gaming Controller”