FlightDeck: A “Touchless” MIDI Controller

flightdeckmidi

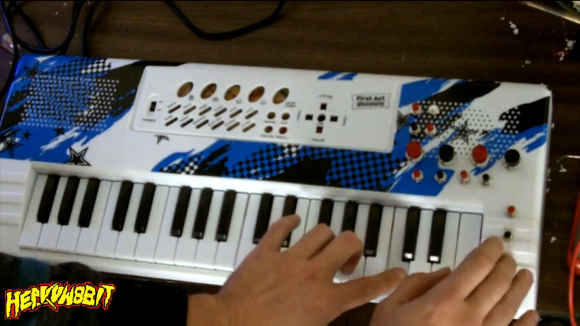
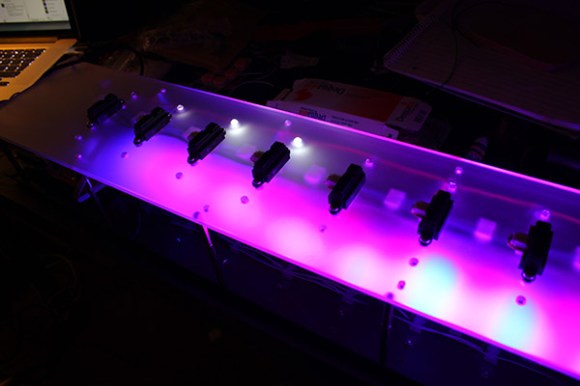
[Edward] wanted a different way to modulate notes on his MIDI controller, so he decided to go touchless. Inspired by the pressure-sensing modulation on his Edirol keyboard, [Edward] aligned eight sensors into a row of playable notes and used infrared to sense the distance of a player’s hand from the keys. He also included some function buttons to cycle through 10 octaves and RGB LEDs beneath the table that perform alongside the music.

He chose SHARP GP2D120 sensors (direct link to datasheet) for their low threshold, which allowed the board to detect distance close to the sensor. Each is mounted onto a sheet of frosted acrylic along with its own “hold note” button and an LED to indicate the key is playing. The lower panel houses an Arduino Mega that drives the system along with an RGB LED strip and its driver board. [Edward] used Maxuino and OSC-Route to interface the Mega to a Max/MSP patch which runs the show.

Learn more about the FlightDeck’s features in a video demonstration of the controller and the software after the break, then check out some other MIDI hacks like this organ pedal or the Arduino-driven MIDI sequencer.

Continue reading “FlightDeck: A “Touchless” MIDI Controller”

Guest Rant: From Bits To Atoms

I’ve been a software developer for quite a while. When you spend long enough inside a particular world, it’s easy to wind up with an ever-narrowing perspective. You start seeing everything from a software point of view. As the saying goes, when your only tool is a hammer, you tend to treat every problem as NP-Complete. Or something. I forget how that goes.

Anyway, the point is, it’s always good to broaden one’s horizons, and solve as many different kinds of problems as possible. To that end, I started to get into hobby electronics recently. The journey has been very enlightening in a number of ways.

Continue reading “Guest Rant: From Bits To Atoms”

HHH: CNC Storage Base From The Rabbit Hole

henchmen-rabbithole-cnc-storage-base

Remember when we announced the Hackaday Hackerspace Henchmen program and asked you to send in the best CNC hacks from your Hackerspace? Well so far this is the only entry, which puts [Mazz] in the top spot to take all the loot for himself. Send in your projects by 10/31/13 if you want a shot at stickers, shirts, and a parts vendor gift card.

What he sent in is a storage cabinet base built for his hackerspace — The Rabbit Hole in Rochester, Minnesota. The group managed to get their hands on a CarveWright CNC machine but didn’t have a spare bench to put it on. The thought of dropping a lot of cash into something wasn’t appealing to them. But as luck would have it, about the same time this arrived at the space one of the members spied a free filing cabinet curbside.

The cabinet was a vertical four-drawer unit. It was chopped in half, with the resulting two-drawer units bolted side-by-side to each other. From here a frame was built to support the cabinets, along with locking casters so that it’s easy to move around. The inaugural run with the new machine/cabinet combination was to mill a sign for the space:

rabbit-hole-carved-sign

Making A Diode Matrix ROM

Here is a nice project that allows youngsters (but also adults!) to actually see the data stored in a Read Only Memory (ROM). The memory shown in the picture above is made of diodes. [Scott] made it as a part of his Barcamp Fall 2013 presentation about visualizing ROMs. He starts his write-up by stating the obvious: this memory is not practical. Nonetheless, it still was a fun exercise to do. [Scott] then greatly described all the different kinds of read only memories that you can find out there, with a few words explaining how they work. In his diode ROM, bits are ‘programmed’ by adding (or not) a diode between a given data line (anode) and an address line (cathode). When pulling low a given address line, the corresponding data line will only be pulled low if a diode is present. [Scott] finally checked his circuit by using a very old device programmer which could only be run in DOS.

Keyboard Spoofs 4 NES Controllers For Chiptune Goodness

NES-keyboard

This toy keyboard is being used to play music on an NES. As you probably already know, the hardware inside those original controllers was dead simple. They’re just a parallel to serial shift register that reads from all of the keys. To get this keyboard up and running [heavyw8bit] simply mounted eight chips inside the gutted toy, connecting two of them to the keyboard keys, and the rest to the array of push buttons he added to the right.

So what’s the point of using this as a quadruple game controller? Are you expecting to see what a full speed-run of Contra looks like using this as the controls? That’s not the point at all. This becomes a musician-friendly frontend for the NES synthesizer ROM called NESK-1. [heavyw8bit] wrote the game/program in order to allow you to use the original console hardware to play all of the sounds you know and love. Our favorite is the arpeggio example heard at about 2:35 into the clip after the break.

Continue reading “Keyboard Spoofs 4 NES Controllers For Chiptune Goodness”

Laptop Keyboard EL Panel Backlight

keyboard-el-panel-backlight

[nullpointr] wanted a backlit keyboard for his Asus Transformer Prime so that it would be a bit easier to use in low-light situations. He considered a few different options and ended up adding electroluminescent panels behind the keys.

Those paying close attention might wonder why we called this a laptop in the title. Well, it’s a tablet with a keyboard dock and that’s a mouthful. This actually really helps to simplify the modifications because the motherboard and other bits are all in the screen portion of the device. EL panels are also a nice choice because you can cut them to size and they still function. With a bit of case work, three panels were made to fit side-by-side.

The part that just isn’t going to make it in the original enclosure is the inverter that drives the panels. It’s the black box to the left. [nullpointr] added a USB-form-factor jack to the side of the case that allows the inverter to be disconnected quite easily. This way the Transformer Prime can still go with him on the road, it just won’t light up unless he also hauls around that add-on.

Way way back we saw someone do this with fiber optics and an LED. Unfortunately that project link seems to be dead so we figure it’s about time someone revisited the concept.

Tips And Tricks For The C Pre-processor

C Pre-processor

The C pre-processor can help you write more concise, easy to follow code. It can also let you create a tangled ball of macros and #defines. [s1axter] wrote up a guide on how to use the pre-processor and keep your sanity.

We’ve seen some neat hacks with the C pre-processor, such as a full adder implementation, but this focuses on more practical usages. First, [s1axter] explains what the pre-processor does with your code by writing simple macros. Next up is arguments, and usage of ‘##’ directive for metaprogramming. Finally, we get a good explanation of why you need to worry about scope when using macros, and how to safe code by using ‘do {} while()’ statements.

If you’re into embedded programming, this guide will help you understand some of the more complex pre-processor techniques out there. It’s helpful for making your code clearer, and abstracting away hardware dependencies in a few lines of code.