Xbox One Headset 2.5 Mm Plug Adapter

In all of Microsoft’s grand wisdom they found it necessary to make the new Xbox One headset adapter without a standard 2.5 mm headset jack. People have invested great amounts of money in quality headsets for previous game platforms that now cannot jack into the Xbox One controllers. This may seem like a déjà vu hack from a week ago but it is different and adds more solutions for the annoying Xbox One headset compatibility problem.

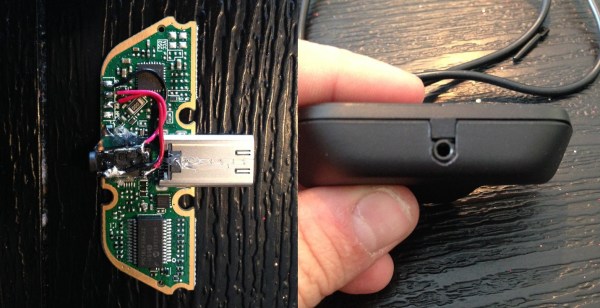
[Jon Senkiw] A.K.A [Xandrel] wasn’t having any of this Microsoft nonsense so he cracked open the headset adapter case that plugs into the Xbox One controller. He photographed the PCB and wiring and realized he could fit a 2.5 mm headset jack from an old donor cellphone into the case. A dap of hot glue, some AWG 30 jumper wires and a bit of plastic trimming was all it took to get a jack inside the headset adapter just the way Microsoft should have done from the factory.

Previously when [octanechicken] added a 2.5 mm female phone adapter at the end of the cable he did not connect the black wire to anything being it was the 2nd side of a push-pull speaker. However, from looking at [Jon’s] photos he connected the speaker output wire to a solder pad on the PCB where the black wire originally connected, marked HPL, and he had nothing connected to the HPR pad. This seemed to work for [Jon] just fine, but is the opposite of what [octanechicken] did last week when he connected the blue wire to the speaker output which would have traced back to the HPR pad on the PCB.

This hack makes these controllers backwards compatible without too much issue being reported. If you have issues please report here or on [Jon’s] SE7ENSINS thread. He has also made comments on the thread that he is willing to help mod headsets, so if you’re not able to hack this yourself [Jon] might be willing to help.

Hidden Reed Switches For DIY Home Security

01-Before

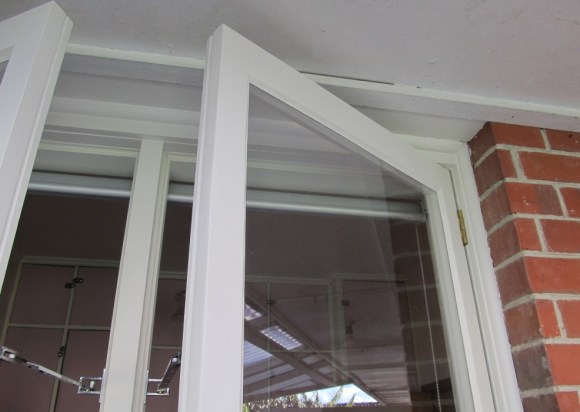
[Rhys] wanted to secure his home against burglars, but didn’t want to go the normal route of using those bulky plastic magnet and reed switch deals. So he sourced some glass reed switches and made his own completely hidden security system.

By using small glass reed switches [Rhys] was able to mount them flush to the wood paneling just above the window frames. To do this he drilled and then chiseled two slots for the reed switches to go in, with the wires routed into the house. A bit of bondo or drywall filler and some paint later and they are completely invisible! To finish it off he glued small neodymium magnets to the top of the window frame which close the switches. It’s a very clean build and quite inexpensive to do — the possibilities for wiring up your entire home like this are quite tempting!

He’s got the switches installed already… why not couple it all to a complete home security setup? We shared a project last year that does just that!

E-volo VC200 Makes Maiden Flight. Flying Cars Incoming

The e-volo VC200 has made it’s maiden unmanned flight. Does the craft above look a bit familiar? We first reported on the e-volo team back in 2011. Things have been going great for the team since then. They’ve created an 18 motor (Octadecacopter?) prototype dubbed the VC200. The group has taken a smart approach to building their craft. Rather than try to keep everything in-house, they’ve created a network by partnering with a number of companies who are experts in their fields. A sailplane company laid up the carbon fiber composite frame for the EC200. Junkers Profly, a German aviation company, developed a ballistic parachute system in case something goes wrong in flight.

From the outside, the VC200 looks like a grown up version of the Quadcopters we’ve seen here on Hackaday. Even the control system used for the test flight looks like a modified Radio Control Transmitter. The motors are outrunner brushless motors. Props are carbon fiber. We’re hoping the control system is a bit more evolved (and redundant) than the systems used in R/C quads though. Just like in smaller scale models, batteries are still the limiting factor. The VC200 will only fly for about 20 minutes on a charge. However, e-volo says that new technology should allow it to extend that time to around an hour. Not very much for a cross country flight, but plenty to pioneer a new type of aircraft. Where do we sign for the beta program?

Continue reading “E-volo VC200 Makes Maiden Flight. Flying Cars Incoming”

VFD And Nixie Clock Twofer

Clocks

Sometimes the stars align and we get two somewhat similar builds hitting the Hackaday tip line at the same time. Recently, the build of note was clocks using some sort of display tube, so here we go.

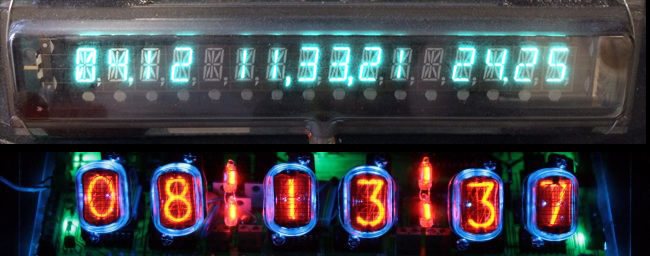
First up is [Pyrofer]’s VFD network time clock (pic, above). The build started as a vacuum flourescent display tube he salvaged from an old fruit machine – whatever that is. The VFD was a 16 character, 14 segment display, all controlled via serial input.

The main control board is, of course, an Arduino with a WizNet 5100 Ethernet board. The clock connects to the Internet via DHCP so there’s no need to set an IP address. Once connected, the clock sets itself via network time and displays the current date, time, and temperature provided by a Dallas 1-wire temperature probe.

Next up is [Andrew]’s beautiful Nixie clock with enough LEDs to satiate the desires of even the most discerning technophile. The board is based on a PIC microcontroller with two switching power supplies – one for the 170VDC for the Nixies, and 5V for the rest of the board.

A battery backed DS1307 is the real-time clock for this board, and two MCP23017 I/O expanders are used to run the old-school Nixie drivers

All this is pretty standard for a Nixie clock build, if a little excessive. It wasn’t enough for [Andrew], though: he used the USB support on his PIC to throw a USB port on his board and wrote an awesome bit of software for his PC to set the time, upload new firmware, and set the color fade and speed. With this many LEDs, it’s not something you want in your bedroom with all the lights on full blast, so he implemented a ‘sleep’ mode to turn off most of the lights and all the Nixie tubes. It’s a great piece of work that could easily be successfully funded on Kickstarter.

A Kinect Controlled Robotic Hand

hand

It’s that time of year again when the senior design projects come rolling in. [Ben], along with his partners [Cameron], [Carlton] and [Chris] have been working on something very ambitious since September: a robotic arm and hand controlled by a Kinect that copies the user’s movements.

The arm is a Lynxmotion AL5D, but instead of the included software suite the guys rolled their own means of controlling this arm with the help of an Arduino. The Kinect captures the user’s arm position and turns that into data for the arm’s servos.

A Kinect’s resolution is limited, of course, so for everything beyond the wrist, the team turned to another technology – flex resistors. A glove combined with these flex resistors and an accelerometer provides all the data of the position of the hand and fingers in space.

This data is sent over to another Arduino on the build for orienting the wrist and fingers of the robotic arm. As shown in the videos below, the arm performs remarkably well, just like the best Waldos you’ve ever seen.

Continue reading “A Kinect Controlled Robotic Hand”

DIY 3D Projector From An LCD

We’ve shared many home made projectors in the past, but we think this might just be the first home made 3D projector!

[Nicholas] has created a wonderful write up on this project on his blog, and in an Instructable, and even more details are available on the original forum post (in French though).

To sum it up though, he’s using an old LCD from a broken laptop, split into two halves. By using a Fresnel lens and two separate optical lenses that are adjustable he can combine the two images (top and bottom of the LCD) on the wall. Then by adding a polarization filter to each lens, he can reuse the cheap 3D goggles from the cinema for his own setup to see in 3D! This style of passive 3D does require a special projector screen to keep the polarization intact — he’s using a Da-Lite Silverlight screen, whose metallic surface ensures the polarization is kept the same.

It’s a great project and is definitely worth checking out. If you’re in the mood for a smaller form factor projector, it’d be worth checking out this one we covered quite a few years ago!

Get Tangled Up In EL Wire With Freaklabs

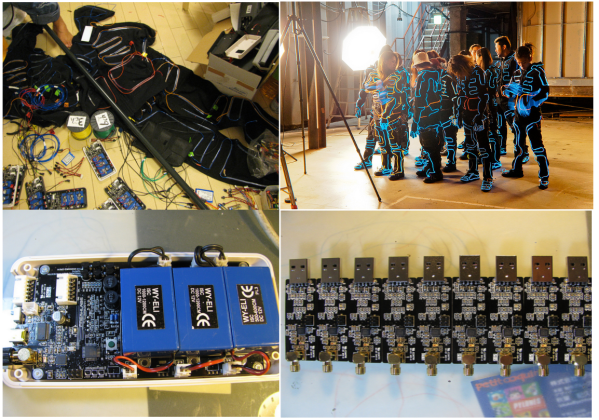
[Akiba] over at Freaklabs has been working with electroluminescent (EL) wire.  An entire dance company worth! We know [Akiba] from his post tsunami radiation monitoring work with the Tokyo Hackerspace. Today he’s one of the engineers for Wrecking Crew Orchestra, the dance company that put on the viral “Tron Dance” last year. Wrecking Crew Orchestra just recently put on a new production called Cosmic Beat. Cosmic Beat takes Wrecking Crew’s performances to a whole new level by adding stage projection mapping and powerful lasers, along with Iron Man repulsor style hand mounted LEDs.

As one might expect, the EL wire costumes are controlled by a computer, which keeps all the performers lighting effects in perfect time. That’s where [Akiba] came in. The modern theater is awash in a sea of RF noise. Kilowatts of lighting are controlled by triacs which throw out tremendous amounts of noise. Strobes and camera flashes, along with an entire audience carrying cell phones and WiFi devices only add to this. RF noise or not, the show must go on, and The EL costumes and LEDs have to work. To that end, [Akiba] He also created new transmitters for the group. He also changed  the lighting booth mounted transmitter antenna from an omnidirectional whip to a directional Yagi.

The EL wire itself turned out to be a bit of a problem. The wire wasn’t quite bright enough. Doubling up on the wire would be difficult, as the dancers are already wearing 25 meters of wire in addition to the control electronics. Sometimes best engineering practices have to give way to art, so [Akiba] had to overdrive the strings. This means that wires burn out often. The dance troupe has gotten very good at changing out strands of wire during and between shows. If you want a closer look, there are plenty of pictures available on [Akiba’s] flickr stream.

Continue reading “Get Tangled Up In EL Wire With Freaklabs”