Octoscroller Takes The Hexascroller To The Next Level

octosc2

The folks at NYCResistor have a new toy in the Octoscroller. For a couple of years now the NYCResistor crew has used the HexaScroller as a clock and general alert system. Now that RGB LED panels are cheaply available, the group decided to upgrade both the number of sides and the number of colors.

Octoscroller uses eight 16×32 RGB LED panels. These panels are relatively easy to interface to, but require constant refresh even to display a static image. This makes them both memory and CPU intensive for smaller microcontrollers. Brightness control via PWM only increases the difficulty.

On the plus side, the panels are structurally strong. This allows the Octoscroller to avoid the plywood ring which made up the frame of the Hexascroller. 3D printed brackets and hardware were all that was needed to complete the Octoscroller frame.

The brain of the this beast is a BeagleBone Black running LEDscape along with some custom software. Imagery comes from the Disorient Pyramid.

If you’re in the New York area, NYCResistor plans to offer classes on building your own Octoscroller.  You can also see the Octoscroller in person at MakerFaire NYC this weekend.

One Man’s Microwave Oven Is Another Man’s Hobby Electronics Store

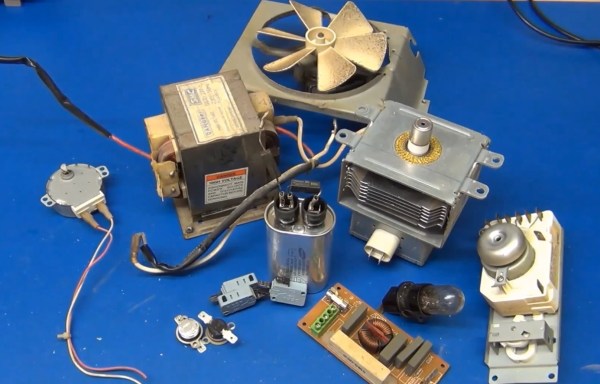
There are loads of Internet content depicting the usefulness of salvaged innards found in defunct microwave ovens. [Mads Nielsen] is an emerging new vblogger with promising filming skills and intriguing beginner electronics content. He doesn’t bring anything new from the microwave oven to the dinner table, yet this video should be considered a primer for anybody looking to salvage components for their hobby bench. To save some time you can link in at the 5 minute mark when the feast of parts is laid out on the table. The multitude of good usable parts in these microwave ovens rolling out on curbsides, in dumpsters, and cheap at yard sales all over the country is staggering and mostly free for the picking.

The harvest here was: micro switches, X and Y rated mains capacitors, 8 amp fuse, timer control with bell and switches, slow turn geared synchronous 4 watt motor 5 rpm, high voltage capacitor marked 2100 W VAC 0.95 uF, special diodes which aren’t so useful in hobby electronics, light bulb, common mode choke, 20 watt 68 Ohm ceramic wire-wound resistor, AC fan motor with fan and thermostat cutout switches NT101 (normally closed).

All this can be salvaged and more if you find newer discarded units. Our summary continues after the break where you can also watch the video where [Mads] flashes each treasure. His trinkets are rated at 220 V but if you live in a 110 V country such components will be rated for 110 V.

Continue reading “One Man’s Microwave Oven Is Another Man’s Hobby Electronics Store”

Robotic Tentacles For A Disturbing Haunted House

testicles

[ivorjawa] is putting on a haunted house this Halloween that we really don’t want to go to. His robot tentacle is already supremely creepy, and we’re assuming it will only be more frightening once it’s covered in fabric and foam rubber.

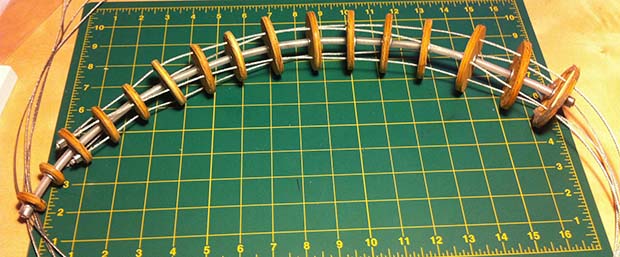
Each tentacle can move on two axes thanks to four steel cables running through this strange Geiger-esque contraption. In the base of the tentacle are two stepper-motor driven cylinders that take up slack on one cable and draw out another cable. Two of these control boxes, driven by a stepper motor and an Arduino motor shield, allow the tentacle to reach out and grab in any direction. You can check out the mechanics of the build on [ivorjava]’s flickr

On a semi-related note, even though we’re more than a month out from Halloween, we should have more Halloween builds in our tip line by now. If you’re working on one, don’t be afraid to send it in, even if you’re just showing off a work in progress.

Continue reading “Robotic Tentacles For A Disturbing Haunted House”

Giant Video Walls Powered By A Raspberry Pi

There’s no denying that giant video walls are awesome, but creating one usually means a fairly complex setup with either multiple computers or very expensive video cards. Now, with Pi Wall, you can make a video wall as large as your wallet will allow with only one Raspi per monitor, and a single master pi to control the whole shebang.

As long as you have a few displays with an HDMI input, it’s easy to turn them into a giant monitor. Just plug one Pi per monitor into a network switch, have a Pi (or other Linux box) transmit a video to all the video tiles, and sit back and enjoy the show.

Right now there is an installation guide for creating a Pi Wall, but there are a few limitations; this software only works with the video player provided with the Raspberry Pi, omxplayer. If you’re looking to create an enormous display for a flight simulator or what have you, you might need to do a bit of tinkering under the hood.

Modifying A Knock-off Battery Charger To Be Safer

i-tv5pN2R-X3

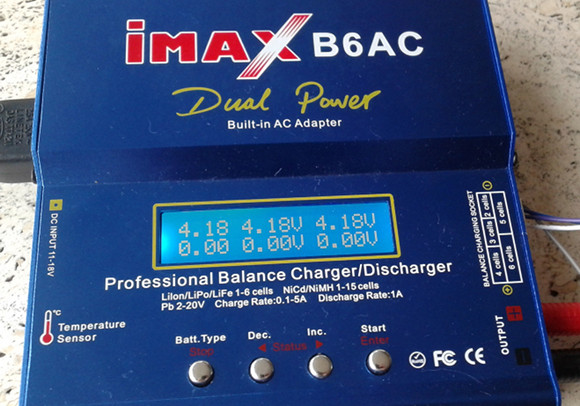
Sometimes buying a low-cost clone off of eBay is a great option, but [Martin] wisely decided to test his counterfeit IMAX B6AC, and found it grossly lacking. His detailed breakdown shows an alarming array of problems, including poor design and construction, and a lack of warning if the balance circuit fails. In addition, the charger wasn’t properly calibrated. By using a precision multimeter, Martin found that the charger actually brought cells above critical voltage. So really, using a charger like this out of the box can both destroy your battery pack and/or start a fire. One other interesting detail – this model can only be calibrated once. Sweet features.

[Martin] detailed his fixes in a well-illustrated blog post. He first had to re-enable the calibration menu using this method which requires bricking the device first! Once un-bricked, however, he could do the recalibration using a voltage divider and a reliable power source.

This project really underscores the need for a precisely calibrated multimeter. Not only would [Martin] not have been able to test his charger properly, but the re-calibration wouldn’t have been as accurate as needed. As hobbyists, this is a reminder that we can only trust our tools if they are accurate.

Electron Tree Bridal Gifts

[Mark] just sent us in this fascinating example of Lichtenberg Figures, or more commonly known as Captured Lightning.

He just got married yesterday to his beautiful wife [Charlie] and they wanted to do something different for their bridal party. They chose to capture lightning inside acrylic spheres. Quite an impressive gift if we do say so ourselves!

The funny thing is, I was just reading [Theo Gray’s] Mad Science book which explains this phenomena. These Lichtenberg Figures are created by blasting a beam of high energy electrons at a piece of acrylic. Many of the electrons get trapped inside the acrylic and form a plane of charge. When the acrylic object gets struck with a grounding  stud, a discharge path is formed and all the electrons escape, leaving a completely unique lightning-like path in their tracks.

Unfortunately to make these you’re going to need a linear accelerator; a very expensive machine that [Mark] was lucky enough to use through his work. However the couple didn’t stop there, they also designed the lighted base using a PIC12F1501 micro-controller to finish off the gifts!

See how they were made after the break! Just a heads up, the video is very loud when the electrons are fired! If you’re wearing headphones keep the volume low.

Continue reading “Electron Tree Bridal Gifts”

Modified E-ZPass Detects Reads Far From Toll Booths

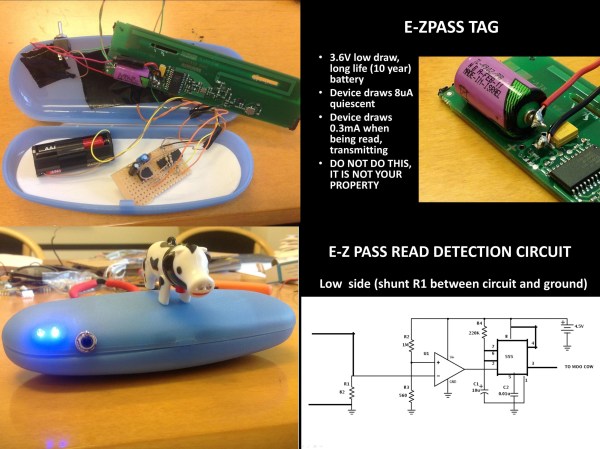
Def Con speaker [pukingmonkey] has spent quite a bit of time studying methods government and law enforcement use to track private citizens’ vehicles on the roads. One of the major tracking methods is E-ZPass, an electronic toll collection system used in several states around the country. [pukingmonkey] cracked open his E-ZPass tag to find a relatively basic circuit. In his DEF CON presentation (PDF), he notes you shouldn’t do this to your own tag, as tags are legally not the property of the user.

The tag uses a 3.6 volt long life battery to operate. When idle, the tag only draws 8 microamps. During reads, current draw jumps to 0.3 mA. Armed with this information, it was relatively simple to add a current detecting circuit that outputs a pulse on tag reads. Pulses are then fed into a toy cow, which lights up and “Moos” on each read.

Continue reading “Modified E-ZPass Detects Reads Far From Toll Booths”