Call For Hams And Hackers: Welcome ICE/ISEE-3 Home

ISEE-3, one of America’s most dedicated space exploration vessels is on its way home. Unfortunately, when it gets here, no one will be talking to it. NASA decommissioned the equipment needed to communicate with the satellite nearly 15 years ago. [Emily Lakdawalla] at the planetary society has been following the long traveled probe for years. Her recent article on the topic includes the news that NASA essentially gave up the battle before it even started.

Originally named International Sun/Earth Explorer 3 (ISEE-3), the spacecraft was launched atop a Delta rocket on August 12, 1978. Its mission was to study interaction between the Earth’s magnetic field and solar wind. As part of this mission ISEE-3 became the first spacecraft to enter halo orbit. It did this by positioning itself at Lagrangian point L1, directly between the sun and the Earth. In 1982, scientists on earth were preparing for the 1986 flyby of Halley’s Comet. ISEE-3 was repurposed as a comet hunter, and renamed International Cometary Explorer (ICE). The craft flew back to Earth and entered lunar orbit, coming within 120km of the moon’s surface. It used this momentum to achieve a heliocentric orbit, on track for two comet encounters. ICE/ISEE-3 encountered Comet Giacobini-Zinner on September 11, 1985, collecting data and becoming the first spacecraft to fly through a comet’s plasma tail. While not considered part of the Halley Armada, ICE/ISEE-3 took measurements as it passed within 28 million km of Comet Halley’s nucleus. Since then, ICE/ISEE-3 has continued on its 355 day heliocentric orbit. It studied coronal mass ejections in the early 90’s, before being shut down in May of 1997. Follow us past the break to learn ICE/ISEE-3’s fate.

Continue reading “Call For Hams And Hackers: Welcome ICE/ISEE-3 Home”

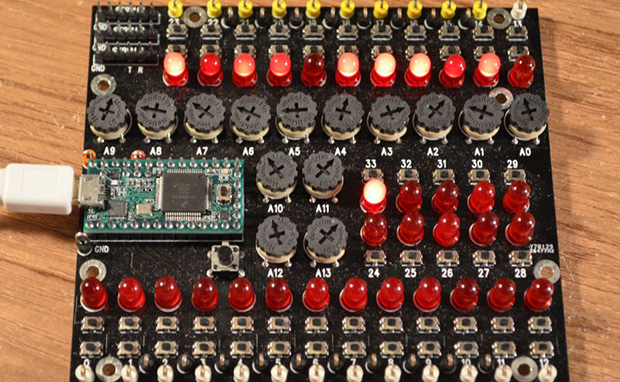
The 128 Button, 6 Axis, 17 Slider, 4 POV Hat Switch Joystick Controller

stick

[Paul Stoffregen], creator of the Teensy series of dev boards, previously implemented a six-axis joystick for Teensyduino, the Arduino library for the Teensy. He had originally tried 8 axes, but a few problems cropped up, deadlines approached, and he left it as is. A few recent projects gave him some insight into how to implement a joystick with more than six axes as a USB HID device, so he started looking at how to read an improbable amount of pots and buttons for a USB joystick.

So far, the biggest problem is figuring out what software can actually use an HID joystick with this many controls. The answer to that question is none. The Linux-based jstest-gtk is able to read 6+17 pots, the four hat switches, but only 64 of the 128 buttons. A user on the Teensy forums, [Pointy], has been working on his own joystick test app that works on Linux Windows, but testing the joystick on Windows is an exercise in futility for reasons no one can figure out.

As for why anyone would want a six-axis, 17-slider, 128-button joystick, think about this: with this much control, it would be relatively simple to build the MIDI controller to end all MIDI controllers, or a cockpit simulator for everything from a C172, 737, to a Kerbal interplanetary cruiser. That’s an impressive amount of control, and all from a $20 Teensy dev board.

Further testing of this Teensy joystick is desperately needed, so if you’re able to help out drop a note in the forum thread.

Troubleshooting A Broken Power Supply

IMG_0657

How many power bricks have died on you? Have you ever tried to fix them? Sometimes it’s easier to grab another one (they grow on trees right?), but wouldn’t it be nice to save the broken ones from filling up landfills? Depending on the cause of death, it could be a super simple fix!

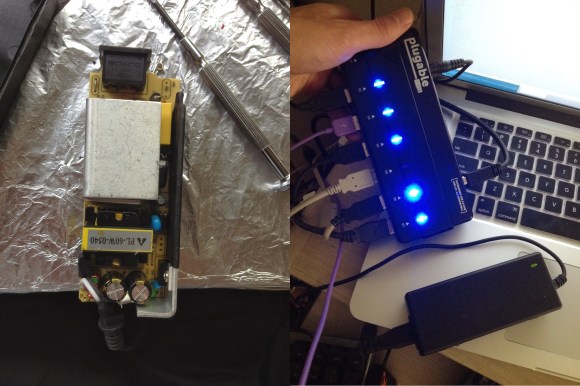
[Chaim-Leib] recently purchased a powered USB hub that came with a beefy 5v, 4A power supply — it worked great — until 6 months later, when it didn’t. The company sent him a new one, and let him keep the faulty one. Looking for a challenge, [Chaim-Leib] decided to crack it open and see if he could fix it himself.

No burnt caps, no fried diodes, no burn marks anywhere in fact! Luckily he spotted the culprit: One lonely resistor had lifted up from its pad. Having never jostled or dropped the power brick, this failure likely came from some kind of stress formed during original assembly — throw in a bunch of hot and cold thermal changes, and pop goes the solder pad!

It was a simple fix with some solder, and he emailed the company photos of his operation — they’ve promised to send them on to the engineering team to further evaluate the problem.

That was easy.

Introducing The FleaFPGA Experimenter’s Board

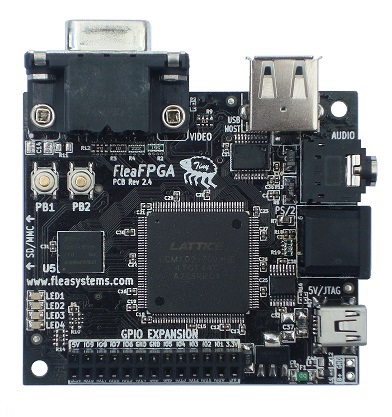
[Valentin] recently tipped us about an FPGA development board he just finished. It is called the FleaFPGA and is aimed to get people interested in the world of Field Programmable Gate Arrays. One of the other reasons that also got [Valentin] to design his own board was that he was frustrated with the existing solutions, them being either too pricey or fairly spare in terms of connectivity.

The main components that you can see in the platform shown above are: a lattice MachX02-7000HE FPGA (6864LUTs), 256Mbits of SDRAM, a USB2.0 host port, a 4096-color VGA connector, a 3.5mm stereo connector, an SD/MMC card slot, a PS/2 keyboard/mouse combo port, a few push buttons and LEDs. An expansion header is also present in order to connect the FleaFPGA to future shields that will be developed. Unfortunately only the board schematics have been released and [Valentin] is currently aiming for a price of $60 per board for <100 quantities. You’ll be able to see a video of the board in action after the break, in which the FPGA has been loaded with a 68000 software core running a variation of the Amiga Juggler Demo.

Continue reading “Introducing The FleaFPGA Experimenter’s Board”

A Clock That Plots Time

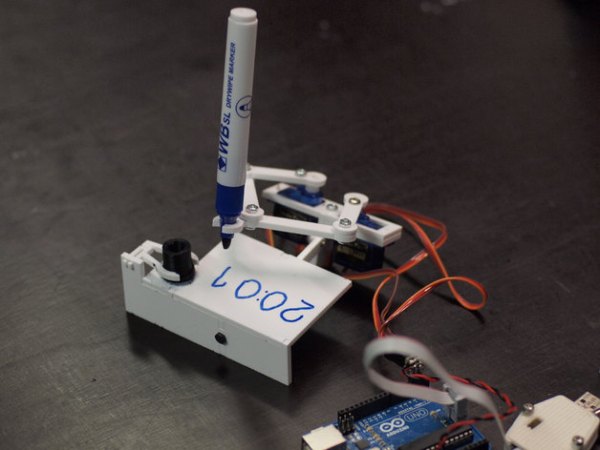
[Johannes] just sent us a tip about his small plotter that plots out the current time.

[Johannes] small clock plotter uses a dry wipe pen to write out the time on a small piece of dry erase board. The design is Made of three small 9g servos, with one to lift the pen off the writing surface and the other two to control a pair of connected jointed arms for the x and y-axis.

The little robot painstakingly wipes away the previous time before scrawling the current time in its place (with minute accuracy).

[Johannes] had hackability in mind when creating this project, making sure to keep to standard parts and making the code and design files available. The hardware for the build can be laser cut or 3D printed. The Arduino sketch can be found on GitHub and the design files can be found on Thingiverse. There are more detailed build instructions on Nuremberg’s FabLab page (translated).  Continue reading “A Clock That Plots Time”

Arduino Powered ECG Informs Users Of Their Death

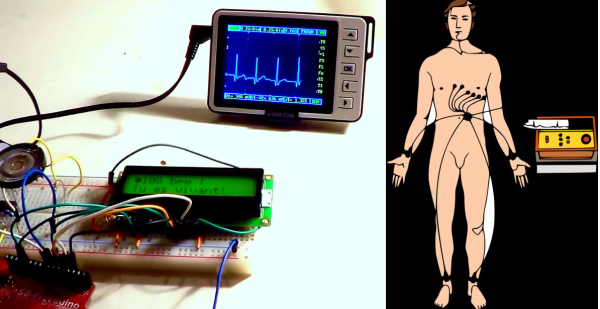
Just when you thought you’d seen an Arduino do everything, [birdyberth] built an Arduino powered Electrocardiogram (ECG or EKG). Electrocardiography is a non invasive method of studying the heart. For many of us that means a 10 minute test during our yearly physical exam. Medical grade ECGs can use up to 10 electrodes. To keep things simple [birdyberth] went the route of a few circuits we’ve seen before, and reduced it to two electrodes and a ground reference. [birdyberth] makes note that the circuit is only safe if battery power is used.

The “heart” of any ECG is an instrumentation amplifier. Instrumentation amplifiers can be thought of as super differential amplifiers. They have buffered inputs, low DC offset, low drift, low noise, high open loop gain, and high impedance among other favorable characteristics. The downside is cost. A typical op amp might cost 0.50 USD in single piece quantities. Instrumentation amplifiers, like [birdyberth’s] INA128 can cost $8.30 or (much) more each. The extra cost is understandable when one thinks about the signals being measured. The ECG is “picking up” the heart’s electrical signals from the outside on skin. On commonly used ECG graph paper, a 1mm square translates to about .1 mV. High gain and clean signals are really needed to get any meaningful data here.

Electrodes are another important part of an ECG. Medical grade ECG units typically use disposable adhesive electrodes that make a strong electrical connection to the skin, and hurt like heck when they’re ripped off by the nurse. [birdyberth] was able to make electrodes using nothing more than tin foil and paper clips. We think the real trick is in the shower gel he used to make an electrical connection to his skin. While messy, the gel provides a low resistance path for the tiny currents to flow.

The actual processing in [birdyberth’s] circuit is easy to follow. The signal from the instrumentation amplifier is sent through a low pass filter, through a 741 op amp, and then on to the Arduino. The Arduino uses a 16×2 LCD to display heart rate in beats per minute, along with a friendly message informing you if you are alive or dead. The circuit even provides audible feedback for heart beats, and the classic “flatline tone” when the users either disconnects the electrodes or expires. [birdyberth] has also plugged in his pocket oscilloscope just after the low pass filter. As his video shows, the familiar ECG waveform is clearly visible. We’d love to see a more complex version of this hack combined with [Addie’s] heart simulator, so we could know exactly which heart malady is killing us in real time!

Continue reading “Arduino Powered ECG Informs Users Of Their Death”

Mini-Forge On A Budget

7

Feeling a little black-smithy? Ever wanted to hammer some red-hot steel into a new shape? Turns out, it’s well within your reach!

We’ve seen soup can forges, paint can forges, and even full blown coal fired forges — but none quite as simple as this. All you need is a fire brick — and some tools.

The problem is, fire bricks are kind of fragile. In order to drill into it without cracking the brick [Mike] advises us to clamp it in a wooden jig to help support it. Slowly drill a long hole lengthwise in it, slightly oblong to allow for your work piece to go inside. Flip the brick sideways, and add a second perpendicular hole in order to insert your gas torch of choice.

Now before you go heating it up, it is wise to reinforce the brick by wrapping some wire around it to prevent it from falling apart when it inevitably cracks due to temperature changes. A more permanent solution is to encase the entire brick in concrete to make it more durable, which [Mike] plans on doing next time. Continue reading “Mini-Forge On A Budget”