From Schematic To PCB In Four Hours

lpkf_metrix

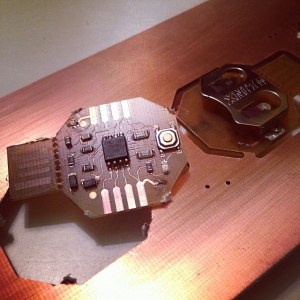
Last super bowl Sunday, instead of checking the game, [Mattw] decided to extend a design and make a PCB of a trinket clone. [Mattw] altered a trinket clone design by [Morgan Penfield Redfield] to shrink it down, perforated the USB connector to allow for easy removal and put most of the parts on a single layer.

After finalizing the design, [Mattw] put it into the LPKF Protolaser S that Seattle’s Metrix Create Space has. For those of you who don’t know, the LPKF protolaser uses a laser to directly ablate off the copper from the boards.  This makes prototyping much faster without the need for a lot of nasty chemicals.

About six minutes in the Protolaser, some component placement by hand followed by a run through their reflow oven and [Mattw] had three boards ready to be tested. All told, about 4 hours from start to finish.

The end circuit looks great and the LPKF protolaser gives us a case of serious tool envy. If you’re like us and don’t have access to the fancy laser you might try our hand at this high-resolutino photo-etch process.

[via reddit]

Motion Tracking On The Cheap With A PIC

motion tracking

Ever need a cheap motion tracker for very basic object following? Did you know you can throw one together with a few IR distance sensors and a PIC?

The setup is fairly simple. [Aron Horan] is using a dsPIC30F4011 PIC, a SHARP infrared distance sensor, an RC servo, and a PICkit2 for testing. It works by scanning left and right using the servo motor. When the edge of an object is detected, it will turn away from the object until it can no longer detect the edge — then it turns back. Unfortunately this does mean it will always be twitching, even when it’s tracking an object.

Like many of the other projects [Aron] has documented, he’s included everything you need to know to be able to recreate the project yourself. Flowcharts, wiring diagrams, and the code — written in C of course! The following video includes an excellent demonstration, but if you want to skip straight to the action, you can see it start tracking a multimeter at about 0:39 in.

Continue reading “Motion Tracking On The Cheap With A PIC”

Thrust-Vectoring Hovercraft On A Budget

FANEWZ5HRH0XXYR.MEDIUM

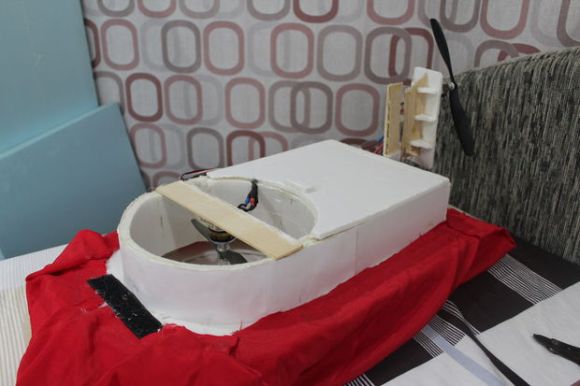
Looking for a fun little experiment in thrust vectoring? [Saral Tayal] has come up with what he thinks is the first style of thrust vectoring hovercraft.

A typical hovercraft uses one or two drives, one to hover, one to direct movement — or one for both, diverted to the two outputs. [Saral’s] toy hovercraft uses two, but unlike traditional designs, instead of having a rudder on the back to direct the airflow for steering, he steers the entire fan assembly. On a full size hovercraft, this could be a lot of fun.

It’s a pretty simple project that you could quite easily build on a weekend — if you’ve got RC parts kicking around, even easier! He’s using two brushless motors with ESCs, a 9g servo, and a small RC transmitter/receiver. The props come from a regular RC plane — just pick one suitable for the motor being used. Depending on what you have on hand, this project will be under $100 to build. The rest is mostly foam-board, balsa wood, and glue.

Check out the following video to see how it hovers!

Continue reading “Thrust-Vectoring Hovercraft On A Budget”

Shenzhen Tour And UnHuman Soldering Classes With DP

dp-hacker-camp

If you’re free the first week of April and don’t mind sitting on a plane for a looooong time you should check out the Hacker Camp that Dangerous Prototypes is planning. We’re sure you remember [Ian Lesnet] who is a Hackaday Alum, creator of the Bus Pirate, and geeky world traveler. Now’s your chance to try out what to him is a way of life.

The event is April 3-5 in Shenzhen, China. Although marketed as a “Hacker Camp”, to us it sounds more like training for those interested in running hardware companies that use the Shenzhen manufacturing district as the anchor of their supply chain. Part of the prep-work for the trip includes submitting board files which will be fabbed and ready for you on the first day. [Ian] and his crew will be your guides for the culture of the area; complete with meals and bar time. But there are also soldering workshops as part of the package. Don’t pooh-pooh the idea. This is unhuman soldering… BGA and QFN soldering instruction from the people who repair cellphones and other microelectronics.

This [Rick Steves] style adventure is the first that we remember hearing about that targets the open hardware community. But we must admit, it sounds like a lot more fun than a European river cruise!

[Thanks Akiba]

Wearing A Homemade EKG Whilst Base Jumping!

video.overlay

[Andrew Wilson] is a pretty extreme guy. He base jumps for fun, and is also a hacker. And while you can try to explain the awesome adrenaline rush that comes with this kind of extreme hobby, it’d be nice if you could show it off, you know, quantitatively. So, he decided to make his own EKG, pair it with his GoPro, and go for a jump!

An EKG is an electrocardiogram — a fancy term for a heart rate monitor — and [Andrew’s] has built his own using a small instrument amplifier circuit. This circuit amplifies the differential signal put out by your heart. The data are fed through an ADC on an Arduino Uno, and then saved to a SD card. He also added a piezo buzzer to try to help sync the data to the video — unfortunately it was too quiet for the GoPro to pick up. So for now he’s stuck with pressing record and start on his EKG at the same time.

Once he was satisfied with a few safe tests, he decided to take it for a base jump. For our viewing pleasure, he’s taken the data collected from the EKG and post-processed it into a nice scrolling graph overlay for the video.

We guarantee your hands will get sweaty as his heart rate goes up as he prepares to make the plunge.

Continue reading “Wearing A Homemade EKG Whilst Base Jumping!”

Update: Tetris Handheld Get PCB And Case

update-handheld-tetris

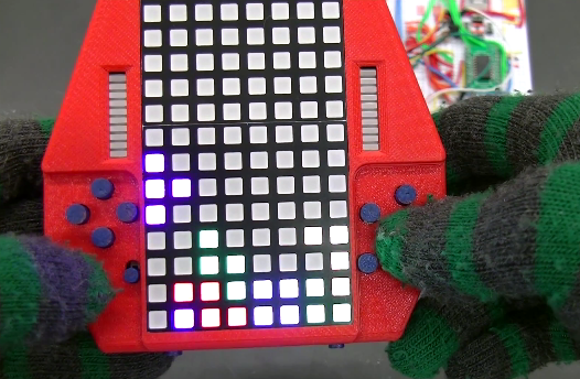
Check out this sweet-piece of homemade handheld gaming! [Jianan Li] has been hard at work on the project and published the updates in two parts, one that shows off the PCB he had fabbed for the project, and another which details the 3D printed case. This is, of course, is the culmination of the Tetris project we first saw as an incredbily packed, yet thouroughly tidy breadboarded circuit.

We really enjoy the 8-sided PCB design which hosts all the parts and gives you a place to hold and control the unit, all without seeming to waste much real estate. The case itself is quite impressive. The openings for the square-pixel LED matrices (the original design had round pixels) and the bar graphs all have nice bevel features around them. The control area has a pleasant swooping cutout, with blue buttons which stand out nicely against the red. Check out the slider switch by his left thumb. He printed matching covers for this slider, and the two that stick out the bottom. Also on the bottom are female pin headers so that you don’t need to disassemble the case to interface with the electronics.

All of this and more are shown off in the clip after the break.

Continue reading “Update: Tetris Handheld Get PCB And Case”

4 Axis Delta Router Says Hello World

deltaRouter

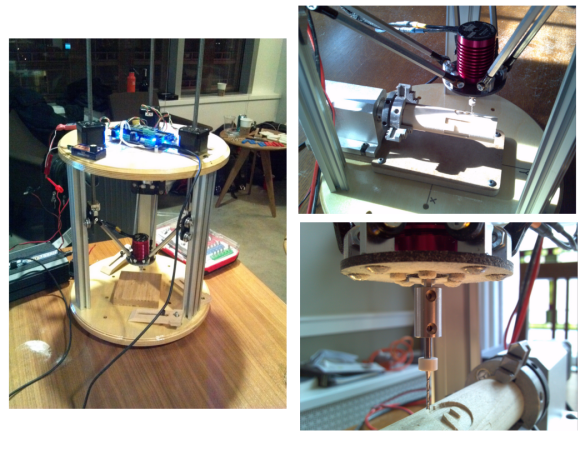
[Bart] stood upon the shoulders of the delta 3D printer giants and created this 4 axis delta router. The router was originally created for ORD Camp, an invite only hackers gathering. Each year he creates a new thing with one main purpose: to spark conversation. In his own words “Practicality and suitability are way down the list, so go ahead and snark away. If you do, you are missing the point.”

[Bart] did things a bit differently with his delta. For motors, he went with non captive steppers. “Non captive” means that rather than a shaft, the motor has a hollow threaded nut which rotates. A lead screw (usually with an acme thread) is passed through this nut. As the motor’s nut turns, the screw is pushed or pulled through the motor, creating a linear actuator. The only major downside is that a non captive stepper motor can’t be adjusted by hand. The screw doesn’t turn and neither do any external parts of the motor. For structure, the router uses MakerSlide and v-grove wheels. The spindle is a simple brushless hobby motor and 30 amp speed control. Rather than the outrunner motors we’ve seen lately, [Bart] wisely chose an inrunner motor normally used on R/C cars. Inrunners generally have less torque than their outrunner counterparts, but they make up for this in RPM. [Bart’s] motor is capable of 30,000 RPM, which is plenty for spindle duty. We think the motor bearings will probably need an upgrade, as the original motor bearings weren’t designed for side loads. For a controller, [Bart] utilized an  Azteeg X3 running Repetier.

The router made a great showing at camp, and [Bart] decided it needed a 4th axis. He sourced a rotary axis from eBay. To keep the software simple, he connected the rotary axis to the extruder outputs on his controller. He was then able to hack the mach3 wrapped rotary post processor to output extruder commands. The results look great. [Bart] says the system definitely needs a tailstock, and we agree. We’re looking forward to the next update on this machine!

Continue reading “4 Axis Delta Router Says Hello World”