3D Printing Metal Structures With A 6-axis Robot

robot printer

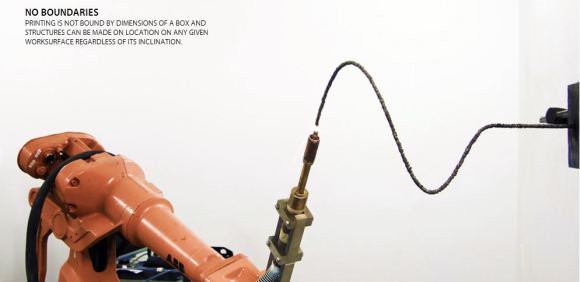
[Joris Laarman] is working on a project called the MX3D-Metal which uses an ABB industrial robot arm and a welding machine to create strong metal structures on any working surface and in any direction.

He started last year with the MX3D Resin printer, which is the exact same concept, but instead of metal, it uses a two-part epoxy that bonds instantly upon mixing. Their lab is located in Amsterdam, and they work closely with IAAC (the Institute for Advanced Architecture of Catalonia) — Autodesk provides funding for the research.

[Joris] has successfully printed complex structures using steel, stainless steel, bronze, copper, and even aluminum. Poking around their website you can find many examples of different things they have printed, including intricate matrices of multiple curved lines which end up looking more organic than mechanical. It uses mostly the same concept as the Rostock Welding robot we covered a few months ago, which is open source and fairly cheap to make at home!

Stick around for a video of both the MX3D-Metal and Resin robot printers in action!

Continue reading “3D Printing Metal Structures With A 6-axis Robot”

We Salute The Television Tube Flag

From [Gijs] comes Beeldbuis Vlag Tijsdlijn, or television tube flag (Translated). We’re not up on our Dutch, but it appears that [Gijs] and friends have created a television tube which waves much like a flag in response to airflow from a fan.  The effect is pretty darn amazing, and that’s putting it mildly. To create this hack, [Gijs] built a modified Wobbulator. The Wobbulator is an early video synthesizer which used added steering coils to modify the operation of a standard TV tube. When excited, the coils would deflect the tube’s electron beam, causing some rather trippy images to appear on-screen. (Yes, here at Hackaday “trippy” is a scientific term).

[Gijs] wanted his screen to be “waved” by a fan, just like a flag would wave. To do this he used an anemometer made of ping-pong ball halves. The anemometer spins up a DC motor from a CD-ROM drive. In this application, the motor acts as a generator, creating a DC voltage. An ATmega328 running the Arduino code reads the voltage from the motor. If the anemometer is spinning, the Arduino then outputs a sinusoidal value. The Arduino’s output is amplified and applied to the coil on the CRT. A network of power resistors ensures the amplifier is correctly loaded. The results speak for themselves. In the video after the break, the tube flag is displaying a slide show of photographs of its construction. As an added hack, [Gijs] used an Arduino Leonardo as a USB keyboard. When the anemometer spins, the primary ATmega328 sends a signal to the Leonardo, which then emulates a push of the arrow keys on the host computer. This lets the tube flag advance its own images. Very cool work indeed!

Continue reading “We Salute The Television Tube Flag”

Guest Post: Try Radar For Your Next Project

Sensors. The low-end stuff that we can get our hands on usually suffers from poor range, lack of sensitivity, and no way to characterize what the target is. But today we can use the good stuff that, until recently, was only available to military: radar. In this post we will discuss how radar works, commercially available small radar devices, and where to learn more to help make it easy to add radar to your next project. Reach out and sense something!
Continue reading “Guest Post: Try Radar For Your Next Project”

LuxBlaster: Blast A Beam Of Light At The Most Intense Light Source

HighBeams

[Hazim] wrote in to tell us about his project that teaches inconsiderate drivers a lesson! Well, theoretically. The LuxBlaster is a spot light which points towards the most intense light source.

The idea is that you can blast drivers who do not turn their high-beams off with a reverse high-beam of your own. It is very important to note that this should never be used, as [Hazim] also clearly states. While this project is meant to prove that it can be done (a “what if”) project, it has two components that are very well done and can easily be used in different projects: the Arduino controlled spotlight and the light intensity tracker.

What would you use an Arduino controlled spotlight for? Smart lighting? What about a light source tracker? Let us know in the comments.

Continue reading “LuxBlaster: Blast A Beam Of Light At The Most Intense Light Source”

BRAIGO – A Lego Braille Printer

Accessibility devices tend to be prohibitively expensive, and it’s always nice to see a hacker apply their skills to making these devices more affordable. BRAIGO is a low cost braille printer by [Shubham Banerjee]. He built the printer using parts from the LEGO Mindstorms EV3 kit, with a few additions. This LEGO kit retails for $349, and a standard braille printer costs over $2000.

The BRAIGO print head uses weights and a pin to punch holes in standard calculator paper rolls. LEGO motors are used to feed the paper and align the head for accurate printing. It takes about 5 to 7 seconds to print each letter, which are entered on the Mindstorms controller.

While this is a great prototype, [Shubham] intends to continue development with the goal of creating an affordable braille printer. He’s a bit swamped with media requests right now, but is working on releasing BRAIGO as an open source project so others can contribute. It’s an impressive project, especially for a 12 year old student. After the break, watch the BRAIGO do some printing.

Continue reading “BRAIGO – A Lego Braille Printer”

An Arduino Programmable Load

Having a big block of hot to dump current into is a very useful thing to have if you’re testing batteries, power supplies, high power LEDs, electroplating, or any thing else that would normally require a huge resistor. [Jakub] found himself in need of an electronic load, and instead of a transistor and a pot, decided to make something more automatic: a programmable load built around an Arduino shield.

The idea behind this load is pretty simple: connect a device to a FET and shunt resistor to measure current. Drive the gate of the FET with an op-amp that maintains either constant current or constant voltage. Control everything with a DAC, and you have a programmable load controlled by an Arduino.

With such a small form factor, getting rid of all that heat was bound to be a problem. For this, [Jakub] is using a 50×50 mm BGA style heat sink with a 5V fan. If it’s good enough for a big CPU, it should be able to handle dumping 70 Watts into a FET. There’s also a conservative application of thermal paste and a very small thermistor underneath the FET that’s able to be read by the Arduino. It might slowly heat up your room, but it’s not going to catch fire.

With the Arduino sketches [Jakub] wrote for his load he was able to characterize a pair of Idea batteries and figure out how much charge a three-year-old recyclable battery had. It’s a great piece of work, and if [Jakub] is willing to go through the hassle of a Kickstarter, it would make a fine crowdfunded product.

The BitBox Console Gets Upgraded

BitBox Rev2

The Bitbox, an open source game console, has received a number of updates in the past couple of months. Last time we covered this DIY console, [Makapuf] had just managed to get the first revision to run a simple game. The second revision will increase the colors to 32k, add another channel of sound for stereo, switch controllers from PS2 to USB, and add support for Olimex’s UEXT expansion devices.

While the hardware upgrades are impressive, there’s been a lot of work on the Bitbox software as well. A new game demo called Fire was created as a set of tutorials to help people start developing for the console. There’s also a BitBoy, a GameBoy emulator for the Bitbox. BitBoy is a ported version of gnuboy for the ARM Cortex-M4 processor that powers the Bitbox. It successfully emulates a number of commercial GameBoy ROMs.

We’re looking forward to seeing what’s next for the Bitbox. After the break, check out a video of BitBoy running on the Bitbox.

Continue reading “The BitBox Console Gets Upgraded”