Sci-Fi Contest Roundup: I Am Iron Man

Back when Iron Man 2 and The Avengers were out in theaters, the Hackaday tip line couldn’t go a week without an arc reactor build being submitted. In keeping with the Internet’s fascination with blinkey glowey things, we expected a huge influx of arc reactors for our Sci-Fi contest. We were pleasantly surprised: all the submissions from the Marvel universe are top-notch, and the two Iron Man entries we have are simply amazing.

Motorized Helmet

1
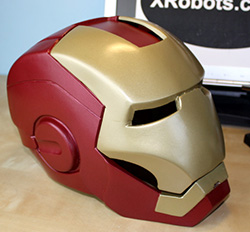
[James Bruton] is working on a replica of the Iron Man movie helmet, complete with a motorized face plate, light up eyes, and an OLED display for a reasonable facsimile of the horribly unrealistic on-screen heads-up display.

While a few bits and bobs of the mechanics were 3D printed, [James] is making the majority of the helmet just as how the on-screen version was made. The helmet was first carved out of sheet foam, then molded and cast into very strong rigid fiberglass. [James] put up a great tutorial series on how he did this and other parts of his Iron Man costume.

Anamatronic

2
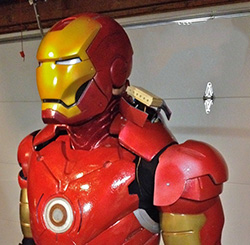
The other Iron Man costume from [jeromekelty] and [Greg Hatter] doesn’t stop at just the helmet. They’re doing everything: shoulder-mounted rocket pods, hip pods, forearm missiles, back flaps, and boots with a satisfying electronic kerthunk sounding with every step.

Inside the custom molded suit are at least four Arduinos, four XBees, an Adafruit WaveShield, and at least 20 servos for all of the Iron Man suit components. The mechanics are actuated via RFID with a tag in a glove; when the wearer waves their hand over some part of the suit, one of the mechanical features are activated.

It’s impressive to say the least, and one of the best documented projects we’ve seen in the Sci-Fi contest.

There’s still time to put together your own Sci-Fi project for the contest. Grab your soldering iron and fiberglass resin, because there’s some seriously great prizes up for grabs.


A High-Speed Logic Gate Board For The Easy-Phi Project

A (long) while ago I presented you the Easy-phi project, which aims at building a simple, cheap but intelligent rack-based open hardware/software platform for hobbyists. With this project, you simply have a rack to which you add cards (like the one shown above) that perform the functions you want.

During these last months my team has been finishing the design and production of several different boards so I’ll start showing them off during these next weeks. Today I present you the High Speed Logic Gate Board, a quantum-physicist requested easy-phi module that can perform logic AND/OR functions at <2GHz speeds. This quite technical write-up is mainly about the constraints that high-speed signals pose for schematics design but is also about the techniques that are used for HS signals termination and monitoring. I hope, however, it’ll give our readers a nice overview of what the insides of a high-speed system may look like. All the files used for this board may be found on the official GitHub repository.

HexDrake — A Low Cost 2-DOF Hexapod

hexdrake low cost hexapod

[David’s] been making robots since he was 16. After conquering the basics, he wanted to build something a bit more interesting than a simple wheeled-robot — he wanted to buy a hexapod but they were too expensive — so he decided to design his own low-cost version!

It’s made out of hand-cut wood, SG90 servos, an Arduino and a 16-channel servo controller. A 2.4GHz remote control sends commands to the Arduino which then communicates to the USC servo controller, allowing for intricate control of the 14 servos that make up the HexDrake.

He’s also added a few LED arrays for the eyes of his robot, which in the future will be animated to give expression to his little hexapod.

It’s an extremely well built little bot, and [David’s] made a very in-depth Instructable for anyone who would like to follow in his footsteps. Stick around after the break to see it scurry around!

Continue reading “HexDrake — A Low Cost 2-DOF Hexapod”

Building EL Displays On A PCB

EL
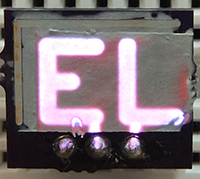
Elecrolumiscent displays have seen a huge swing in popularity recently, but only in limited forms like EL wire or flat EL panels. You can, of course, cut and bend these wires and panels to suit any purpose, but custom shaped EL displays are just the bee’s knees. They’re not hard to fabricate, either: with cheap custom PCBs, all it takes to make custom EL panels is just a few chemicals.

[Nick]’s method of fabricating custom EL displays uses an exposed copper layer on a PCB you’d pick up from OSHpark or any of the random board houses in China. The process consists of designing a display – be it a few letters, pixels, or a seven-segment arrangement. The display ‘stack’ is a layer of painted-on dialectric, a phospor, and finally a translucent conductive ink that connects the display segments to ground. It looks like an extremely easy process, and from the pictures it looks like [Nick] is making some EL displays of reasonable quality.

[Nick]’s work was inspired by the grand poobah of homebrew electrolumiscent displays, [Jeri Ellsworth], who managed to make a similar EL pixel on a PCB. [Nick]’s display looks great, though, and with a little work some custom segment displays should be very possible.

Morphex Ready To Roll

Sphere Morphing Hexabot Takes On The Wilderness

[Zenta’s] sphere morphing hexabot, the MorpHex, continues to impress us. He’s just released a video showing it off — by having it roll down a hill!

We’ve been following the MorpHex since 2011, and it really is an amazing project — especially when it started to roll around on its own! In this latest update, [Zenta] was trying to get a good outdoor test video, as he’s never seen a hexapod robot roll down a hill. The video (and rolling) goes smoothly until about 3 minutes 36 seconds in, when the MorpHex experiences a catastrophic inner body servo failure!

Surprisingly, it didn’t fail during its tumble down the hill, but when it was just walking around afterwards. [Zenta] attributes it to a poor quality servo and had bad feelings about it breaking previously. Not fixing it earlier resulted in having to spend 10 hours of his Easter holiday taking Morphex apart and repairing it! Just goes to show… don’t wait until it’s too late to fix something!

Continue reading “Sphere Morphing Hexabot Takes On The Wilderness”

Simple Hack Creates An Inverted Watch Display

Before and after of a negative display watch conversion

Sometimes you have to bust out the wayback machine to find a good hack. Back in 2008, [Brian] performed this awesome negative display hack on his classic Casio G-Shock watch. The G-Shock, like most digital watches, uses a twisted nematic LCD. All Liquid Crystal Displays are made up of a layer cake of polarizers, glass, and liquid crystal. In non touchscreen displays, the top layer is a sheet of polarizing film glued down with an optical quality adhesive.

[Brian] disassembled his watch to reveal the LCD panel. Removing the glued down polarizing film can be a difficult task. Pull too hard and the thin glass layers will crack, rendering the display useless. After some patient work with an X-acto knife [Brian] was able to remove the film.

Much like the privacy monitor hack, the naked watch appeared to be off. Holding a sheet of linear polarizing film between the watch and the viewer reveals the time. If the film is rotated 90 degrees, the entire screen is color inverted. [Brian] liked the aesthetics of the inverted screen, so he glued down his polarizing film in the offset position. After reassembly, [Brian’s] “customized” watch was ready to wear.

[Via Hacker News]

Measuring Light With ChipKIT

light meter showing LUX value

How does one go about measuring the amount of light in a given area? With a Light Meter of course! Maintaining proper lighting levels can be very important in places like schools, hospitals and even your own workbench.

[Raj] over at Embedded Labs has put together an excellent tutorial on how to construct your very own light meter based upon the chipKIT platform. The chipKIT Uno32 is similar to Arduino, but boasts a much more powerful PIC32MX320F128 microcontroller.  We’ve seen projects that feature the chipKIT Uno (pdf warning) here before. From playing pong to hosting several temperature sensors, it’s certainly a versatile platform.

The light meter uses an I/O shield and communicates to a BH1750FVI digital light sensor via I2C. The firmware divides the raw data coming off the sensor by a constant, and displays the light intensity data on an OLED display in Lux, foot-candles, and Watts/m^2 units. Be sure to check out the tutorial for full schematics and source.