Retrotechtacular: Designing And Building RCA Televisions

waveform
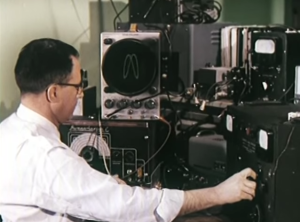
While it’s almost cliché to say they don’t make things like they used to, this week’s Retrotechtacular offers fairly conclusive proof that, at the very least, they used to put more time and effort into manufacturing consumer electronics. Gather your homemade wisecrackin’ robots and settle in front of this 1959 film entitled “The Reasons Why”, a rah-rah film created for new employees of the RCA Victor television division.

It may open with a jingle, but things quickly turn serious. Quality is no laughing matter for the men and women devoted to bringing you the best television set for your money. This type of unmatched excellence begins with tireless R&D into improving sound and picture quality. Every transformer is tested at five times the rated voltage, and every capacitor at two times the rating. Every switch undergoes a series of mechanical tests, including a pressured steam bath to ensure they will hold up even if you drag your set out to the porch some unbearably hot deep South August night.

hot august nights

Cabinet design is just as important—what’s the use in housing a chassis and kinescope that’ll last for 60 years in some cheap box? Woods from all over the world are carefully considered for their beauty and durability. A television set is, after all, the centerpiece of the American family room furniture group. These carefully selected woods are baked in a series of ovens to prove they’ll stand up to hours of continuous use.

Continue reading “Retrotechtacular: Designing And Building RCA Televisions”

16-Bobbin Rope Braiding Machine Inspired By Surplus Store Find

When the Red Bull Creation build days were past, [David] pulled us aside and asked if we wanted to see the mechanical hack he’s been working on. He built this rope braiding machine, which uses 16 bobbins, with help from his brother [Jed].

Ideas for projects always come from funny places. [David] came up with this one after finding a rope braiding machine at Ax-man Surplus. This outlet, located in the Twin Cities (Minneapolis/St. Paul, Minnesota) has been the origin for innumerable hacks. Just one that comes to mind is this electric scooter project from the ’90s.

[David] wanted to understand how the mechanism, which divides the bobbins up into groups of orbiting spools, actually works. It’s both mesmerizing and quite tough to visualize how it works without really getting in there and looking at the gearing. Thankfully you can do just that if he follows through with his plan to turn this into a kit.

In case you don’t recognize him, [David] was on the 1.21 Jigawatt’s team during this year’s Creation. We’ve also seen a couple of hacks from him in the past like this half-tone drum printer, and this bicycle frame welding jig.

Changing Unipolar Steppers To Bipolar

If you’ve been a good little hacker and have been tearing apart old printers like you’re supposed to, you’ve probably run across more than a few stepper motors. These motors come in a variety of flavors, from the four-wire deals you find in 3D printer builds, to motors with five or six wires. Unipolar motors – the ones with more than four wires – are easier to control, but are severely limited in generating torque. Luckily, you can use any unipolar motor as a more efficient bipolar motor with a simple xacto knife modification.

The extra wires in a unipolar motor are taps for each of the coils. Simply ignoring these wires and using the two coils independently makes the motor more efficient at generating torque.

[Jangeox] did a little experiment in taking a unipolar motor, cutting the trace to the coil taps, and measuring the before and after torque. The results are impressive: as a unipolar motor, the motor has about 380 gcm of torque. In bipolar mode, the same motor has 800 gcm of torque. You can check that video out below.

Continue reading “Changing Unipolar Steppers To Bipolar”

Hijacking Chromecast With The Rickmote Controller

rick-astelyWith a simple $35 dongle that plugs right into your TV, it’s possible to enjoy your favorite TV shows, YouTube channels, and everything else Chromecast has to offer. Being a WiFi enabled device, it’s also possible to hijack a Chromecast, forcing your neighbors to watch [Rick Astley] say he’s never going to give you up.

The rickmote, as this horrible device is called, runs on a Raspberry Pi and does a lot of WiFi shennaigans to highjack a Chromecast. First, all the wireless networks within range of the rickmote are deauthenticated. When this happens, Chromecast devices generally freak out and try to automatically reconfigure themselves and accept commands from anyone within proximity. The rickmote is more than happy to provide these commands to any Chromecast device, in the form of the hit song from 1987 and 2008.

Video demo of the rickmote below, along with a talk from ToorCon describing how the hijacking actually works.

Continue reading “Hijacking Chromecast With The Rickmote Controller”

Clay 3D Printer Keeps It Simple

Clay 3D Printer

Artist [Jonathan] has built a 3D printer specifically for printing in clay. The part count is kept to a minimum and the printer was designed to be made with basic tools and beginner skills. The intent was to not require access to a plastic 3D printer in order to build this printer. Although this build’s goal was clay printing, the extruder could certainly be swapped out for a typical plastic printer version.

This Delta uses quite a bit of MDF. The top and bottom plates are MDF, as are the bearing carriages and extruder mount plate. 12mm rods are solely responsible for the support between the top and bottoms plates as well providing a surface for the LM12UU linear bearings. These bearings are zip tied to the MDF bearing carriages. The 6 arms that support the extruder mount plate are made from aluminum tubing and Traxxas RC car rod-ends. NEMA17 motors and GT2 belts and pulleys are the method used to move the machine around.

Getting the clay to dispense was a tricky task. Parts scavenged from a pneumatic dispensing gun was used. If you are unfamiliar with this type of tool, think: Power Caulk Gun. Clay is fed into the re-fillable syringes and an air compressor provides the 30 psi required to force the clay out of the nozzle. The pressure alone controls the rate of clay flow so it is a little finicky to get the extrusion rate correct. Depending on the size of the final sculpture, 1 to 2mm diameter nozzles could be used. For larger work, 1mm layer height works well. For the smaller pieces, 0.5mm is the preferred layer height.

Continue reading “Clay 3D Printer Keeps It Simple”

Building A True Unix Keyboard

keyboard

compact keyboards that do away with a third of the keys you would usually find on a normal-sized keyboard are all the rage now, but for [jonhiggs], they weren’t good enough. There is a long tradition of Unix shortcuts these compact keyboards don’t pay attention to – CTRL-A being the Home key, and CTRL-D being the Page Down key. To fix this horrible oversight of Unix history, [jon] tore apart one of these compact keyboards, rewired the switch matrix, and made his own perfect keyboard.

The keyboard [jon] is using is a Filco Minila, a very nice and high quality keyboard in its own right.  After mapping out the switch matrix, [jon] wired all the switches up to a Teensy 2.0 loaded up with the TMK firmware. This is a pretty standard way of building a custom keyboard, and [jon] could have just cut a switch plate and installed panel-mount switches and wired up the matrix and diodes point to point. The case for the keyboard is constructed out of Lego.

Because this is a true, modern Unix keyboard, [jon] needed to connect this keyboard to a box running his *nix of choice. He’s doing this in the most future-retro way possible, with an Amazon EC2 instance. This project isn’t done yet, and [jon] is hoping to add an ARM dev board, an iPad Retina display, battery, and SSD, turning this into a completely homebrew laptop designed around [jon]’s needs.

Aquarium with variable LEDs

18-Channel PWM Aquarium Lights Provide Habitat-Like Life For Fish

Whether you want to keep your fish happy or just need a good light show, this aquarium light fits the bill. It is the second iteration, but [William] calls it v1. That’s because v0 — which used a few loops of LED strips — never really met his requirements.

This build uses just six LEDs, each a 30 Watt RGB monster! To source about 350 mA for each, and to control brightness with 18-channels of pulse width modulation, he had to plan very carefully. This meant a proper aluminum project box and a beefy, fan-cooled power supply.

The driver board is his own design, and he etched a huge board to hold all of the components. Everything is driven by an Arduino Mega, which has 16 hardware PWM channels; two short of what he needed. Because of this he had to spend a bit of time figuring out how best to bit-bang the signals. But he’s putting them to good use, with fish-pleasing modes like “sunset” or the “passing rainbow” pattern which is shown in the image above.

If you need something a little less traditional why not house your fish in a computer case, complete with LED marquee for displaying data.