Improving A Homebrew CT Scanner With Barium

CTscanner

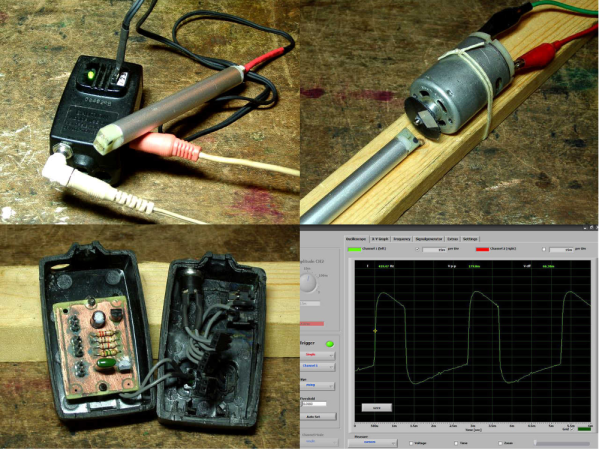
[Peter] has been working on his homebrew CT scanner for a while, and it’s finally become something more than a spinning torus of plywood. He’s managed to image the inside of a few pieces of produce using an off-the-shelf radiation detector and a radioactive barium source

When we last saw [Peter]’s CT scanner, he had finished the mechanical and electronic part of the Stargate-like device, but the radioactive source was still out of reach. He had initially planned on using either cadmium 109 or barium 133. Both of these presented a few problems for the CT scanner.

The sensor [Peter] is a silicon photodiode high energy particle detector from Radiation Watch this detector was calibrated for cesium with a detection threshold of around 80keV. This just wasn’t sensitive enough to detect 22keV emissions from Cd109, but a small add-on board to the sensor can recalibrate the threshold of the sensor down to the noise floor.

Still, cadmium 109 just wasn’t giving [Peter] the results he wanted, resulting in a switch to barium 133. This was a much hotter source (but still negligible in the grand scheme of radioactivity) that allowed for a much better signal to noise ratio and shorter scans.

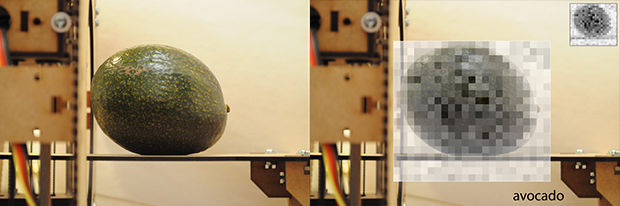
With a good source, [Peter] started to acquire some data on the internals of some fruit around his house. It’s still a slow process with very low resolution – the avocado in the pic above has 5mm resolution with an acquisition time of over an hour – but the whole thing works, imaging the internal structure of a bell pepper surprisingly well.

3D Printering: Making A Thing With Solidworks, Part II

printering1

Last week we started to Make a Thing  in Solidworks.  We got as far as sketching and extruding the base. This week we’ll make the back portion. We’ll use some of the same techniques in Part I and a few new features such as 3D filleting and the Hole Wizard.

As you know, this is not the first ‘Making a Thing’ tutorial. In case you missed them, the softwares previously covered in the 3D Printering series are:

engineeringdrawingblack1

Continue reading “3D Printering: Making A Thing With Solidworks, Part II”

Wireless AC Control With The Raspberry Pi

We’ve seen some of [Connor]’s work before, and it looks like he’s now turning to product design. He’s come up with an adapter for the Raspberry Pi to control a few wireless wall socket relays, allowing anyone with a Pi to control lights, coffee makers, TVs, and anything else that falls under the very broad home automation banner.

The system uses a 315MHz radio breakout board for a Raspberry Pi to control the relays in one of three wall socket adapters. There’s a script running on the Pi with a very nice GUI to turn the lights on and off.

[Connor]’s product is extremely similar to a certain WiFi-enabled wall-plug relay system controlled by a smartphone, and to that end, he’s decided to call his device the Belchin’ Emo Switch. The name might need work, but he’s selling three Raspberry Pi-controlled wall plugs for the same price of one wall plug from Brand A.

Below you’ll find [Connor]’s videos for his device. You can also check out this reddit thread where he shows off just how open source he can be; there are part suppliers and even how he’s packaging this system for shipment.

Continue reading “Wireless AC Control With The Raspberry Pi”

Get Your Hackerspace A 3D Printer

logo

LulzBot is yet again giving away a few of their very fancy and well-reviewed 3D printers away to a few hackerspaces.

This isn’t the first time LulzBot has given away a few of their printers; a year and a half ago, they gave away eight AO-100 printers and they also donated one to our ‘ol buddy [Caleb] for TheControllerProject, a forum to connect disabled gamers to people who have the means and ability to make custom gaming controllers.

The rules for this giveaway are simple: Be a hackerspace, and display, “creativity and contributions to the free software and open hardware community.” It’s as simple as that. If you’re a hackerspace without a 3D printer – which would be somewhat astounding at this point – here’s your chance to get one of the best 3D printers around.

The contest will be open starting March 1 and ends on March 14, with entry requiring a hackerspace fill out a form somewhere on the LulzBot servers.

Confuse The Birds With This Daylight Simulation System

F7WW1DAHQP02H5D.LARGE

Hackers love a challenge. So when [Patrick’s] father-in-law asked him to look into a daylight simulation system for his bird breeding cages, [Patrick] quickly discovered the ridiculous prices for commercial systems… so he convinced his father-in-law to let him design and build one instead.

Like any project, [Patrick] quickly listed the requirements of the system before starting anything.

  • It must brighten gradually in the morning
  • Stay constant throughout the day
  • Dim in the evening to a very low intensity

In addition to this, the lighting transition should be smooth, and the lights cannot flicker, as this can be stressful for the birds — oh, and it needs to be reliable.

To build the system, [Patrick] has chosen an Arduino Duemillenova, an RTC, a small LCD screen, some cheap LEDs from eBay and a handful of N-channel NPN transistors to provide the PWM for the LEDs. The entire system cost less than $100 — a much cheaper alternative to commercial systems.

We think the system looks great, but as a big fan of the Hack a Day community, [Patrick] would love to hear your feedback!

Robot Foosball Will Kick Your Butt If You Play Slowly

foosball_pt3_1

Sometimes we find a project that is so far outside of our realm of experience, it just makes us sit back and think “wow”. This is definitely one of those projects. [Saba] has created a Robotic Foosball set that learns.

[Saba Khalilnaji] is a recent engineering graduate from UC Berkeley, and his passion is robotics. After taking an Artificial Intelligence class during his degree (you can take it online through edX!), he has decided to dabble in AI by building this awesome robot Foosball set.

His “basic” understanding of machine learning includes a few topics such as Supervised Learning, Unsupervised Learning and Reinforcement Learning. For this project he’s testing out a real-world application of Reinforcement Learning using the Markov Decision Process or MDP for short. At an extremely top level description it works by programming an agent to learn from the consequences of its actions in a given environment. There are a set of states, actions, probabilities for given state and action, and rewards for specific state and action sets.

Before we butcher the explanation anymore, check out his blog for more information — and watch the following video.

Continue reading “Robot Foosball Will Kick Your Butt If You Play Slowly”

Sound Card Tachometer Rises From The Junkbox

We love writing up projects that re-use lots of old parts. In fact, we save the links and use them as defense when our significant other complains about the “junk” in the basement. No, that tactic hasn’t ever worked, but we’re going to keep trying. Case in point, [Wotboa] needed a non-contact tachometer. There are plenty of commercial products which do just that. After consulting his parts bin, [wotboa] realized he had everything he needed to hack out his own. An IR break beam sensor from an old printer was a perfect fit in an aluminum tube. With the outer shell removed, the emitter and detector were mounted in the nylon shell of an old PC power supply connector, effectively turning them pair into a reflective sensor. To amplify the circuit, [wotboa] used a simple 2n2222 transistor circuit. The key is to keep the voltage seen by the sound card the range of a line level signal. This was accomplished by adding a 2.2 Megohm resistor in line with the output. [wotboa] drew his schematic in eagle, and etched his own PCB for the project. Even the tachometer’s case came from the parts bin. An old wall wart power supply gave up its shell for the cause, though [wotboa] is saving the transformer for another project.

For sensing, [wotba] used [Christian Zeitnitz’s] Soundcard Oscilloscope software.  Measuring the RPM of the device under test is simply a matter of determining the frequency of the signal and multiplying by 60. A 400 Hz signal would correspond to a shaft turning at 24,000 RPM. The circuit performs well in the range of RPM [wotboa] needs, but using a sound card does have its limits. The signals on the scope look a bit distorted from the square waves one would expect. This is due to the AC coupled nature of sound cards. As the signal approaches DC, the waveform will become more distorted. One possible fix for this would be to remove the AC coupling capacitor on the sound card’s input. With the capacitor removed, an op amp buffer would be a good idea to prevent damage to the sound card.

[Via Instructables]