Fully Integrated HiFi Studio Monitor

Studio Monitor and PCB

Have you ever wanted to build a high quality audio crossover and amplifier? [Rouslan] has put a lot of thought into making his dual amplifier studio monitor both high quality and simple to build.

With a concise schematic, a meaningful block diagram, and simulation results to boot, his well-written post has everything you need to build self-powered bi-amped speakers based on the LM4766 from Texas Instruments. It is great to see simulations which verify the functionality of the circuit, this can go a long way when working with complicated analog filters and audio circuitry. For those of you who do not have access to PSPICE (an expensive professional simulation tool), [Rouslan] uses LTspice from Linear Technology. TINA-TI from Texas Instruments is another great free alternative.

Additionally, [Rouslan] goes over the typical issues one has with a bi-amplifier studio monitor, such as phase misalignment and turn-on pop, and then provides a solution. Note that his project is powered by 20VAC, which requires an external transformer to convert the 120VAC in the wall to 20VAC. Be careful with high voltages! In the future, adding a high quality voltage regulator will most likely increase the performance.

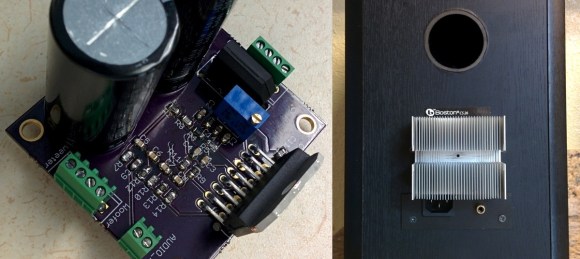
His post finishes up with a very clean circuit board, which he ordered from OSH Park. With such a complete design, there is nothing keeping you from building your own. Go out and put that old speaker sitting in your basement to good use!

If you don’t have an old speaker sitting around, check out these very cool DIY speakers.

Fail Of The Week: Silicone Molding That Won’t Cure

fotw-uncured-silicone

Mold making is a hacking skill we see pop up around here from time to time. But rarely do we hear about problems in the process, and they must happen. Here’s proof. This Fail of the Week focuses on [Michael’s] unfortunate experience with failed mold making due to uncured silicone around the master mold. It’s worse than it may sound, since he lost about a pound of silicone to the fail, and we’re unsure of whether he can even use the master again (how do you clean uncured silicone off of something?). Not to mention the time lost from setting up the pour and waiting 20 hours for it to cure.

Soon after the issue presented itself [Michael] started researching to see what had gone awry and noticed that the master should have been sealed with acrylic lacquer. This gave him the opportunity to test several different finishes before making a run at the full mold once again. He picked up a variety of the paint products he could find locally, used them to coat some scraps, and globbed on some silicone to see which worked the best.  He found a couple of different primers worked well, as did both glossy and matte acrylic coatings.

If you’ve never had a reason for mold making before, keep it in mind. You’d be surprised what kind of factory-production-type things can be pulled off by 3D printing a master, and casting a silicone mold of it.


2013-09-05-Hackaday-Fail-tips-tileFail of the Week is a Hackaday column which runs every Wednesday. Help keep the fun rolling by writing about your past failures and sending us a link to the story — or sending in links to fail write ups you find in your Internet travels.

From Schematic To PCB In Four Hours

lpkf_metrix

Last super bowl Sunday, instead of checking the game, [Mattw] decided to extend a design and make a PCB of a trinket clone. [Mattw] altered a trinket clone design by [Morgan Penfield Redfield] to shrink it down, perforated the USB connector to allow for easy removal and put most of the parts on a single layer.

After finalizing the design, [Mattw] put it into the LPKF Protolaser S that Seattle’s Metrix Create Space has. For those of you who don’t know, the LPKF protolaser uses a laser to directly ablate off the copper from the boards.  This makes prototyping much faster without the need for a lot of nasty chemicals.

About six minutes in the Protolaser, some component placement by hand followed by a run through their reflow oven and [Mattw] had three boards ready to be tested. All told, about 4 hours from start to finish.

The end circuit looks great and the LPKF protolaser gives us a case of serious tool envy. If you’re like us and don’t have access to the fancy laser you might try our hand at this high-resolutino photo-etch process.

[via reddit]

Motion Tracking On The Cheap With A PIC

motion tracking

Ever need a cheap motion tracker for very basic object following? Did you know you can throw one together with a few IR distance sensors and a PIC?

The setup is fairly simple. [Aron Horan] is using a dsPIC30F4011 PIC, a SHARP infrared distance sensor, an RC servo, and a PICkit2 for testing. It works by scanning left and right using the servo motor. When the edge of an object is detected, it will turn away from the object until it can no longer detect the edge — then it turns back. Unfortunately this does mean it will always be twitching, even when it’s tracking an object.

Like many of the other projects [Aron] has documented, he’s included everything you need to know to be able to recreate the project yourself. Flowcharts, wiring diagrams, and the code — written in C of course! The following video includes an excellent demonstration, but if you want to skip straight to the action, you can see it start tracking a multimeter at about 0:39 in.

Continue reading “Motion Tracking On The Cheap With A PIC”

Thrust-Vectoring Hovercraft On A Budget

FANEWZ5HRH0XXYR.MEDIUM

Looking for a fun little experiment in thrust vectoring? [Saral Tayal] has come up with what he thinks is the first style of thrust vectoring hovercraft.

A typical hovercraft uses one or two drives, one to hover, one to direct movement — or one for both, diverted to the two outputs. [Saral’s] toy hovercraft uses two, but unlike traditional designs, instead of having a rudder on the back to direct the airflow for steering, he steers the entire fan assembly. On a full size hovercraft, this could be a lot of fun.

It’s a pretty simple project that you could quite easily build on a weekend — if you’ve got RC parts kicking around, even easier! He’s using two brushless motors with ESCs, a 9g servo, and a small RC transmitter/receiver. The props come from a regular RC plane — just pick one suitable for the motor being used. Depending on what you have on hand, this project will be under $100 to build. The rest is mostly foam-board, balsa wood, and glue.

Check out the following video to see how it hovers!

Continue reading “Thrust-Vectoring Hovercraft On A Budget”

Shenzhen Tour And UnHuman Soldering Classes With DP

dp-hacker-camp

If you’re free the first week of April and don’t mind sitting on a plane for a looooong time you should check out the Hacker Camp that Dangerous Prototypes is planning. We’re sure you remember [Ian Lesnet] who is a Hackaday Alum, creator of the Bus Pirate, and geeky world traveler. Now’s your chance to try out what to him is a way of life.

The event is April 3-5 in Shenzhen, China. Although marketed as a “Hacker Camp”, to us it sounds more like training for those interested in running hardware companies that use the Shenzhen manufacturing district as the anchor of their supply chain. Part of the prep-work for the trip includes submitting board files which will be fabbed and ready for you on the first day. [Ian] and his crew will be your guides for the culture of the area; complete with meals and bar time. But there are also soldering workshops as part of the package. Don’t pooh-pooh the idea. This is unhuman soldering… BGA and QFN soldering instruction from the people who repair cellphones and other microelectronics.

This [Rick Steves] style adventure is the first that we remember hearing about that targets the open hardware community. But we must admit, it sounds like a lot more fun than a European river cruise!

[Thanks Akiba]

Wearing A Homemade EKG Whilst Base Jumping!

video.overlay

[Andrew Wilson] is a pretty extreme guy. He base jumps for fun, and is also a hacker. And while you can try to explain the awesome adrenaline rush that comes with this kind of extreme hobby, it’d be nice if you could show it off, you know, quantitatively. So, he decided to make his own EKG, pair it with his GoPro, and go for a jump!

An EKG is an electrocardiogram — a fancy term for a heart rate monitor — and [Andrew’s] has built his own using a small instrument amplifier circuit. This circuit amplifies the differential signal put out by your heart. The data are fed through an ADC on an Arduino Uno, and then saved to a SD card. He also added a piezo buzzer to try to help sync the data to the video — unfortunately it was too quiet for the GoPro to pick up. So for now he’s stuck with pressing record and start on his EKG at the same time.

Once he was satisfied with a few safe tests, he decided to take it for a base jump. For our viewing pleasure, he’s taken the data collected from the EKG and post-processed it into a nice scrolling graph overlay for the video.

We guarantee your hands will get sweaty as his heart rate goes up as he prepares to make the plunge.

Continue reading “Wearing A Homemade EKG Whilst Base Jumping!”