31st Chaos Communications Congress

The 31st annual Chaos Communications Congress (31C3) kicked off today and you’ve already missed some great talks. If you’re not in Hamburg, Germany right now, you can watch the talks as they happen on the live stream. So stop reading this blog post right now, and check out the list of presentations. (But don’t fret if you’ve already missed something that you’d like to see. All the talks are also available after the fact.)

For those of you whose worldview is centered firmly on the You Ess of Ay, you’ll be surprised to learn that the Congresses are essentially the great-grandaddy of the US hacker conventions. If you’re one of the many (old?) US hackers who misses the early days of yore before DEFCON got too slick and professional, you’ll definitely like the CCC. Perhaps it’s the German mindset — there’s more emphasis on the community, communication, and the DIY aesthetic than on “the industry”. It’s more HOPE than DEFCON.

This is not to say that there won’t be some great hacking showcased at 31C3. It is the annual centerpiece of the European hacker scene, after all. Hardware, firmware, or software; it’s all exploited here.

Some of the talks are in German, naturally, but most are in English. If you haven’t attended before, you at least owe it to yourself to check out the live stream. Better yet, if you’re a member of an American hackerspace, you can at least set up local remote viewing for next year. Or maybe you’ll find yourself visiting Germany next Christmas.

[Image: Wikipedia / Tobias Klenze / CC-BY-SA 3.0]

NeXT Cubes And LCD Monitors

The NeXT slabs and cubes were interesting computers for their time, with new interesting applications that are commonplace today seen first in this block of black plastic. Web browsers, for example, were first seen on the NeXT.

Running one of these machines today isn’t exactly easy; there are odd video connectors but you can modify some of the parts and stick them in an LCD monitor. It’s a tradeoff between a big, classic, heavy but contemporary CRT and a modern, light, and efficient LCD, but it’s still a great way to get a cube or slab up and running if you don’t have the huge monitor handy.

The NeXT cube doesn’t have a single wire going between the computer and the monitor; that would be far too simple. Instead, a NeXT Sound Box sits between the two, providing the user a place to plug the monitor, keyboard, mouse, and audio connectors into. [Brian] took the board from this Sound Box and put it inside an old NEC LCD monitor he had sitting around. 12V and 5V rails were wired in, the video lines were wired in, and [Brian] created a new NeXT monitor.

There are two versions of the NeXT Sound Box – one for ADB peripherals (Apple IIgs and beige Macs), and another for non-ADB peripherals. [Brian] also put together a tutorial for using non-ADB peripherals with the much more common ADB Sound Board.

diy conveyor belt

DIY Conveyor Gets You From Here To There

[gwfong] was in a bind. He had to make a unique Halloween prop that dispensed candy to young trick-or-treaters at a Haunted House. He decided on a conveyor belt system and besides being functional, it also had to be inexpensive to make. After poking around the hardware store [gwfong] had an idea: make it out of items he can re-use after Halloween!

As you can see, the main roller system is made of paint rollers. These are cheap and certainly re-useable after the conveyor is disassembled. Luckily for the project, the handle of the paint roller just happens to fit very snugly into a 3/4″ PVC pipe fitting. Four T-fittings and some short lengths of PVC pipe were purchased and are used to mount the paint rollers to a wooden base. A piece of canvas cut to length and sewed into a continuous loop makes up the conveyor belt. A loose belt certainly won’t deliver any candy so two turnbuckles, one at each end, keep the belt tight on the rollers.

There is a DC motor that spins a pulley which is coupled, via a standard rubber band, to one of the end paint rollers. A full-speed conveyor haphazardly flinging candy around wouldn’t work out to well so an Arduino and motor shield are used to control the conveyor’s speed and duration. A 7.4 5000mAh Li-Po battery provides the necessary electricity for a nights-worth of un-tethered candy dispensing.

Continue reading “DIY Conveyor Gets You From Here To There”

Learning I2C With The Bus Pirate

When an air quality display project needed a display, [Inderpreet] looked into small character-based LCDs. [Inderpreet’s] chosen LCD used an I2C interface, which was new to him. Rather than shy away, [Inderpreet] grabbed his Bus Pirate and dove in!

I2C or Inter-Integrated Circuit serial interfaces are often mentioned here on Hackaday. They generally are easy to use, but as with all things, there are little gotchas which can make the road a bit more bumpy the first time you travel it. One of those things is voltage interfacing – I2C uses bidirectional open drain lines, so interfacing 3.3 V and 5V circuits requires a voltage level shifter circuit designed to handle that requirement. Thankfully in [Inderpreet’s] case, both his TI launchpad target devboard and the LCD used 3.3 volt logic levels.

buspirate2
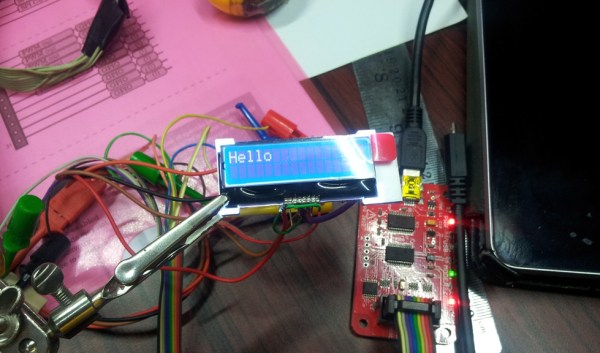
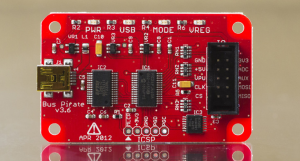
Before using the TI though, [Inderpreet] wanted to test with the Bus Pirate first. This would allow him to verify the hardware, and to make sure he was correctly using the I2C bus. The Bus Pirate can operate at 3.3V or 5V logic levels, and has on-board programming specific to the I2C bus. Controlling the Bus Pirate is as easy as hooking up a serial terminal program and plugging in a USB cable.

The I2C bus protocol is relatively simple, but can still be confusing to a new user. Each transaction needs an address, read/write bit, and a start command sent in the proper sequence before the data bytes can begin flowing. There are also acknowledge bits which prove that the data bytes are actually being received by the LCD. The Bus Pirate made all this easy, allowing [Inderpreet] to quickly display “Hello” on his LCD module.

The I2C bus is just the tip of the iceberg for the Bus Pirate. If you’re interested in learning more, check it out over at The Hackaday Store!

[via Dangerous Prototypes]

Hanging Monitors Keeps Your Desk Slightly Less Messy

[Gertlex] – like just about everyone reading this, I’m sure – has a messy desk with monitors, keyboards, mice, several other input devices, tablets, and a laptop. He wanted a system that would reduce the wire clutter on his desk and after thinking a bit came up with a really cool solution for arranging his monitors. He’s hanging the monitors from a shelf above his desk using nothing but some aluminum and a few 3D printed brackets.

The main structure is a shelf of ‘bridge’ above his desk, made from 3/4″ ply. The inventive bit of this build is the two 1″ square aluminum tubes spanning the width of this shelf. From these, a few bits of aluminum angle pieces slide along the 1″ rails. a mount holds a 1″ round pipe to these supports, and a VESA mount is clamped to the pipe. There’s an imgur album that goes through the entire design. It’s certainly an improvement over the earlier battlestation, and the wiring loom cleans everything up nice and tidy.

[Gertlex]’s new system of hanging monitors is great, but this simple puts some even cooler builds on the table. The sliding system is great, but by putting one monitor on its own carriage, you could have an infinitely reconfigurable monitor setup. Some proper bearings, 3D printed VESA mounts, and maybe even a few stepper motors would make a build like this the coolest battlestation rig since the great ‘capacitor plague and I have a soldering iron so free monitors’ spectacular of 2005.


dremelduplicator

Dremel Powered Duplicating Carving Machine

[Adran] wanted to be able to accurately cut out a bunch of the same parts out of wood but didn’t have the cash to spend on buying or building an automated CNC machine. After thinking about it for a while he decided to build a mechanical device that will allow him to duplicate objects by tracing them in 3 dimensions. This type of duplicator uses a stylus to trace over the surface of an object while the cutting tool is also moved over a piece of raw material, cutting as it goes. The end result is a newly carved object that is the same shape as the original. The idea is like a pantograph that works in 3 dimensions.

The wood frame is constructed to move freely front to back and left to right. To control the height of the cutting tool, in this case a Dremel, the frame pivots up and down and the X-axis rail. A screw driver is mounted off the side of the Dremel that acts as a stylus. It is mounted in the same orientation as the Dremel bit and is constrained such that it and the Dremel move in the same direction and amount at all times. When the tip of the screwdriver is traced over a 3D part, the Dremel moves the exact same amount carving a part out of a block of material.

Although the machine works, [Adran] admits there is some room for improvement. The left to right motion is a little choppy as the wood frame is riding directly on steel rails. He plans on adding linear bearings for the next revision to smooth things out.

Pandaphone

Pandaphone Is A DIY Baby Toy

[Tyler] was looking for a gift for his friend’s one year old son. Searching through the shelves in the toy store, [Tyler] realized that most toys for children this age are just boxes of plastic that flash lights and make sound. Something that he should be able to make himself with relative ease. After spending a bit of time in the shop, [Tyler] came up with the Pandaphone.

The enclosure is made from a piece of 2×4 lumber. He cut that piece into three thinner pieces of wood. The top piece has two holes cut out to allow for an ultrasonic sensor to poke out. The middle piece has a cavity carved out using a band saw. This would leave room to store the electronics. The bottom piece acts as a cover to hide the insides.

The circuit uses an ATtiny85. The program watches the ultrasonic PING sensor for a change in distance. It then plays an audio tone out of a small speaker, which changes pitch based on the distance detected. The result is a pitch that is lower when your hand is close to the sensor, but higher when your hand is farther away. The case was painted with the image of a panda on the front, hence the name, “Pandaphone”. Based on the video below, it looks like the recipient is enjoying it! Continue reading “Pandaphone Is A DIY Baby Toy”