90s PowerBook Runs MacOS Monterey

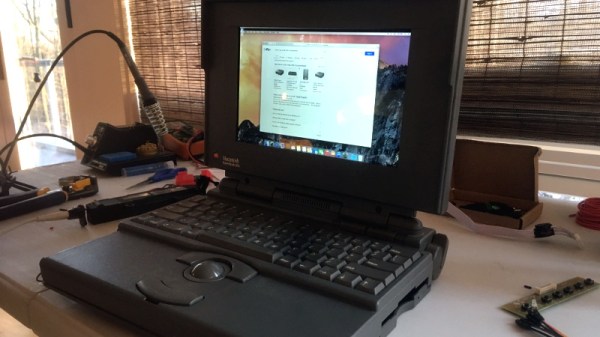
Even though Apple isn’t known for making the most pro-consumer devices ever (at least not since the Apple II), the trope that Apples aren’t upgradable, customizable, or otherwise hackable doesn’t really hold much weight. It does take more work to modify them or change how Apple wants them to behave, but it’s not completely impossible. Take this example of a ’94 Apple PowerBook which runs macOS Moneterey thanks largely to new internals from a 2015 MacBook Pro.

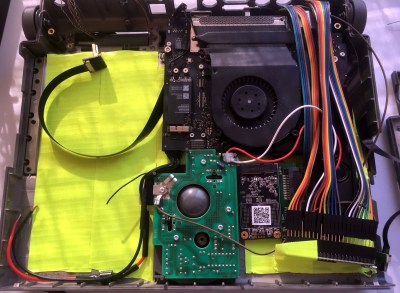
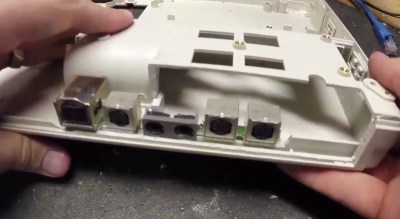
[Billy] originally intended for a Raspberry Pi to go inside this old PowerBook, but at the time, prices for ARM single-board computer (SBC) were astronomical. For around the same price as the Pi was at the time, he was able to pick up a retina display from an iPad and the internals from a broken MacBook Pro to outfit this retro case. There’s also a Teensy installed to get the trackpad working and a driver board for the display from Adafruit, and a number of case mods were needed to get everything to fit including the screen which was slightly larger than the original 9.5″ display the laptop would have shipped with.

This project took both inspiration and some of the actual code needed to get everything working from another project we featured a while ago where a Mac Mini was installed inside of a PowerBook case from 1993. Unlike projects that use smaller SBCs for retrocomputing, these builds are notable because the hardware on the inside makes them usable as daily driver computers even today, and might even be an upgrade if you’re using the internals from a MacBook Pro that would have originally had a butterfly keyboard.

Continue reading “90s PowerBook Runs MacOS Monterey”

Upgrading The PowerBook 100 With A Fresh New Battery

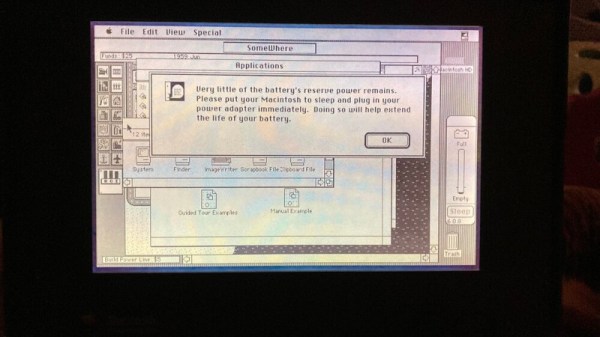
The PowerBook 100 was one of the earliest Apple laptops released, coming not long after the breakout Macintosh Portable. Unlike modern hardware, it relied on sealed lead acid batteries. [360alaska] has such a laptop whose original battery is long dead, so they set about building a replacement battery with lithium cells instead.

The battery and its associated support circuitry is a mite unconventional in its design, but it gets the job done. The build uses two lithium polymer pouch cells in place of the original four cell sealed-lead acid battery, to replicate the roughly 7.2V nominal voltage. Because of this, unfortunately the stock PowerBook charger can’t provide enough voltage to fully charge the LiPo cells up to their full 8.4 volts.

The workaround selected is that when the batteries fall below 80% state of charge, relays disconnect the cells from their series configuration powering the laptop, and instead connect each cell to its own single-cell charger board. Once charging is complete, the relays switch back out of charging mode so the batteries power the laptop once more. The only major drawback is that withdrawing the power adapter while the batteries are on charge will cut all power to the laptop.

It may not be perfect, but [360alaska] has succeeded in building a drop-in battery solution for the PowerBook 100 that can be used with the stock charger. Laptop batteries can be a fraught thing to deal with; often there are safeguards or DRM-type issues to navigate to get them to work around. Sometimes open-source designs are the best solution out there.

Retro PowerBook Gets A Mac Mini Transplant

Around these parts, seeing a classic laptop or desktop computer get revived with the Raspberry Pi is fairly common. While we’re not ones to turn down a well-executed Pi infusion, we know they can be controversial at times. There’s an impression that such projects are low-effort, and that the combination of old and new tech gains little in the way of usability due to the usability quirks of the Pi itself.

But we think even the most critical in the audience will agree that this build by [Tylinol], which sees the internals of a circa 1993 PowerBook 165c get replaced with that of a 2014 Mac Mini, is something else entirely. For one thing, there’s no question that packing a modern (relatively) desktop computer motherboard into a laptop’s body takes a lot more planning and effort than hot gluing the comparatively tiny Pi into the same space. Plus as an added bonus, anyone who counts themselves among the Cult of Mac will be happy to see the vintage machine retain its Cupertino pedigree.

So how do you get a Mac Mini inside of a PowerBook? Very carefully. As explained by [Tylinol], the inside of the PowerBook’s case was coated in graphite and conductive enough to be a problem. So after the original hardware was removed, a layer of tape was added to insulate it; though we imagine a suitably thick spray-on coating could be used as well if you don’t have that kind of patience.

Once the case was gutted and insulated, [Tylinol] added new stand-offs to mount the Mac Mini motherboard and hard drive. For anyone wondering, the 2014 model was used because the shape of the board almost perfectly fits around the trackball PCB. A board from a newer Mac could be used, but it would likely mean using an external mouse.

Which would have been a problem for [Tylinol], because one of the main goals of this build was to get the original input working. That meant adapting the Apple Desktop Bus (ADB) devices to USB, which turns out to be something of a Dark Art. But with the help of some contemporary information about the long-forgotten protocol and a Teensy 3.5, both devices are now picked up as standard USB HID.

But of course, that’s just scratching the surface. [Tylinol] also had to figure out how to swap the original display out for a modern panel, and then get the whole thing running on internal battery power. Even if you’re not particularly interested in retro Apple hardware, this is really a phenomenal build that deserves a thorough read-through.

For those of you who don’t mind getting a Pi in a PowerBook, we recently saw a recreation of Lord Nikon’s laptop from Hackers that went that route.

Recreating Lord Nikon’s Laptop From Hackers

The outlandish computers from 1995’s Hackers are easily one of the most memorable elements of the iconic cult classic. In the film, each machine is customized to reflect the individual hacker that operates it, and feature everything from spray painted camouflage paint schemes to themed boot animations based on the owner’s personal iconography. But what might not be so obvious is that the real-life props took a considerable amount of hardware hacking before they were ready for their big-screen debut.

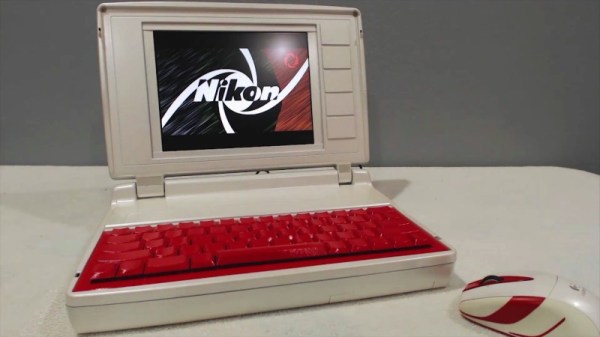
A group of dedicated Hackers fans have created a website to document, and ideally recreate, all the custom work that went into the various pieces of tech featured in the film. As explained by [Nandemoguy], the group’s latest triumph is a screen-accurate build of Lord Nikon’s laptop. The final product not only looks just like the machine used in the film, but thanks to the internal Raspberry Pi, is far more powerful than the original computer would have been.

Unless you’re on the team over at HackersCurator.com, you might not know that the laptops in the film were handmade chimeras that combined the external cases of various PCs with (usually) the internals of an Apple Powerbook 180c. Why the prop masters of the film would have gone through so much trouble to create the character’s computers is not immediately clear, but if we had to guess, presumably it was due to the requirements of the over-the-top graphical interfaces that are featured so heavily in the film.

At any rate, the replica created by [Nandemoguy] is built in much the same way. At least for the parts you can see on the outside, anyway. He goes through the considerable case modifications required to replace the original keyboard on the Toshiba Satellite T1850 with a Powerbook keyboard, which as you might have guessed, has been converted into a USB HID device with a Teensy microcontroller. He even cuts the ports off the back of the Mac’s motherboard and glues them in place around the backside of the machine. But everything else, including the LCD, is all new hardware. After all, who really wants to go through all that trouble just to have a fancy Powerbook 180c in 2019?

Even if you weren’t a fan of Hackers, the level of detail and effort put into this build it absolutely phenomenal. It’s interesting to see the parallels between this replica and the burgeoning cyberdeck scene; it seems like with a Teensy, a Raspberry Pi, and enough Bondo, anything can be turned into a functional computer.

Continue reading “Recreating Lord Nikon’s Laptop From Hackers

Ask Hackaday: Calling All 68k Experts

This is a tale of old CPUs, intensive SMD rework, and things that should work but don’t.

Released in 1994, Apple’s Powerbook 500 series of laptop computers were the top of the line. They had built-in Ethernet, a trackpad instead of a trackball, stereo sound, and a full-size keyboard. This was one of the first laptops that looked like a modern laptop.

The CPU inside these laptops — save for the high-end Japan-only Powerbook 550c — was the 68LC040. The ‘LC‘ designation inside the part name says this CPU doesn’t have a floating point unit. A few months ago, [quarterturn] was looking for a project and decided replacing the CPU would be a valuable learning experience. He pulled the CPU card from the laptop, got out some ChipQuick, and reworked a 180-pin QFP package. This did not go well. The replacement CPU was sourced from China, and even though the number lasered onto the new CPU read 68040 and not 68LC040, this laptop was still without a floating point unit. Still, it’s an impressive display of rework ability, and generated a factlet for the marginalia of the history of consumer electronics.

Faced with a laptop that was effectively unchanged after an immense amount of very, very fine soldering, [quarterturn] had two choices. He could put the Powerbook back in the parts bin, or he could source a 68040 CPU with an FPU. He chose the latter. The new chip is a Freescale MC68040FE33A. Assured by an NXP support rep this CPU did in fact have a floating point unit, [quarterturn] checked the Mac’s System Information. No FPU was listed. He installed NetBSD. There was no FPU installed. This is weird, shouldn’t happen, and now [quarterturn] is at the limits of knowledge concerning the Powerbook 500 architecture. Thus, Ask Hackaday: why doesn’t this FPU work?

Continue reading “Ask Hackaday: Calling All 68k Experts”

Hackaday Links: March 20, 2016

Western Digital introduced their second revision of the PiDrive this week. This is a native USB hard drive – formatted to 314GB – based on the WD Blue drive. The earlier version of the WD PiDrive was 1TB, and cost about $70 USD. The new, 314GB version, sells for about $35. Does Western Digital manufacture 314GB hard drives? No, that would be stupid. Who’s taking bets on the actual capacity of these drives?

[SopaXorsTaker] has introduced us to a brand new way of removing BGA chips. PCBs are usually more flexible than chips, and a few whacks with a hammer is all that’s needed.

For the last few months, [quarterturn] has been upgrading a PowerBook 520. He’s trying to replace the CPU with a 68040 that has an FPU. His first attempt failed, and his second attempt – a new Freescale part that certainly has an FPU – also failed. It’s great experience in desoldering and reworking fine-pitch QFP parts, but [quarterturn] has no idea why the Apple System Profile reports an FPU-less CPU. It might be something in the ROM that tells the PowerBook not to use the FPU, in which case the obvious upgrade would be to replace the ROM with one from a PowerBook 550c or a Sonnet upgrade card. If you have either of those, I’m sure [quarterturn] would like to have a word with you.

LIDAR! We all know what the coolest use of LIDAR is, but it’s also useful for robots, drones, and other autonomous thingamadoos. Here’s a Kickstarter for a LIDAR module, 40 meter range, 360 degree range, 500 samples per second, and UART/USB connections.

[Bill] is trying to start a Makerspace in Fort Lauderdale. Here’s the indiegogo campaign.

We launched the 2016 Hackaday Prize this week. Why should you enter? Because last year, it seemed everyone who entered early won something. There’s $300,000 worth of prizes on the line. Need an idea? [Dave Darko] has just the thing for you. It’s the Hackaday Prize Buzzword Generator, the perfect thing for spitballing a few ideas and seeing what sticks.

stupid-ideas

Upgrading And Desoldering A Fake CPU

[quarterturn] had an old Apple Powerbook 520c sitting around in his junk bin. For the time, it was a great computer but in a more modern light, it could use an upgrade. It can’t run BSD, either: you need an FPU for that, and the 520 used the low-cost, FPU-less version of the 68040 as its main processor. You can buy versions of the 68040 with FPUs direct from China, which means turning this old Powerbook into a BSD powerhouse is just a matter of desoldering and upgrading the CPU. That’s exactly what [quarterturn] did, with an unexpected but not surprising setback.

The motherboard for the Powerbook 500 series was cleverly designed, with daughter cards for the CPU itself and RAM upgrades. After pulling the CPU daughter card from his laptop, [quarterturn] faced his nemesis: a 180-pin QFP 68LC040. Removing the CPU was handled relatively easily by liberal application of ChipQuik. A few quick hits with solder braid and some flux cleaned everything up, and the daughter card was ready for a new CPU.

The new FPU-equipped CPU arrived from China, and after some very careful inspection, soldering, and testing, [quarterturn] had a new CPU for his Powerbook. Once the Powerbook was back up and running, there was a slight problem. The chip was fake. Even though the new CPU was labeled as a 68040, it didn’t have an FPU. People will counterfeit anything, including processors from the early 90s. This means no FPU, no BSD, and [quarterturn] is effectively back to square one.

That doesn’t mean this exercise was a complete loss. [quarterturn] did learn a few things from this experience. You can, in fact, desolder a dense QFP with ChipQuik, and you can solder the same chip with a regular soldering iron. Networking across 20 years of the Macintosh operating system is a mess, and caveat emptor doesn’t translate into Mandarin.