Build A Seismometer Out Of Plumbing Parts

For those outside the rocking and rolling of California’s tectonic plate, earthquakes probably don’t come up on a daily basis as a topic of conversation. Regardless, the instrument to measure them is called a seismometer, and it’s entirely possible to build one yourself. [Bob LeDoux] has shared his article on how to build a Fluid Mass Electrolytic Seismometer, and it’s an impressive piece of work.

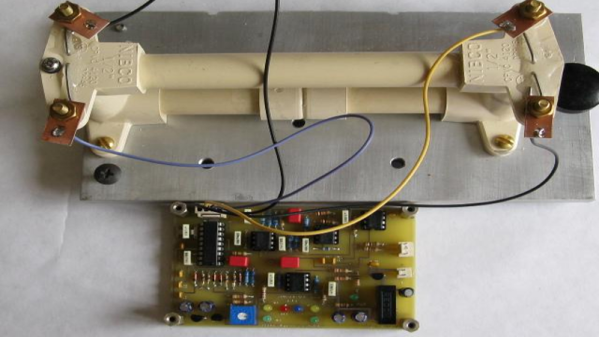
This is an instrument which works very differently from the typical needle-and-graph type seen in the movies. Fluid is held in a sealed chamber, with a restricted orifice in the center of a tube. The fluid level is monitored at each side of the orifice. When motion occurs, fluid levels change at either side which allows seismic activity to be measured.

Hooked up to some basic analog electronics, in this form, the device only shows instantaneous activity. However, it would be trivial for the skilled maker to hook this up to a datalogging setup to enable measurements to be plotted and stored. The entire project can be built with simple hand tools and a basic PCB, making it highly accessible.

It’s not the first time we’ve seen a seismometer, either – the Raspberry Shake project is a distributed network of sensors running on the Raspberry Pi.

A Drum Set In Your Pocket

Cargo pants can fit drumsticks in the pockets if you don’t mind them sticking out. They can also hold this drum set and still have enough room for a pair of headphones, some pens, and a small notebook. At least, guy’s cargo pants can fit all that. Now your pocket is decked out with enough music gear to compose and drum few drum loops and even scribble some notes. We can’t speak for [Tomash Ghz] carrying a notebook, but he wanted a drum set in his pocket badly enough to make a custom circuit board to bring to the 2017 Fasma Festival in Athens. He wrote code for a Teensy 3.2 which fits on the back of his PCB next to a 9V battery. Don’t be afraid, the smallest components are 0805 so even clumsy fingers will be able to build their own. The Gerber files and BOM are all available, so nothing is stopping you.

On the board, we find an array of op-amps to support headphone and line-level outputs, four big ole’ buttons to activate each type of drum: kick, tom, snare, and hat. Then we have four potentiometers to change the sound of each like pitch, decay/length, modulation, and distortion. Once the perfect pattern is recorded, it can be saved in non-volatile memory in case you run out of juice although it can run up to seven-and-a-half hours on one battery. If you find yourself invested in the hardware, there is also a video walk-through about using the drum machine so grab your notebook and beat it.

We have seen simpler drums in simpler chips, and even drums on an entirely different type of chip.

Continue reading “A Drum Set In Your Pocket”

Raspberry Pi Jukebox Hits All The Right Notes

We (and by extension, you) have seen the Raspberry Pi crammed into nearly every piece of gear imaginable. Putting one inside a game console is so popular it’s bordering on a meme, and putting them into old stereos and other pieces of consumer electronics isn’t far behind. It’s always interesting to see how hackers graft the modern Raspberry Pi into the original hardware, but we’ll admit it can get a bit repetitive. So how about somebody scratch building an enclosure for their jukebox project?

[ComfortablyNumb] took the road less traveled when he created this very nice wooden Raspberry Pi enclosure in the shape of an eighth note. Stained and varnished and with a nice big touch screen in the middle to handle the controls, it’s an attractive and functional piece of home audio gear that we imagine most people would be happy to hang on their wall.

The process starts by printing out the desired shape on a piece of paper to use as guide, and then gluing together strips of wood to create the rough outline. Then the surface was thoroughly sanded to bring all of the strips of wood to the same level, and the final design was cut out. On the back of the note, [ComfortablyNumb] boxed out an area to hold the Waveshare seven-inch touch screen panel and the Raspberry Pi itself.

Having seen so many projects where the Pi is rather unceremoniously shoehorned into another device, it’s refreshing to see the results of a purpose-built enclosure. Since [ComfortablyNumb] was able to build the electronics compartment to his exact dimensions, the final result looks exceptionally clean and professional. Not a drop of hot glue to be seen. It also helps that this build only required the Pi and the display; as the device is meant to be plugged into an existing audio setup, there’s no onboard amplifier. The audiophiles out there might recoil in horror, but adding a dedicated digital to analog converter (DAC) would be easy enough to add if the stock audio on the Pi isn’t good enough for you.

The project is finished off with stain and several coats of varnish to get that deep and rich color. We don’t often find ourselves working with dead trees around these parts, but we’ve got to admit that the final product does look quite handsome. Certainly beats the LEGO cases many of our Pi projects live in.

If you’re looking for more wooden-encased Pi jukeboxes, you might enjoy this somewhat abstract magstripe-based take on the concept. Of course, we’ve also seen our fair share of actual jukeboxes receive a Raspberry infusion over the years.

[via /r/raspberry_pi]

The 1859 Carrington Event

Like many Victorian gentlemen of means, Richard Carrington did not need to sully himself with labor; instead, he turned his energies to the study of natural philosophy. It was the field of astronomy to which Carrington would apply himself, but unlike other gentlemen of similar inclination, he began his studies not as the sun set, but as it rose. Our star held great interest for Carrington, and what he saw on its face the morning of September 1, 1859, would astonish him. On that morning, as he sketched an unusual cluster of sunspots, the area erupted in a bright flash as an unfathomable amount of energy stored in the twisted ropes of the Sun’s magnetic field was released, propelling billions of tons of star-stuff on a collision course with Earth.

Carrington had witnessed a solar flare, and the consequent coronal mass ejection that would hit Earth just 17 hours later would result in a geomagnetic storm of such strength that it would be worldwide news the next day, and would bear his name into the future. The Carrington Event of 1859 was a glimpse of what our star is capable of under the right circumstances, the implications of which are sobering indeed given the web of delicate connections we’ve woven around and above the planet.

Continue reading “The 1859 Carrington Event”

Open Sourced Carbon Fiber Rod Ends

Modellers and makers who have been around the block for a few decades generally have their preferred materials. Balsa wood, sheet metal, brass tube… these were all staples of the hobbyist workshop. Composites are very much the new kid on the block and are starting to gain more of a foothold in the hobby marketplace. [Anthony] has been experimenting in this area, and has created some useful attachments for carbon fiber tubing.

The fittings are designed to be lasercut from aluminium or 3D printed. The rod ends are a simple two-piece design that slots together, before insertion into the carbon fiber rod. [Anthony] shows off a series of rods being used as linkages with a stepper motor, before performing pull-out tests on the links. Installed with cyanoacrylate glue, the link holds up to a pull load in excess of 180 lbs. The strength is impressive, and [Anthony] also talks about how to install the appropriate bearings to use the links for motion projects.

Overall, these links will likely prove useful to anyone using carbon fiber rods in a build, and helpfully, the required files are all available on GitHub. The source material is now cheap and readily available online, and is strong and resilient when used properly. We’ve seen carbon fiber popping up in a lot more projects recently, too. Video after the break.

Continue reading “Open Sourced Carbon Fiber Rod Ends”

Crash Your Code – Lessons Learned From Debugging Things That Should Never Happen™

Let’s be honest, no one likes to see their program crash. It’s a clear sign that something is wrong with our code, and that’s a truth we don’t like to see. We try our best to avoid such a situation, and we’ve seen how compiler warnings and other static code analysis tools can help us to detect and prevent possible flaws in our code, which could otherwise lead to its demise. But what if I told you that crashing your program is actually a great way to improve its overall quality? Now, this obviously sounds a bit counterintuitive, after all we are talking about preventing our code from misbehaving, so why would we want to purposely break it?

Wandering around in an environment of ones and zeroes makes it easy to forget that reality is usually a lot less black and white. Yes, a program crash is bad — it hurts the ego, makes us look bad, and most of all, it is simply annoying. But is it really the worst that could happen? What if, say, some bad pointer handling doesn’t cause an instant segmentation fault, but instead happily introduces some garbage data to the system, widely opening the gates to virtually any outcome imaginable, from minor glitches to severe security vulnerabilities. Is this really a better option? And it doesn’t have to be pointers, or anything of C’s shortcomings in particular, we can end up with invalid data and unforeseen scenarios in virtually any language.

It doesn’t matter how often we hear that every piece of software is too complex to ever fully understand it, or how everything that can go wrong will go wrong. We are fully aware of all the wisdom and cliches, and completely ignore them or weasel our way out of it every time we put a /* this should never happen */ comment in our code.

So today, we are going to look into our options to deal with such unanticipated situations, how we can utilize a deliberate crash to improve our code in the future, and why the average error message is mostly useless.

Continue reading “Crash Your Code – Lessons Learned From Debugging Things That Should Never Happen™”

New Part Day: Small, Cheap, And Good LIDAR Modules

Fully autonomous cars might never pan out, but in the meantime we’re getting some really cool hardware designed for robotic taxicab prototypes. This is the Livox Mid-40 Lidar, a LIDAR module you can put on your car or drone. The best part? It only costs $600 USD.

The Livox Mid-40 and Mid-100 are two modules released by Livox, and the specs are impressive: the Mid-40 is able to scan 100,000 points per second at a detection range of 90 m with objects of 10% reflectivity. The Mid-40 sensor weighs 710 grams and comes in a package that is only 88 mm x 69 mm x 76 mm. The Mid-100 is basically the guts of three Mid-40 sensors stuffed into a larger enclosure, capable of 300,000 points per second, with a FOV of 98.4° by 38.4°.

The use case for these sensors is autonomous cars, (large) drones, search and rescue, and high-precision mapping. These units are a bit too large for a skateboard-sized DIY Robot Car, but a single Livox Mid-40 sensor, pointed downward on a reasonably sized drone could perform aerial mapping

There is one downside to the Livox Mid sensors — while you can buy them direct from the DJI web site, they’re not in production. These sensors are only, ‘Mass-Production ready’. This might be just Livox testing the market before ramping up production, a thinly-veiled press release, or something else entirely. That said, you can now buy a relatively cheap LIDAR module that’s actually really good.