Building A Hundred-Year-Old Radio Transmitter

Our Hackaday team is spread across the world, but remains in easy contact through the magic of the Internet. A number of us hold amateur radio callsigns, so could with a bit of effort and expenditure do the same over the airwaves. A hundred years ago this would have seemed barely conceivable as amateurs were restricted to the then-considered-unusable HF frequencies.

Thus it was that in December 1921 a group of American radio amateurs gathered in a field in Greenwich Connecticut in an attempt to span the Atlantic. Their 1.3 MHz transmitter using the callsign 1BCG seems quaintly low-frequency a hundred years later, but their achievement of securing reception in Ardrossan, Scotland, proved that intercontinental communication on higher frequencies was a practical proposition. A century later a group from the Antique Wireless Association are bringing a replica transmitter to life to recreate the event.

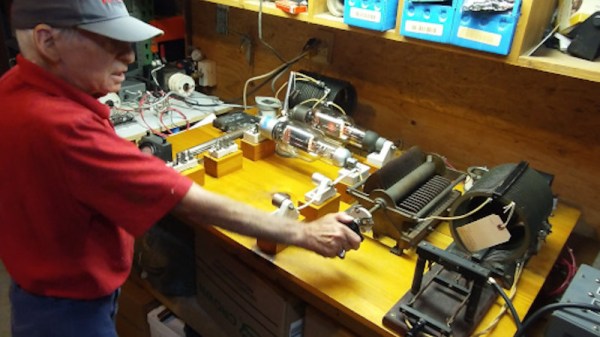
A free-running oscillator is today rarely seen in a radio transmitter, but at the time their single-tube Colpitts oscillator using a UV-204 transmitting tube would have been considered a stable source. That fed a 1KW power amplifier using three more UV-204s in parallel, which in turn fed a Marconi-style T antenna design with an earth counterpoise of multiple radial wires. The replica was originally built for an event in 1996, and substitutes the similar 204A tube for the now unobtainable UV-204. Even then, hundred-year-old tubes are hard to find in 2021, so they could only muster a single working example for the PA.

All in all it’s a very interesting project, and one of which we hope we’ll hear more as the anniversary approaches. If we can get the transmission details we’ll share them with you, and let’s see whether the same distances can be traversed with the more noisy conditions here in 2021.

To demonstrate how advanced this transmitter was for 1921, take a look at the Alexanderson alternator, its mechanical contemporary.

One Wood Ring To Rule Them All

[Olivier Gomis] did not have access to the fires of Mount Doom to forge a large replica of the One Ring, so he had to settle for patience, maple, and a wood lathe. It does have the added convenience of not needing to fire to expose its true nature, just angry pixies from a wall socket.

[Olivier] made the ring in separate inner and outer sections from 72 blocks of maple. The blocks were glued together in 12-sided rings, and stacked in layers to achieve the desired width. The surfaces were cut smooth and thinned out on a wood lathe, and an internal channel was created for LED strips. The Black Speech was cut through the walls of both the inner and outer surfaces using a manual router. Using the ring itself as a former, he made a wooden base for the router to allow it to slide across the surface without wobbling.

The inside wall was cut into sections and glued into a recess in the external portion. The inscriptions were covered with a maple veneer, which still allows it to be visible when the internal LEDs are switched on. The wiring runs from the base of the stand through an S-shaped stem that was made from layers of veneer clamped in a former. A total of 53 hours of painstaking effort went into this work of art, but the end product would make any hardcore Lord of the Rings fan envious.

For more LOTR-themed hacks, check out the secret door to the Mines of Moria secret door, and a sword that glow blue in the presence of unsecured WiFi.

Continue reading “One Wood Ring To Rule Them All”

3D Printing Your Own Sturdy Lens Caps

Lens caps are important for protecting expensive camera lenses from damage. Dust, grit, and other nasty things will all quickly spoil the quality of a shot, and can even permanently damage a lens if you’re unlucky. However, lens caps are also lost quite easily. Thus, it’s useful to be able to make your own, and [DSLR CNC DIY] has the low down on how to do it. 

The benefit of printing your own lens caps is customization. No matter the oddball size and shape of your lens, when you’re 3D printing your own cap, you can design it to fit. The video also shows off the benefits of being able to embed text right into the body of the cap, so you’re never confused as to which cap goes with which lens. The caps use the metal lever from a binder clip in order to provide the clamping force necessary to hang on to the lens. It’s an improvement over some living-hinge designs that grow weaker over time.

Overall, if you’ve got a bunch of lenses that need a new cap, this could be the project for you. It’s also likely much cheaper and easier than hunting down replacement caps for obscure lenses online. Alternatively, contemplate what you could do with fancy lens adapters. Video after the break. Continue reading “3D Printing Your Own Sturdy Lens Caps”

Simple Tactile Drawing Pad Is Quite Impressive

Everyone needs to be able to communicate and express themselves, even people with blindness or low vision. Embossing paper with some kind of stylus is a popular, low-tech option, but there’s one big problem: pressing paper from the top leaves a dent, and so letters have to either be written backwards or else felt-read backwards. For this year’s Hackaday Prize, [Subir Bhaduri] is working on a fantastic tool that embosses positively, and from the top side of the paper.

Positive emboss marks from a clever pantograph and a pair of stylii.Here’s how it works: a pointed stylus pushes upward from the underside and meets up with a concave receiver on the top side through the paper. The two stylii move in concert thanks to the pantograph-inspired parallelogram setup, which we imagine would make it easier for someone with low vision to keep their bearings as they move around the page.

The video below shows prototype #2, which is the first one that worked. Well, it works, but [Subir] says it needs improvement, so prototype #3 is in the sketching stage now. [Subir] is planning to fix the paper in place somehow and also figure out how to keep the pantograph arms out of the user’s way.

Pantographs are used for all sorts of things, but the sweetest use we’ve seen was to carve messages into chocolate hearts.

Continue reading “Simple Tactile Drawing Pad Is Quite Impressive”

An HP15-C emulator PCB

Calculate Like It’s 1989 With This HP15C Emulator

Back in the day, your choice of calculator said a lot about your chops, and nothing made a stronger statement than the legendary Hewlett-Packard Voyager series of programmable calculators. From the landscape layout to the cryptic keycaps to the Reverse Polish Notation, everything about these calculators spoke to a seriousness of purpose.

Sadly, these calculators are hard to come by at any price these days. So if you covet their unique look and feel, your best bet might be to do like [alxgarza] and build your own Voyager-series emulator. This particular build emulates the HP15C and runs on an ATMega328. Purists may object to the 192×64 LCD matrix display rather than the ten-digit seven-segment display of the original, but we don’t mind the update at all. The PCB that the emulator is built on is just about the right size, and the keyboard is built up from discrete switches that are as satisfyingly clicky as the originals. We also appreciate the use of nothing but through-hole components — it seems suitably retro. The video below shows that the calculator is perfectly usable without a case; a 3D-printed case is available, though, as is an overlay that replicates the keypad of the original.

We’ve seen emulators for other classic calculators of yore, including Sinclair, Texas Instruments, and even other HP lines. But this one has a really nice design that gets us going.

Continue reading “Calculate Like It’s 1989 With This HP15C Emulator”

Reporting From BornHack 2021: Hacker Camps Making It Through The Pandemic

In a normal summer we would be spoiled for choice here in Europe when it came to our community’s events, with one big camp and a host of smaller ones near and far. Only the most hardcore of travelers manage to make it to all of them, but it’s usually possible to take in at least one or two over the season. But of course, this isn’t a normal summer. Many of us may now be vaccinated against COVID-19, but we remain in the grip of a global pandemic. The massive Dutch MCH camp was postponed until 2022, and most of the smaller camps have fallen by the wayside due to uncertainty. But one hacker camp carried on.

BornHack in Denmark was the world’s only in-person summer hacker event of 2020, and on its return last week made it the only such event in Europe for 2021. Having secured a ticket earlier in the year when they went on sale, I navigated the tricky world of cross-border European travel in a pandemic to make my way to the Hylkedam scout camp on the Danish isle of Fyn for a week in the company of hackers from all over Northern Europe. BornHack had achieved the impossible again, and it was time to enjoy a much-needed week at a hacker camp.

Continue reading “Reporting From BornHack 2021: Hacker Camps Making It Through The Pandemic”

Ten Winners Of The Hackaday Prize Supportive Tech Challenge

Congratulations to the ten projects that have been selected to receive $500, and continue to the finals of the 2021 Hackaday Prize! Each of these are a different take on the Reimagine Supportive Tech Challenge that sought ways to make great hardware ideas work for more people.

Ebooks have made it possible for everyone to have a library in their pocket, and that has included the visually impaired as text-to-speech can read the printed word. But that’s not a complete replacement for reading for yourself and so the Thenar steps in as an affordable, portable braille ebook reader. It leverages a single braille cell on the edge of the device, and a tank-track-style scroll wheel for user input. Complete with a docking station to inductively charge the battery, it’s a high-end reader for those who need an alternative to epaper.

Okay, pop-quiz; how many of us want to have a future involving solar-powered everything? Most of us now have our hands up, but how many of us can set up a high-efficiency solar charge controller ourselves? If this next finalist (pictured at the top) has its way the answer will be just about everyone. The 2.5 kilowatt solar generator in a rugged brief case is packing a whopping 160 (!) 18650 lithium cells. The charging side of the design handles the maximum power-point tracking (MPPT) while the discharging side protects the user with a circuit breaker and all kinds of regulated outputs like 120 V, 24 V, 12 V, and of course all of the USB-C functionality you’d expect from a system like this.

Ten Finalists, Eight Dozen Entries

We cherry-picked two excellent finalists above, but all ten of these are easily worth their own mention (and many have already been individually featured on these pages). Congrats to the folks who will be headed to the finals in October!

It was a tight field of nearly 100 entries for this round, make sure to take some time to check those out and offer kudos in the comment sections of each project. We’re excited to see what comes of the robotics-oriented challenge currently underway!