Careful Cuts Lets Logger Last A Year On A Coin Cell

Coin cells are great for backup power for things like real-time clocks, or even for powering incredibly small mechanical devices like watches. But for something like a data logger, running on a standard microcontroller, most people would reach for a lithium cell of some sort. Not so with this build, though, which squeezes every joule of energy from a coin cell in order to run a data logger for a full year.

Won’t be needing that anymore.

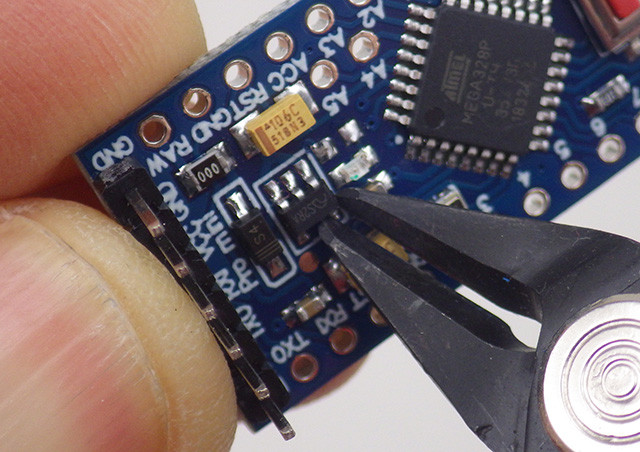
Most of the design and engineering required to improve the efficiency of the data logger involve standard practices for low-power devices such as shutting off unnecessary components and putting the device to sleep when not actively running, but this build goes far beyond that. The Vcc pin on the RTC was clipped which disables some of its internal logic but still keeps its basic functionality intact.

All of the voltage regulators were removed or disabled in favor of custom circuitry that doesn’t waste as much energy. The status and power LEDs were removed where possible, and the entire data logger is equipped with custom energy-efficient code as well.

If you’re starting a low-power project, even one that isn’t a datalogger, it’s worth checking out this build to see just how far you can go if you’re willing to hack at a PCB with cutting tools and a soldering iron. As to why this data logger needed such a low power requirement, it turns out it’s part of a kit being used in classrooms and using a coin cell brought the price of the entire unit down tremendously. Even if you have lithium cells on hand, though, it’s still worthwhile to check out the low power modes of your microcontroller.

Thanks to [Adrian] for the tip!

The Tasmanian Tiger’s Comeback Tour, Powered By Science

Scientists estimate that approximately 900 species have gone extinct in the last five centuries alone, to say nothing of the thousands or millions that vanished from life in the billions of years before that.

Conventional wisdom states that once an animal has gone extinct, it’s gone forever. However, a team from the University of Melbourne hopes to change all that, with their new project aiming to bring the Tasmanian Tiger back to life.
Continue reading “The Tasmanian Tiger’s Comeback Tour, Powered By Science”

The Noble Effort To Put OpenSCAD In The Browser

In a world of CAD packages with arcane or unfriendly interfaces there’s a stand-out player that’s remarkable because it has no interface. OpenSCAD is a CAD package for coders, in which all design elements are created in a scripting language rather than graphically. It’s maybe not for everyone but it has a significant following, and its reach has been extended further as you can now run it from within a modern web browser.

The origins of this project can be tracked back to August of 2021, when when Autodrop3D’s [mmiscool] offered a sizable bounty for anyone willing to port the parametric CAD modeler to web assembly. Developer [Dominick Schroer] ultimately answered the call with openscad-wasm, which implements the core of OpenSCAD as a JavaScript ES6 module. From there, it just needed to get paired with a user interface, and off to the cloud we go.

Opening it up and giving it a go, we found it to be a very usable OpenSCAD version, albeit a little slower to render than the desktop equivalent on a mediocre laptop. We didn’t try exporting and printing an STL, but so far it has given us no reason to believe it wouldn’t be every bit as useful as the version you’re used to.

But wait, there’s more! Parallel to this effort, [Olivier Chafik] has also been working on his own idea of what OpenSCAD in the web should be. He’s using the same core developed by [Dominick], but has combined it with the Monaco editor from Microsoft and a Javascript STL viewer. Despite being very similar, we’re happy to report there’s no rivalry here; in fact, according to the video after the break, it sounds like two the projects have already swapped a bit of code.

The move among desktop applications to move into the browser and often into a pay-to-play cloud has seemed relentless over recent years, so it’s pleasing to see a rare example of a browser migration that’s open-source. It has the handy effect of bringing the CAD package to platforms such as tablets or Chromebooks which wouldn’t normally be an OpenSCAD platform, and this we like, a lot.

Continue reading “The Noble Effort To Put OpenSCAD In The Browser”

3D Printing Snap Fit Joints

Owning a 3D printer seems to progress through stages. You start printing simple shapes. Then you get serious about calibration and quality. Eventually, you move to trying to design and build practical things. To get practical, you often need to join parts together and that requires glue, fasteners, threaded inserts, and plastic welding. However, you can also make parts that fit together using friction and the springiness of plastic. For example, [Lucas Carolo] recently had a look at 3D printing snap-fit joints. These are commonly seen on the end of straps so that you can connect two ends together.

Of course, you can use them anywhere you need a secure connection. However, you might want to consider that since the jaws compress, there will be repeated stress on the part, so it might not be a good choice for items that you will frequently snap together. Also, brittle plastic such as PLA might not be the best choice of materials. There are several different kinds of joints. The cantilever version has a hook that bends into place and, as mentioned earlier, is common on luggage or backpack straps. The post offers tips on how to design a durable hook. In particular, the orientation of the hook during printing is critical because of the stress involved.

Another type of snap-fit joint is the kind you find on many snap electronic enclosures or things like pen caps. In these joints, a large bump (a boss) fits into a similar groove on the other part. The post has a little less information on these but does mention that you should form the bosses with a chamfer. If you want more details, the post links to a great guide and an enclosure tutorial that you should check out.

We’ve covered this topic before and have some other guides to check out. We’ve also seen some pretty innovative connecting methods.