3D Printing For Textile Work

While it isn’t for everyone, some of the best creators we know are experts at working with textiles. While the art is ancient, it isn’t easy and requires clever tools. [Lauren] collected a few 3D prints that can help you with knitting, crochet, and even a knitting loom.

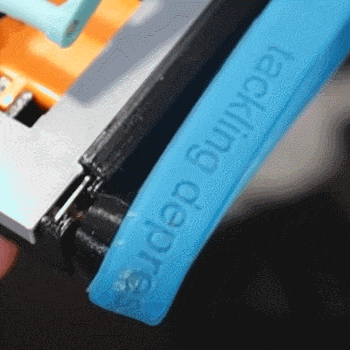
Some of the designs are pretty basic like the yarn bowl, or pretty easy to figure out like the simple machine for re-spooling wool. We were frankly surprised that you can 3D print a crochet hook, although the post does mention that breaking them is a real problem.

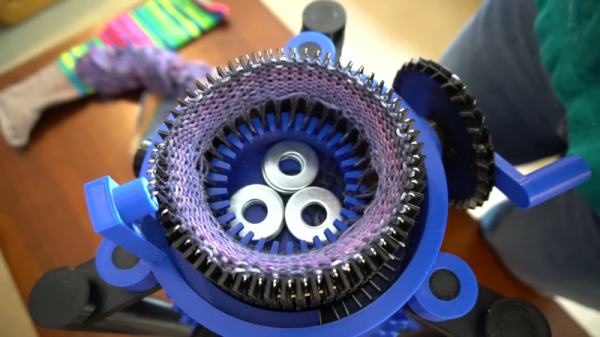
We were really impressed though, with the sock knitting machine. There are actually a few of these out there, and you can see a similar one in the video below. Of course, like a RepRap printer, it needs “vitamins” in the form of metal rods, fasteners, and the like. There’s also a  portable knitting loom which looked interesting.

We aren’t adept enough with fabric arts to know if these tools are serious contenders compared to commercial products, but we have to admit the sock knitting machine looks like it could be. We recently saw a sophisticated loom, although that might be a bit more than most people need. We have looked at open-source knitting machines, too. Of course, if you’d rather not create with textiles, you can always 3D print on them, instead.

Continue reading “3D Printing For Textile Work”

If The Blade Sees Its Shadow, It’s Another 64th Of Accuracy

If you’ve bought a miter saw in the past few years, you might have noticed the LED “laser” that came with it. The goal was to show where on the piece the saw was going to cut. But over a year or two, you might have found the laser to have drifted or skewed into a crooked line. [Fisher] decided that his after-market laser wasn’t entirely accurate enough and added a shadow line instead. (Video, embedded below the break.)

The blade has a thickness (known as kerf), and with a laser to one side, you can only accurately cut on one side of the line. A shadow line works differently. By shining a line at the top of the blade, you get a mark where the blade will cut precisely. You can also see your marks as the laser doesn’t shine over them. Previously, [Fisher] had tried to use LED strips, but after a comment suggested it, he found a sewing light on a gooseneck. It worked great as a small compact light fitting the blade housing. After some quick modifications, hot glue, and duct tape, the light was installed, and the wires were routed while still allowing the saw its full range of motion.

The result is impressive, with a clear shadow on even darker hardwoods. Just the few test cuts he made seemed entirely accurate. Of course, you can always go deeper down the hole of accuracy and measurement. But overall, [Fisher] has a great little mod that speeds up his workflow more accurately. Continue reading “If The Blade Sees Its Shadow, It’s Another 64th Of Accuracy”

Hackaday Links Column Banner

Hackaday Links: September 11, 2022

Good news out of Mars from the little lunchbox that could — in the seven times that MOXIE has run since it arrived in February 2021, it has reached its target production of six grams of oxygen per hour, which is in line with the output of a modest tree here on Earth. The research team which includes MOXIE engineers report that although the solid oxide electrolysis machine has shown it can produce oxygen at almost any time or day of the Martian scale, they have not shown what MOXIE can do at dawn or dusk, when the temperature changes are substantial, but they say they have ‘an ace up (their) sleeve’ that will let them do that. We can’t wait to see what they mean.

In other, somewhat funnier space news — early last Sunday morning, the ESA’s Solar Orbiter was cruising by Venus as part of a gravity-assist maneuver to get the Orbiter closer to the Sun. Two days before the Orbiter was to reach its closest point to the spacious star, it spat a coronal mass ejection in the general direction of both Venus and the Orbiter (dibs on that band name), as if to say ‘boo’. Fortunately, the spacecraft is designed to withstand such slights, but the same cannot be said for Venus — these events have their way with Venus’ atmosphere, depleting it of gasses.

Continue reading “Hackaday Links: September 11, 2022”

Engraving A Puzzle Box? Here’s A Collection Of Single-Line Cryptex Fonts

Here’s a neat resource from [MSRaynsford] that is worth bookmarking for anyone who gets creative with laser engravers, CNC routers, or drawing robots: SVGFonts are single-line symbol fonts that [MSRaynsford] created for his laser-cut and engraved cryptex puzzle boxes. They provide an easy way to engrave text as symbols.

Single-line fonts for engraving that include a runic-looking alphabet, a Greek-inspired set, and two symbol sets based on Flag Semaphore.

CNC engraving of letters and symbols is one of those things that seems simple, but is actually more complex than it may appear. It is often desirable to use a tool to engrave symbols with a single line, in much the same way a person would write them if using a pen. But fonts and art for letters and numbers aren’t normally a single line. Thankfully there is a solution in the form of Hershey text, an extension for which is included in Inkscape. It turns out that Hershey Fonts have their origin back in the 1960s, when the changing landscape of electronics and industry opened new opportunities and demanded new solutions.

That’s why, when [MSRaynsford] needed fonts in different styles and symbols for creating his puzzle boxes, he had to design them himself and they had to be single-line vector art, just like Hershey Text. The small collection includes English letters designed to resemble a runic alphabet, a Greek-inspired series, and two coded alphabets based on flag semaphore.

Grab ’em on GitHub, because you never know when you’ll need to make a quick cryptex.

A display in a field showing the water stress index over time

Hackaday Prize 2022: Using Infrared Thermometers To Measure Crops’ Water Stress

If you live anywhere on the Northern Hemisphere, you’re likely to have experienced one of the many heatwaves that occurred this summer. Extreme heat is dangerous for humans and animals, but plants, including important crops, also suffer. High temperatures lead to increased transpiration and evaporation, and if the water lost in this way is not replenished quickly enough, plants will stop growing and eventually wither and die.

In order to keep track of the amount of water available to crops, [Florian Ellsäßer] built the Crop Water Stress Sensor: a device that checks whether plants have enough moisture available to stay healthy. It does this by measuring the temperature of the leaves to calculate evaporation levels. If the leaves are cooler than their surroundings, this means that water is evaporating from them and the plant apparently has enough water available. If the leaves’ temperature is closer to the ambient temperature, then the plant may be running low on water.

[Florian]’s system performs this measurement using an infrared array, which is basically a low-resolution thermal camera that remotely measures the temperature of everything in its field of view. This IR array is pointed at a field, where it will see both leaves and the ground between them. The difference in temperature between these two can then be used to calculate the Crop Water Stress Index (CWSI), a standardized measure of how well-hydrated plants are. The result is shown on a display and also indicated using a convenient red-yellow-green status LED that shows if the crops in question need watering.

The system can be solar powered for completely remote operation, while its data can be read out through a WiFi interface. [Florian] is planning to update the design with a LoRa interface for greater range: the eventual goal is to build a large network of these sensors throughout agricultural areas and use the combined data to raise awareness of water shortages in certain areas. In order to make the sensors easy to build by anyone interested, all design files are available on the project page.

Keeping crops moisturized is one of the key tasks of agriculture, and we’ve seen several projects that aim to optimize and automate it, from a simple-but-effective ESP8266-based moisture sensor to complete hydroponics systems.

A Crowned Pulley Keeps Robot’s Treads On Track

[Angus] at Maker’s Muse recently created a new and tiny antweight combat robot (video, embedded below) and it has some wonderfully clever design elements we’d like to highlight. In particular: how to keep a tracked robot’s wheel belt where it belongs, and prevent it from slipping or becoming dislodged. In a way, this problem was elegantly solved during the era of the steam engine and industrial revolution. The solution? A crowned pulley.

Silicone bracelet and crowned pulley result in a self-centering belt with a minimum of parts.

A crowned pulley is a way of automatically keeping a flat belt centered by having a slight hump in the center of the pulley, which tapers off on either side. Back when steam engines ran everything, spinning axles along the ceiling transferred their power to machinery on the shop floor via flat belts on pulleys. Crowned pulleys kept those flat belts centered without any need for rims or similar additions.

The reason this worked so well for [Angus]’s robot is partly its simplicity, and partly the fact that it works fantastically with the silicone wrist bracelets he uses as treads. These bracelets are like thick rubber bands, and make excellent wheel substitutes. They have great grip, are cheap and plentiful, and work beautifully with crowned pulleys as the hubs. It’s a great solution for a tiny robot, and you can how it self-centers in the image here.

Antweight robots are limited to 150 grams which means every bit counts, and that constraint leads to some pretty inventive design choices. For example, [Angus]’s new robot also has a clever lifter mechanism that uses a 4-bar linkage designed to lever opponents up using only a single motor for power. Watch [Angus] explain and demonstrate everything in his usual concise and clear manner in the video, embedded below.

Continue reading “A Crowned Pulley Keeps Robot’s Treads On Track”

Full Transparency: Stronger FDM Prints

We always look forward to [Stefan’s] CNC Kitchen videos. They are usually useful, but always carefully thought out and backed with experimental data. His latest is about creating transparent and strong FDM prints. You normally don’t associate the FDM process with clear prints even with clear filament. The problem is the filament doesn’t lay down in a particular structure, so light scatters producing a sort of white color. However, [Stefan] found a post on Printables called “How to Print Glass” which changes the structure of the part and, of course, [Stefan] wanted to see if the process also led to stronger parts.

The process is slow and the basic idea is to use no top and bottom layers. The entire part is essentially infill. You also need to set the infill to go in the same direction for each layer. As [Stefan] mentions, there have been other efforts to make transparent parts, especially in vase mode. Of course, you can also get transparent parts using resin printing, although it isn’t always as easy as you might think.

Continue reading “Full Transparency: Stronger FDM Prints”