A Neat Trick To 3D Print With Fewer Warping Issues

Warping! It messes up your 3D printed parts, turning them into a useless, dimensionally-inaccurate mess. You can design your parts around it, or try and improve your printer in various ways. Or, you can check out some of the neat tricks [Jan] has to tackle it.

The basic concept is a particularly valuable one. [Jan] notes that ABS and PLA are relatively compatible. In turn, he found that printing ABS parts on top of a thin layer of PLA has proven a great way to improve bed adhesion and reduce warping. He’s extended this technique further to other material combinations, too. The trick is to find two materials that adhere well to each other, where one is better at adhering to typical print beds. Thus, one can be used to help stick the other to the print bed. [Jan] also explains how to implement these techniques with custom G-Code and manual filament changes.

We’ve been discussing the issue of warping prints quite often of late. It’s a common problem we all face at one time or another! Video after the break.

Continue reading “A Neat Trick To 3D Print With Fewer Warping Issues”

Apple Forces The Signing Of Applications In MacOS Sequoia 15.1

The dialogue that greets you when you try to open an unsigned application in MacOS Sequoia 15.1.

Many MacOS users are probably used by now to the annoyance that comes with unsigned applications, as they require a few extra steps to launch them. This feature is called Gatekeeper and checks for an Apple Developer ID certificate. Starting with MacOS Sequoia 15, the easy bypassing of this feature with e.g. holding Control when clicking the application icon is now no longer an option, with version 15.1 disabling ways to bypass this completely. Not unsurprisingly, this change has caught especially users of open source software like OpenSCAD by surprise, as evidenced by a range of forum posts and GitHub tickets.

The issue of having to sign applications you run on MacOS has been a longstanding point of contention, with HomeBrew applications affected and the looming threat for applications sourced from elsewhere, with OpenSCAD issue ticket #880 from 2014 covering the saga for one OSS project. Now it would seem that to distribute MacOS software you need to have an Apple Developer Program membership, costing $99/year.

So far it appears that this forcing is deliberate on Apple’s side, with the FOSS community still sorting through possible workarounds and the full impact.

Thanks to [Robert Piston] for the tip.

Fix That Old Remote With Graphite

A button that stopped working has probably led to more than a few smashed remotes over the years. Fortunately [pescado99] has shared a beautifully simple cure for dead or dying remote buttons: graphite dry lubricant.

Most remotes operate by pushing a conductive carbon coating on the back of the button onto a pair of contacts on the PCB. Unfortunately, that conductive coating can wear off, leaving you with a dead or dying button. The video after the break [pescado99] demonstrates how to use a cotton swab to apply powdered graphite to the rear of the buttons to make them conductive again. A soft pencil can also be used, but the graphite works better.

This beautifully simple hack is too good not to share and could save many remotes from landfills. If you’re more interested in upgrading remote, you can build your own universal remote or replace it with a web browser.

Continue reading “Fix That Old Remote With Graphite”

Building A Hydrogen-Powered Foam Dart Cannon

Nerf blasters are fun and all, but they’re limited by the fact they have to be safe for children to play with. [Flasutie] faced no such restrictions when building his giant 40 mm foam dart launcher, and it’s all the better for it.

This thing is sizeable—maybe two to four times bigger than your typical Nerf blaster. But that’s no surprise, given the size of the foam ammunition it fires. [Flasutie] shows us the construction process on how the 3D-printed blaster is assembled, covering everything from the barrel and body assembly to the chunky magazine. Loading each round into the chamber is a manual process, vaguely akin to a bolt-action mechanism, but simplified.

It’s the method of firing that really caught our eye, though. Each round has a cartridge and a foam projectile. Inside the cartridge is a quantity of flammable HHO gas generated, presumably, from water via electrolysis. The blaster itself provides power to a spark gap in the cartridge that ignites the gas, propelling the projectile through the barrel and out of the blaster.

We’ve seen plenty of Nerf blasters and similar builds around these parts, including some with a truly impressive rate of fire. Video after the break.

Continue reading “Building A Hydrogen-Powered Foam Dart Cannon”

Close up of a DA14 nixie multimeter

The Nixie Tube Multimeter That Almost Made A Comeback

In a world of digital monotony, the Avo DA14 digital multimeter, with its vintage nixie tube charm, is a refreshing gem. Recently refurbished by [Thomas Scherrer], this multimeter video review is a blend of nostalgia and tech savvy. The DA14 not only has style, but substance — delivering resistance, current, and voltage measurements that make you wonder why more multimeters didn’t stick with this stylish glow.

As [Thomas] starts by powering up the DA14, we were instantly captivated as the Nixie tubes illuminate in their retro orange. With each twist of the dial, he demonstrates just how intuitive the multimeter is to operate, walking us viewers through each function while giving some extra love to its calibration process—a neat front-panel potentiometer that requires just a touch of finesse to get perfect readings.

But, as with all good tinkering tales, things go downhill when issues with analog inputs and the display pop up. A teardown reveals a beautifully complex inner assembly of transformers, rectifiers, and circuit boards, giving the DA14 its impressive yet fragile structure. When the critical defective display chip is found, hopes for a full repair dim. His story ends without a revival, but if you want to see a similar attempt that did get resurrected – albeit without those nixie digits – take a look at this LCD transplant we covered previously.

Continue reading “The Nixie Tube Multimeter That Almost Made A Comeback”

Capturing Light In A Vacuum: The Magic Of Tube Video Cameras

Cameras are a funny rabbit hole to fall down as a hacker, because we have well over a century of items to pick and choose from, a lot of which can be had for relative pennies. In my case I have more of them than I’d care to mention, mostly film cameras and 8mm movie cameras, but there are one or two that are entirely different. My first interest in electronics came through PAL televisions, so it’s hardly surprising that along the way I’ve also acquired more than one chunky old tube-based video camera. These devices are now long ago supplanted by their solid state replacements, but they retain a fascination for me as the mirror of the CRT-based TV sets I know so well. It’s time for a fascinating descent into the world of analogue video.

Electrons chasing light, chasing electrons

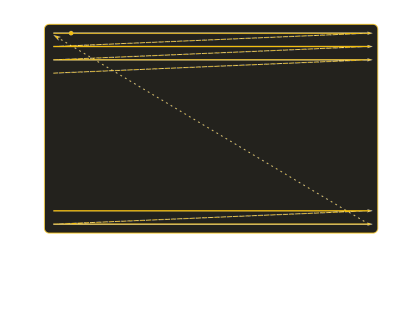
The zig-zag line pattern of a TV scan.
A raster scan pattern. Ian Harvey, Public domain.

The basic mode of operation behind all but some of the very earliest electronic camera tubes is that an electron gun paints its raster of electrons onto a light-sensitive target, and the current flowing through the electron beam varies in proportion to the light at each particular point on the target. This can be used to create a voltage, which when combined with the various sync pulses makes a video signal that would be understood by a monitor. The various different types of tubes have names such as Iconoscope, Emitron, or Vidicon, and while the main differences between those various types of tube lie in the combination of materials and design of their targets. Successive generations of tube made improvements to sensitivity and noise performance, first combining photoemissive layers with electron multiplying layers to amplify the video signal in much the same way as a photomultiplier tube does, and then using photoconductive targets to vary the conductivity of the target depending on the light at a particular point. Continue reading “Capturing Light In A Vacuum: The Magic Of Tube Video Cameras”

Producing An Exquisite Wooden Keyboard

Keyboards! They’ve been almost universally made out of plastic since the dawn of the microcomputer era. Meanwhile, wood is a rather desirable material and it lends itself rather well to touch-heavy human interface devices. As [ProcessX] shows us, though, it can take quite a bit of work to fabricate a keyboard entirely out of this material.

The video shows us the construction of a Japanese wooden keyboard from Hacoa, which retails for around $1000 USD. The video shows us how the wooden housing is produced from start to finish, beginning with the selection of some fine walnut. From there, we get to see how the frame is routed out and machined, along with the more delicate work to create all the keycaps out of wood, too. They’re laser engraved to give them high-quality markings that will last the test of time. What we don’t see is the construction of the electronics—it appears that’s handled separately, and the wooden frame and keycaps are then assembled around the otherwise complete existing keyboard.

It’s nice to see what it takes to produce commercial-quality parts like this out of wood. We’ve seen other wooden keyboard builds before, too.

Continue reading “Producing An Exquisite Wooden Keyboard”