To Test A (Smart) LED

Adding LEDs to a project used to be enough to make it cool. But these days, you need arrays of addressable multi-color LEDs, and that typically means WS2812B or something similar. The problem is that while it was pretty easy to test garden-variety LEDs, these devices can be a bit harder to troubleshoot. [Gokux] has the answer, as you can see in the video below.

Testing these was especially important to [Gokux] because they usually swipe the modules from other modules or LED strips. The little fixture sends the correct pulses to push the LED through several colors when you hold it down to the pads.

However, what if the LED is blinking but not totally right? How can you tell? Easy, there’s a reference LED that changes colors in sync with the device under test. So, if the LEDs match, you have a winner. If not… well, it’s time to desolder another donor LED.

This is one of those projects that you probably should have thought of, but also probably didn’t. While the tester here uses a Xiao microcontroller, any processor that can drive the LEDs would be easy to use. We’d be tempted to breadboard the tester, but you’d need a way to make contact with the LED. Maybe some foil tape would do the trick. Or pogo pins.

Continue reading “To Test A (Smart) LED”

Flow chart containing directions on how to determine if you should use this toolkit as a resident, business owner, civic activist, or government official

Hackable Cities

There are many ways to hack the world. Graduate students at Parsons The New School for Design developed a guide for hacking the biggest piece of technology humans have developed – the city.

One of the things we love here at Hackaday is how hacking gives us a tool to make the world a better place for ourselves and those around us. Even if it’s a simple Arduino-based project, we’re (usually) trying to make something better or less painful.

Taking that same approach of identifying a problem, talking to the end user, and then going through design and execution can also apply to projects at a larger scale. Even if you live in an already great neighborhood, there’s likely some abandoned nook or epic vista that could use some love to bring people out from behind their screens to enjoy each other’s company. This guide walks us through the steps of improving public space, and some of the various ways to interact with and collate data from the people and organizations that makeup a community. This could work as a framework for growing any nascent hacker or makerspaces as well.

Hacking your neighborhood can include anything: a roving playground, a light up seesaw, or a recycling game. If you’ve seen any cool projects in this regard, send them to the tipsline!

3D Print An Instant Camera

Instant photography occupies a niche in film photography that has endured despite its relatively high cost and the ease of newer digital technologies. There are two main manufacturers, Polaroid and Fujifilm, as well as a few smaller boutique camera makers. Into this comes [Toast], with an entirely 3D printed instant camera, not a Polaroid as he calls it, but one for Fuji Instax Mini film.

Currently available instant film comes in cartridges in which each picture is a layered design with a sachet of developing chemicals at the end. Once the film part has been exposed it is developed by passing through a set of rollers which squeeze the chemicals evenly over the film, allowing it to develop. The camera in the video below the break is simple enough, a pinhole box camera design, but the huge challenge and the interesting part of the video comes in the developer attachment which has those rollers. It’s considerably more challenging than it might at first appear, and he goes through many iterations before getting it right with some steel rollers.

The 3D print files are available but only at a price, and despite that we think there’s enough in the video below for anyone who wants to experiment for themselves. For the rest of us it’s an insight into a technology we all know about, but maybe have never looked closely at.

Instax has appeared here before, usually as an instant back for older cameras, but sometimes for far tastier projects.

Continue reading “3D Print An Instant Camera”

Harvesting Water With High Voltage

Atmospheric water harvesting is a way to obtain fresh water in arid regions, as there is always some moisture in the air, especially in the form of morning fog. The trick lies in capturing this moisture as efficiently as possible, with a range of methods available that start at ancient low-tech methods involving passive fog droplet capture all the way to variants of what are effectively large dehumidifiers.

A less common way involves high-voltage and found itself the subject of a recent Plasma Channel video on YouTube. The inspiration for the build was a 2018 paper by [Maher Damak] et al. (PDF) titled Electrostatically driven fog collection using space charge injection.

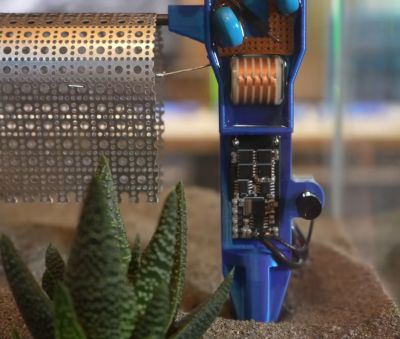
One of the two stakes that make up the electrostatic precipitator system for atmospheric water harvesting. (Credit: Plasma Channel, YouTube)

Rather than passively waiting for dew to collect on the collector, as with many of the methods detailed in this review article by [Xiaoyi Liu] et al., this electrostatic approach pretty much does what it says on the tin. It follows the principle of electrostatic precipitators with a high-voltage emitter electrode to ionize the air and grounded collector wires. In the video a small-scale version (see top image) was first constructed, demonstrating the effectiveness. Whereas the passive grid collected virtually none of the fog from an ultrasonic fog maker, with 35 kV applied the difference was night and day. No water was collected with the first test, but with power applied a significant 40 mL was collected in 5 minutes on the small mesh.

With this scale test complete, a larger version could be designed and tested. This simplifies the emitter to a single wire connected between two stakes, one of which contains the 20 kV HV generator and battery. The mesh is placed right below it and grounded (see image). With an extreme fog test inside a terrarium, it showed a very strong effect, resulting in a harvest of 14 mL/Wh for this prototype. With a larger scale version in a real-life environment (i.e. desert) planned, it’ll be interesting to see whether this method holds up in a more realistic scenario.

Continue reading “Harvesting Water With High Voltage”

Old IPad To New Screen

Turning surplus LCD panels into stand-alone monitors with the help of a driver board is an established hack, and a search of eBay or AliExpress will turn up boards for almost any widely available panel. [Drygol] has a couple of old iPad screens, and has done exactly this with them. What makes these two projects stand aside from the crowd is their attention to detail, instead of creating a hacky monitor this is almost something you might buy as a product.

For a start, both screens sit in very smart 3D printed cases. Behind them is the LCD driver, and perhaps this is where many people might leave it. But the point of an iPad is portability, so the first one receives a suitably large lithium polymer battery and its associated electronics. As such a thing is of limited use without a battery level monitor, so one is mounted flush with the case on the outside. The final touch is a Bluetooth audio board and speaker, making an all-in-one peripheral we’d be happy to carry with us.

The second screen is a slimmer version of the first case, with a different board that has an onboard audio channel. It’s mounted in a stand with a MiSter FPGA emulator, for a very neat and compact desktop set-up.

This project shows what can be done with these screens, and raises the bar. All the files are included, so it should be possible to make your own. We expect someone might stick a Raspberry Pi in there, to make… something like an iPad.

This isn’t the first time we’ve seen an iPad screen mod.

Illustrated Kristina with an IBM Model M keyboard floating between her hands.

Keebin’ With Kristina: The One With All The Green Keyboards

Okay, you have to see the gallery to appreciate it, but this keyboard was designed to resemble a red cedar tree with the green shell and wood bottom and the copper PCB showing through the tree cutouts on the sides.

A lovely green split keyboard with PlayStation buttons.
Image by [WesternRedCdar] via reddit
But you know why I chose this picture — those PS2 buttons. According to [WesternRedCdar] they are just for fun, although they do allow for pressing Ctrl and Alt at the same time with a single thumb.

Oh, and are those Nintendo Switch joysticks above the PS2 buttons? Those are for the mouse and vertical/horizontal scrolling. Honestly, this seems like a great amount of thumb controls. The basics are there (presumably), and there isn’t any thumb-extending excess, like keys on the insides by the mouse.

This bad mama jama runs on an RP2040 and has 50 hand-wired Cherry Brown switches plus the PS2 buttons. In the build guide, you can read all about [WesternRedCdar]’s troubles with integrating those. The Nintendo Switch joysticks weren’t terribly easy, either, since the ribbon connector can’t be soldered directly.

The final issue was one of weight. Since many of the switches stand quite tall, it sort of jostles the keyboard to actuate them. [WesternRedCdar] opined that that the ideal solution would have been to use metal base plates instead of wood, but took care of the issue by adding layers of 1/8″ steel flat bar inside the case.

Continue reading “Keebin’ With Kristina: The One With All The Green Keyboards”

Line Power With No Transformer

Normally, when you want a low DC voltage from the AC line, you think about using a transformer of some kind. [RCD66] noticed that an AC monitor meter must have some sort of power supply but had no transformers in sight. That led to an exploration of how those work and how you can use them, too. You can watch the work in the video below.

Sensibly, there is a transformer in the test setup — an isolation transformer to make it safe to probe the circuit. But there’s no transformer providing voltage changes. Isolation is important even if you are taking apart something commercial that might be trasformerless.

The circuit is simple enough: it uses a capacitor, a resistor, and a pair of diodes (one of them a zener diode). He uses this basic circuit to drive simple regulators with input and output filter capacitors. We’ve seen many variations on this design over the years.

You can’t draw a lot of power through this arrangement. But sometimes it is all you need. However, this is pretty dangerous, as we’ve discussed before. Be sure you understand exactly what the risks are before you decide to build something like this.

Continue reading “Line Power With No Transformer”