AqMood Is An Air Quality Monitor With An Attitude

You take your air quality seriously, so shouldn’t your monitoring hardware? If you’re breathing in nasty VOCs or dust, surely a little blinking LED isn’t enough to express your displeasure with the current situation. Luckily, [Tobias Stanzel] has created the AqMood to provide us with some much-needed anthropomorphic environmental data collection.

To be fair, the AqMood still does have its fair share of LEDs. In fact, one might even say it has several device’s worth of  them — the thirteen addressable LEDs that are run along the inside of the 3D printed diffuser will definitely get your attention. They’re sectioned off in such a way that each segment of the diffuser can indicate a different condition for detected levels of particulates, VOCs, and CO2.
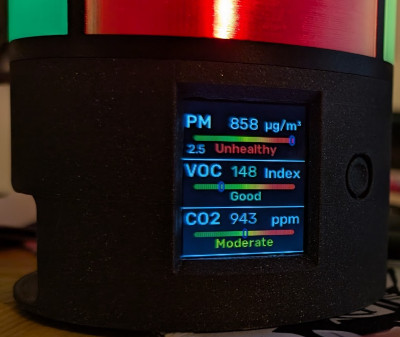
But what really makes this project stand out is the 1.8 inch LCD mounted under the LEDs. This display is used to show various emojis that correspond with the current conditions. Hopefully you’ll see a trio of smiley faces, but if you notice a bit of side-eye, it might be time to crack a window. If you’d like a bit more granular data its possible to switch this display over to a slightly more scientific mode of operation with bar graphs and exact figures…but where’s the fun in that?

[Tobias] has not only shared all the files that are necessary to build your own AqMood, he’s done a fantastic job of documenting each step of the build process. There’s even screenshots to help guide you along when it’s time to flash the firmware to the XIAO Seeed ESP32-S3 at the heart of the AqMood.

If you prefer your air quality monitoring devices be a little less ostentatious, IKEA offers up a few hackable models that might be more your speed.

Half The Reflow Oven You Expected

Toaster oven reflow projects are such a done deal that there should be nothing new in one here in 2025. Take a toaster oven, an Arduino, and a thermocouple, and bake those boards! But [Paul J R] has found a new take on an old project, and better still, he’s found the most diminutive of toaster ovens from the Australian version of Kmart. We love the project for the tiny oven alone.

The brains of the operation is an ESP32, in the form of either a TTGO TTDisplay board or an S3-Zero board on a custom carrier PCB, with a thermistor rather than a thermocouple for the temperature sensing, and a solid state relay to control mains power for the heater. All the resources are in a GitHub repository, but you may have to make do with a more conventionally-sized table top toaster oven if you’re not an Aussie.

If you’re interested, but want a better controller board, we’ve got you covered.

An Inexpensive Way To Break Down Plastic

Plastic has been a revolutionary material over the past century, with an uncountable number of uses and an incredibly low price to boot. Unfortunately, this low cost has led to its use in many places where other materials might be better suited, and when this huge amount of material breaks down in the environment it can be incredibly persistent and harmful. This has led to many attempts to recycle it, and one of the more promising efforts recently came out of a lab at Northwestern University.

Plastics exist as polymers, long chains of monomers that have been joined together chemically. The holy grail of plastic recycling would be to convert the polymers back to monomers and then use them to re-make the plastics from scratch. This method uses a catalyst to break down polyethylene terephthalate (PET), one of the more common plastics. Once broken down, the PET is exposed to moist air which converts it into its constituent monomers which can then be used to make more PET for other uses.

Of course, the other thing that any “holy grail” of plastic recycling needs is to actually be cheaper and easier than making new plastic from crude oil, and since this method is still confined to the lab it remains to be seen if it will one day achieve this milestone as well. In the meantime, PET can also be recycled fairly easily by anyone who happens to have a 3D printer around.

Inside A Fake WiFi Repeater

Fake WiFi repeater with a cheap real one behind it. (Credit: Big Clive, YouTube)

Over the years we have seen a lot of fake electronics, ranging from fake power saving devices that you plug into an outlet, to fake car ECU optimizers that you stick into the OBD port. These are all similar in that they fake functionality while happily lighting up a LED or two to indicate that they’re doing ‘something’. Less expected here was that we’d be seeing fake WiFi repeaters, but recently [Big Clive] got his hands on one and undertook the arduous task of reverse-engineering it.

The simple cardboard box which it comes in claims that it’s a 2.4 GHz unit that operates at 300 Mbps, which would be quite expected for the price. [Clive] obtained a real working WiFi repeater previously that did boast similar specifications and did indeed work. The dead giveaway that it is a fake are the clearly fake antennae, along with the fact that once you plug it in, no new WiFi network pops up or anything else.

Inside the case – which looks very similar to the genuine repeater – there is just a small PCB attached to the USB connector. On the PCB are a 20 Ohm resistor and a blue LED, which means that the LED is being completely overdriven as well and is likely to die quite rapidly. Considering that a WiFi repeater is supposed to require a setup procedure, it’s possible that these fake repeaters target an audience which does not quite understand what these devices are supposed to do, but they can also catch more informed buyers unaware who thought they were buying some of the cheap real ones. Caveat emptor, indeed.

Continue reading “Inside A Fake WiFi Repeater”

Your Badminton Racket Needs Restringing? There’s A DIY Machine For That

We don’t often get our badminton rackets restrung, but if we did, [kuokuo702]’s PicoBETH project would be where we’d turn. This is a neat machine build for a very niche application, but it’s also a nicely elaborated project with motors, load cells, and even a sweet knobby-patterned faceplate that is certainly worth a look even if you’re not doing your own restringing.

We’ll admit that everything we know about restringing rackets we learned by watching [kuokuo]’s demo video, but the basic procedure goes like this: you zigzag the string through the holes in the racket, controlling the tension at each stage along the way. A professional racket frame and clamp hold the tension constant while you fiddle the string through the next hole, but getting the tension just right in the first place is the job of [kuokuo]’s machine. It does this with a load cell, stepper motor, and ball screw, all under microcontroller control. Pull the string through, let the machine tension it, clamp it down, and then move on to the next row.

Automating the tension head allows [kuokuo] to do some fancy tricks, like pre-stretching the strings and even logging the tension in the string at each step along the way. The firmware has an extensive self-calibration procedure, and in all seems to be very professional. But it’s not simply functional; it also has a fun LEGO-compatible collection of bumps integrated into the 3D-printed dust cover. That way, your minifigs can watch you at work? Why not!

Automating random chores is a great excuse to build fun little machines, and in that vein, we salute [kuokuo]’s endeavor. Once you start, you’ll find stepper motors sprouting all around like crocuses in a spring field. And speaking of spring, Easter is just around the corner. So if you don’t play badminton, maybe it’s time to build yourself an eggbot.

Continue reading “Your Badminton Racket Needs Restringing? There’s A DIY Machine For That”

Supercon 2024: Yes, You Can Use The Controller Area Network Outside Of Cars

Ah, the CAN bus. It’s become a communication standard in the automotive world, found in a huge swathe of cars built from the mid-1990s onwards. You’ll also find it in aircraft, ships, and the vast majority of modern tractors and associated farm machines, too.

As far as [Randy Glenn] is concerned, though, the CAN bus doesn’t have to be limited to these contexts. It can be useful far beyond its traditional applications with just about any hardware platform you care to use! He came down to tell us all about it at the 2024 Hackaday Supercon.

Continue reading “Supercon 2024: Yes, You Can Use The Controller Area Network Outside Of Cars”

Custom Slimline CD Player Hides Out Under Speaker

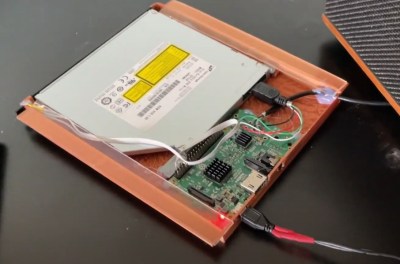
In the era of digital streaming, the market is full of wireless speakers that will play content from your smartphone or pull it down from the Internet directly over WiFi. But if you’re feeling a bit nostalgic and want to throw on one of your old CDs, well, you might have a problem. That’s the situation [Chad Boughton] recently found himself in, so he decided to build a compact CD player that could discreetly connect up to his fancy Klipsch speaker.

The optical drive itself was the easy part, as [Chad] already had a laptop-style drive in an external enclosure that he could liberate. But of course, the speaker wouldn’t know what to do with an external disc drive, so there needed to be an intermediary. Enter the Raspberry Pi.

It might not look like it at first glance, but that’s a Pi 3 tucked into the back of the 3D printed frame. It would have been too tall in its original configuration, so [Chad] removed the USB and Ethernet ports; a modification we’ve covered in the past. Of course, he still needed to use the USB ports, so he ended up soldering the two cables — one to the CD drive and the other to the back of the speaker — directly to the Pi.

When plugged into the Raspberry Pi, the Klipsch speaker shows up as a USB audio device, so the software side of things was relatively simple. [Chad] installed VLC to handle CD playback, but he still needed a way to control everything. To that end, a IR receiver hooked up to the Pi’s GPIO pins means the Pi can detect the signals coming from the speaker’s original remote and pass the appropriate command on to VLC. The whole thing is very well integrated, and you could be forgiven for thinking it might be some kind of stock upgrade module at first glance.

Despite recently celebrating its 40th birthday, the CD is unlikely to completely disappear from our lives anytime soon. Manufacturers can turn their back on the standard if they want, but so long as folks still want to play them, they’ll keep coming up with inventive ways to make it happen.

Continue reading “Custom Slimline CD Player Hides Out Under Speaker”