Nikon Resurrection: Repairing A Broken Lens

Modern DSLR cameras are amazing devices. Mechanics, electronics, and optics, all rolled up in a single package. All that technology is great, but it can make for a frustrating experience when attempting any sort of repair. Lenses can be especially difficult to work on. One misalignment of a lens group or element can lead to a fuzzy image.

[Kratz] knew all this, but it didn’t stop him from looking for a cheap lens deal over on eBay. He found a broken Nikon DSLR 55-200mm 1:4-5.6 AF-S VR camera lens for $30. This particular lens is relatively cheap – you can pick up a new one for around $150 online. Spending $30 to save $120 is a bit of a gamble, but [Kratz] went for it.

The lens he bought mostly worked – the auto-focus and vibration reduction system seemed to be fine. The aperture blades however, were stuck closed. Aperture blades form the iris of a lens. With the blades closed down, the lens was severely limited to brightly lit situations. All was not lost though, as the aperture is a relatively simple mechanical system, which hopefully would be easy to repair.

pinNikonKeeping screws and various parts in order is key when taking apart a lens. [Kratz] used a tip he learned right here on Hackaday: He drew a diagram of the screw positions on a thick piece of paper. He then stuck each screw right into the paper in its proper position.

Carefully removing each part, [Kratz] found a pin had slipped out of the rod that connects the lens’ internal parts with the external aperture control arm. Fixing the pin was simple. Getting the lens back together was quite a bit harder. Several parts have to be aligned blindly. [Kratz] persevered and eventually everything slipped into alignment. The finished lens works fine, albeit for a slightly noisy auto-focus.

It’s worth noting that there are service and repair manuals for many cameras and lenses out there in the dark corners of the internet, including [Kratz]’s 55-200 lens. Reading the repair procedures Nikon techs use shows just how many tools, fixtures, and custom bits of software go into making one of these lenses work.

Neil Movva: Adding (wearable) Haptic Feedback To Your Project

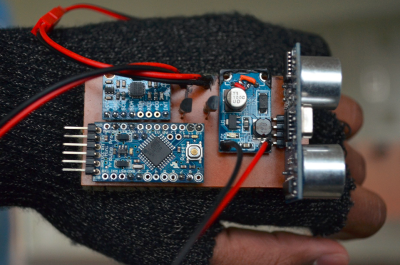
[Neil Movva] is not your average college student. Rather than studying for exams or preparing to defend a dissertation, he’s working on a project that will directly help the disabled. The project is Pathfinder, a wearable haptic navigation system for the blind. Pathfinder is an ambitious project, making it all the way to the semifinals of the 2015 Hackaday Prize. Haptics, the technology of providing feedback to a user through touch, lies at the core of Pathfinder. [Neil] was kind enough to present this talk about it at the Hackaday SuperConference.

Continue reading “Neil Movva: Adding (wearable) Haptic Feedback To Your Project”

Hacklet 89 – Star Wars Projects

Star Wars is an inspirational force to be reckoned with. Few movie franchises have quite so many fans creating everything from elaborate cosplay outfits to fully functional robots. At the 2015 Hackaday SuperCon, former R2D2 driver Grant Imahara mentioned that LucasArts used to maintain a fleet of robots to be deployed at events. Once the execs realized hacker, maker, and hobbyist robots are now more advanced than the machines they built for the actual films, they mothballed the fleet. If you see R2 at a Star Wars event this season, it’s probably an enthusiast behind the controls. This week’s Hacklet is dedicated to the best Star Wars projects on Hackaday.io!

targetshootWe start with [Nathan Gray] and Star Wars Nerf Targets. [Nathan] needed a Star Wars themed game for an event for the kids, and he needed it fast. [Nathan] built a Nerf shooting gallery game with a Star Wars twist. The idea is to shoot the bad guys with Nerf darts. Targets have two sides, so you never can be sure if you’ll see a storm trooper or a friendly Wookie. Hits are detected by piezoelectric disks on each target. A control panel starts the game, keeps score, and plays some great sound effects. An Arduino compatible Teensy 2.0 keeps everything running smoothly. [Nathan] reports that the game was a hit with the kids, and everyone else at the party. Even Grandma had to give the Star Wars Nerf Targets game a try!


vaporatorNext up is Hackaday’s own [Brian Benchoff] with The Hackaday Prize Moisture Vaporator. The 2015 Hackaday Prize promo video called for something space related. Since Southern California has plenty of desert around, a moisture vaporator straight out of Tatooine was just what the doctor ordered. [Brian], [Matt], [Rich] and [Alek] handled most of the construction at the Hackaday Hackerspace in Pasadena. Final assembly was a team effort out in the field. The basic frame of the vaporator consisted of 1 x 3 lumber joined with pocket screws. An iron pipe served as the spine. [Brian] added plenty of greebles to give the vaporator just the right look. The result makes us long for a trip to Toshi Station to pick up some power converters.

life-signs[Davedarko] is up next with Towani Lifesign Wristdevice – Star Wars Ewoks. This was one of [Dave’s] earliest projects on Hackday.io, way down at project #616. He originally built it for the Sci-Fi contest we held in 2014. The Towani family was in the Ewoks movies, which were lesser known spinoffs of the original Star Wars films. The wristbands showing the family’s vitals were featured a few times in the movies. [Dave’s] version is more than a movie prop, it actually works. He’s using an open hardware pulse sensor along with an Arduino Mini to display status on a trio of LEDs.

bb8Finally, we have [Enrico] with Our own BB-8 droid. BB-8 made a splash when he rolled out on stage during Star Wars Celebration. Everyone wondered how the original was done. We’ve since found out that the BB-8 uses Sphero’s technology to get around. However, many of the movie scenes were done with good old-fashioned puppeteer work. [Enrico] is building his own version of BB-8 using holonomic wheels inside the sphere, with a magnetically attached head. He’s planning to 3D print the major parts of his droid. So far, [Enrico] has started testing with magnets. A few printed plastic parts from his R2D2 build have been standing in for the BB-8 shell.

If you want to see more Star Wars projects, check out our new Star Wars project list! If I missed your project due to a great disturbance in the force, don’t be a nerf herder! Just drop me a message on Hackaday.io. That’s it for this week’s Hacklet. As always, see you next week. Same hack time, same hack channel, bringing you the best of Hackaday.io! May the force be with you.

Rory Aronson On Documenting Open Source Projects

Every project starts off with an idea. Sometimes those ideas are bigger than one person, or even a small group of people. That was the position [Rory Aronson] found himself in with Farmbot, his finalist entry in the 2015 Hackaday Prize. Documentation was key for [Rory]. Farmbot first came into the world in the form of a white paper. The paper included a request for collaborators, making this an open source project from day 0. Documentation has been important throughout the Farmbot project, so it was naturally the topic of [Rory’s] talk at the 2015 Hackaday SuperConference.

Continue reading “Rory Aronson On Documenting Open Source Projects”

Rubber Tanks And Sonic Trucks: The Ghost Army Of World War II

Winston Churchill once told Joseph Stalin “In wartime, truth is so precious that she should always be attended by a bodyguard of lies”. During World War II, the power of these bodyguards, in the form of military deception, became strikingly apparent. The German military was the most technologically advanced force ever encountered. The Germans were the first to use jet-powered aircraft on the battlefield. They created the enigma machine, which proved to be an extremely difficult system to break. How could the Allies possibly fool them? The answer was a mix of technology and some incredibly talented soldiers.

The men were the 23rd Headquarters Special Troops, better known as the Ghost Army. This unit was the first of its kind specifically created to deceive the enemy. Through multiple operations, they did exactly that. These 1100 soldiers created a diversion that drew German attention and gunfire to them, instead of the thousands of Allied troops they were impersonating.

The Ghost Army consisted of 4 distinct groups:

  • The 406th Engineer Combat Company Special were 166 “regular” soldiers – these men handled security, construction, and demolition.
  • 603rd Camouflage Engineers were the largest group at 379. As the name implies, the 603rd was created to engineer camouflage. 
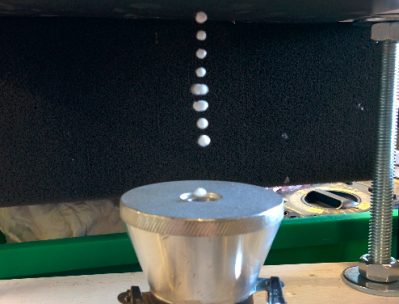
  • 3132 Signal Service Company consisted of 145 men in charge of half-tracks loaded down with massive 500 watt speakers which could be heard for 15 miles. 
  • The Signal Company Special Formerly the 244th signal company, The 296 men of the Signal Company Special handled spoof radio communications.  The Germans heavily relied on captured and decoded radio messages to determine the Allies’ next move.

Continue reading “Rubber Tanks And Sonic Trucks: The Ghost Army Of World War II”

Hacklet 88 – Projector Projects

Everyone loves a big screen TV. Back in the old days, anything over 27 ” was considered big. These days if you’re not sporting at least 50″, you’ll end up with display envy. One thing hasn’t changed though, those who want to go really, really big get into projectors. Hacking and projectors seem to go hand in hand. Anyone else remember those old DIY projection setups where the user would put their TV in a box upside down? This week’s Hacklet is all about projector hacks!

hushWe start with [Chaz] with Projector Hush Box . [Chaz] had a good projector, but still found himself with a problem. Projectors generate a lot of heat, which is dissipated via a fan. For whatever reason, projector companies seem to pick the loudest fans available. [Chaz’s] solution is to put the projector inside a box. Done right, this makes for a quiet projector. Done wrong, it makes an oven. [Chaz] projector hasn’t caught fire yet, so we think he did it right. Two quiet and efficient PC fans direct air through the box, and around baffles which keep the noise down. An anti-reflective coated glass window lets the light out but keeps the noise in. Sound deadening foam helps cut the sound down even further.

led-projNext up is [ric866] with 100w LED projector conversion. The killer with projectors these days are the bulbs. In some cases it’s more cost-effective to buy a new projector than to replace the bulb in an aging one. That’s how [ric866] ended up with a pair of old NEC projectors – one with a working bulb, and one without. Bulbs for this model aren’t cheap at £100. [ric866] found a cheap replacement in a 100 Watt LED. The LED in question only cost £8.99 from everyone’s favorite auction site. LEDs may be efficient, but anyone who’s played with powerful LEDs can tell you they still get hot. [ric866] had to cut up the projector’s case a bit to fit in a heat sink and fan. He also had to spend some time bypassing the various case interlock switches. The final products color calibration looks to be a bit off, but not too shabby for a quick mod!

baffle[Tom_VdE] is serious about recycling. He isn’t one to let an old laptop go to waste when it can be turned into a projector! Remember the “TV in a box” kit we mentioned up in the title? This is the modern version of that same idea. [Tom] tore down the laptop’s LCD and placed it in a CRT monitor case with the appropriate lenses. A setup like this needs length, and focus adjustments. [Tom] managed all that by building a collapsible baffle out of plywood. A build like this needs a lot of light, so [Tom] is using a 100 Watt LED (or two). A water cooling system will keep the LED’s from melting down. [Tom] is still in the prototype phase, but we can’t wait to see his first movie night with this upcycled laptop.

sensorcalFinally, we have [Alex] who built Automatic projector calibration, project #161 on Hackaday.io. [Alex] took his inspiration from [Johnny Chung Lee] to build a system which can map a projector to any angle, size, or position. The secret is phototransistors embedded in the corners of a rectangular piece of foamboard. An Arduino reads the phototransistors while the projector runs a calibration routine. [Alex] switched over to a scanning line from [Johnny’s] original binary pattern. The scan isn’t quite as fast as the binary, but it sure looks cool. Once the positions of the sensors are known, it’s just a matter of mapping the entire screen to a smaller piece of real estate. Toss in a few neat transitions, and you’ve got an awesome demo.

If you want to see more projector projects, check out our new projector project list! If I missed your project, don’t be shy, just drop me a message on Hackaday.io. That’s it for this week’s Hacklet. As always, see you next week. Same hack time, same hack channel, bringing you the best of Hackaday.io!

Go From Prototype To Pilot Production With Zach Fredin

What’s it like to build a run of 100 prototypes in your basement? Get a first-hand account as [Zach Fredin] discusses his development and production of NeuroBytes. The system is a set of electronic models that represent neurons. Connecting them together into different networks helps to teach about how the human nervous system works. It’s a wonderful concept, and was recognized as a finalist for Best Product in the 2015 Hackaday Prize. More recently, [Zach] tells us it has been granted Recommended Status for a Phase I SBIR National Science Foundation grant. Looks like [Zach’s] new job is all NeuroBytes and is well funded. Congratulations!

Check out [Zach Fredin’s] talk from the 2015 Hackaday SuperConference, then join us after the break to dig further into the details of the project.

Continue reading “Go From Prototype To Pilot Production With Zach Fredin”