The Rotary Cell Phone

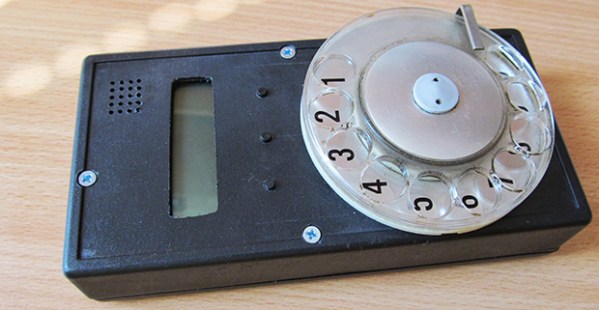
It’s happened. It’s finally happened. In a move that has hipsters donning their good flannel and breaking out that case of Genesee they were saving for a special occasion, the rotary cell phone is now a reality.

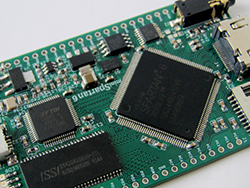
[Jaromir] created this astonishingly retro future device as an entry for the NXP LPC810 challenge, a contest to do the most with an ARM Cortex M0+ microcontroller in an 8-pin package. Having only six I/O pins for controlling a GSM module, display a few buttons, and the fancy rotary dial meant [Jaromir] needed to expand his I/O some way. He chose a shift register to handle the buttons and display in a somewhat impressive demonstration of using a shift register as both an input and output expander at the same time.

From the videos [Jaromir] uploaded, the rotary cell phone isn’t ready for Think Geek to do a production run quite yet. He needs to enter the PIN for the SIM card, AT commands for the GSM module, and is, of course, a horrible method of user input for the younglings who have only seen rotary phones in old movies. That being said, it’s a rotary cell phone running on an 8-pin microcontroller. What more do you want?

Videos of this awesome this truly awesome phone in action below. If you’d like to build your own – and why wouldn’t you – all the files are available on [Jaromir]’s git

Continue reading “The Rotary Cell Phone”

The Bluetooth IPod Controller For Android

iDuinoid

By now, just about everyone in the industrialized world has a broken iPod with a cracked screen, a battery that won’t charge, or one that’s simply sitting in a drawer somewhere. The iPod is still a great way to store music, though, and [Trevor] came up with a way to control its playback with an Android device, showing the song name, playlists, and everything else with an Arduino and a cheap Bluetooth adapter

With the right resistance on a specific pin on the 30-pin dock connector, iPods will send the track name, and playlists over a serial connection, as well as respond to play, pause, skip, and volume commands. There hasn’t been much work towards implementing the copious amount of documentation of this iPod accessory mode in small microcontroller projects, but with a little bit of work, [Trevor] managed to replicate the usual iPod dock commands with an Arduino.

Using an HC-05 Bluetooth module, it’s possible to get this iPod-connected Arduino to relay data to and from an Android device with a small app. The circuit is simple, the app is free, and if you have an iPod with an old battery or cracked screen, it can still work as a music storage device. Not bad, [Trevor].

Laser Cut Miter Joints

polyhedra
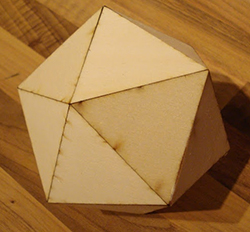
Every project deserves its own laser cut enclosure, of course, but the most common method of joinery – an overabundance of mortises and tenons, and if you’re lucky, a bit of kerf bending – is a little unsightly. Until tastes in industrial design change to accommodate this simple but primitive method of joining two laser cut panels together at an angle takes hold, the search will continue for a better way to cut acrylic and plywood on a laser cutter. The folks at Just Add Sharks might have a solution to this problem, though: miter joints with a laser cutter.

Instead of the slots and tabs of the usual method of constructing laser cut enclosures, miter joints produce a nearly seamless method of joining two perpendicular panels. The key, of course, is cutting a 45° bevel at the joint and gluing or fastening the pieces together. Just Add Sharks is doing this with a laser cut jig that holds a plywood or acrylic piece at a 45° angle to the laser beam. Yes, it’s only one cut per pass, but after adjusting the depth of cut to 1.4 times the thickness of the material, miter joints are easy.

Using a laser for miter joints isn’t limited to 45°, either. There are a few examples of an octahedron and icosahedron. Of course fastening these mitered panels together will be a challenge, but that’s what clamps and glue are for.

Hackaday Links: June 15, 2014

hackaday-links-chain

Love the classic brick Game Boy, but hate the low-contrast LCD, terrible battery life, and the inability to play Pokemon Emerald? This one’s just for you. It’s the ultimate DMG Game Boy – a Game Boy Advance SP stuffed (is it stuffed if it’s taking up more room?) into the classic Game Boy enclosure. Forum thread.

Zooming in to a microchip. It starts off with a DSLR and ends up on a scanning electron microscope. This is an older chip, and the CPU you’re using right now probably has much smaller features.

Every movie and every TV show set in space invariably has space helmets with LEDs pointing towards the face. Think how annoying that would be for an astronaut. Here’s how you add LEDs to a space helmet for a nice theatrical effect. Just don’t use it on a real EVA.

Everyone’s favorite crowdfunded space probe can apparently be detected with an 8-foot dish. That’s the same size as an old C-band dish, a.k.a West Virginia wildflowers. We know some of you have one of these out there, so go make a ~2GHz feed horn, grab a USB TV dongle, write it up, and send it in.

Alright, MAME cabinets. Say you want to go old-school and have a CRT. Some arcade games use a vertically oriented display, while other, slightly more modern games use a horizontally mounted display. How do you fix this? Get a big bearing, of course. This one allows a 19″ CRT to be rotated 90 degrees – all you need, really, if you’re switching between Pacman and Mortal Kombat.

Hey mechanical keyboard enthusiasts! Here’s some Hackaday Cherry MX keycaps. Informal interest check in the comments below. Suggestions welcome.

The Relay-Based Mouse Emulator

mouse

[Nixie]’s job involves using some test software that requires moving a mouse around, clicking a few buttons, checking if everything is okay, and repeating the process over and over again. This is obviously a solution for some keyboard macros, but in a fit of sadistic spite, the test software requires someone to move a mouse around the screen. What is [Nixie] to do? Make a mouse emulator and automate the whole thing, of course.

The Memulator, as [Nixie] calls the device, is the latest in a series of devices to increase productivity when testing. The first version was the mouse tumor, an odd-looking device that simply switched off the LED for an optical mouse, keeping the cursor in one spot while [Nixie] hammered a button repeatedly. The second version is more advanced, capable of moving the cursor around the screen, all without doing an iota of USB programming: [Nixie] is simply using a resistive touch pad, some relays and a few pots to turn buttons into cursor movements. It’s such a simple solution it almost feels wrong.

There’s some interesting tech here, nonetheless. For some reason, [Nixie] has a few cases of old, can-shaped soviet-era relays in this build. While using such cool, awesome old components in such a useful and productive build seems odd, if you’re trying to fix ancient software that’s so obviously broken, you might as well go whole hog and build something that will make someone in twenty years scratch their head.

Vertical video of the Memulator below.

Continue reading “The Relay-Based Mouse Emulator”

The Small & Cheap MiniSpartan6+

FPGA

There have been quite a few boards put out in recent months with an FPGA, some RAM, Flash, and a bunch of I/O, the working theory being FPGAs are the new hotness, ready to steal the crown from Arduino and put a programmable logic development board in the hands of millions. We’re not so sure that’s going to happen. but Scarab Hardware’s miniSpartan6+ board does look pretty nice, and has more than enough on board to serve as anyone’s first FPGA platform. It’s also one of the first FPGA boards we’ve seen that is breadboard friendly. Nice touch.

This tiny board features a Spartan6 LX9 FPGA, with just under 10,000 logic cells. An FPGA platform is useless without some sort of IDE, so the Scarab Hardware folks have taken the Mojo IDE, improved the GUI, added a few libraries, and rolled everything up into a ‘not the Arduino IDE, but as simple and better’ platform.

Right now, the crowdfunding campaign for the miniSpartan6+ is well over 200% funded with a little less than a month to go. The stretch goals the team have in mind – a very likely probability, given what they’re asking – include a faster FPGA, a higher resolution ADC, and support for HDMI input and output. That last bit – HDMI input – will allow anyone to do some cool things like overlaying video with HDMI for a pretty reasonable cost.

The Worst E-Reader Ever

oled

Over on the Projects site, [Jaromir] has created a tiny device with an OLED display, three buttons, and a USB port for storing text files, be it for saving a shopping list, a cheat sheet, or the most unusable e-reader ever made.

The front of the device is simply a 96×32 pixel OLED and three buttons for ‘up’, ‘down’, and ‘open/close’. The reverse side is where the magic happens with a PIC24 microcontroller that sets up a file system on the chip, allowing [Jaromir] to write 64kB of data on what is actually a Flash drive with a pitiful capacity. Text files are viewable on the OLED, with the video below showing the front page of Wikipedia being displayed in a glorious 16×4 text mode.

It’s not a very useful device by any means, but for some reason it’s garnered a lot of skulls and followers over on Hackaday Projects. In response to that, [Jaromir] is working on version two with a new PCB and a design for a 3D printed case. Not bad for what [Jaromir] himself describes as worse than just about any phone or tablet.

Continue reading “The Worst E-Reader Ever”