THP Entry: OpenMV

OpenMV

The future is a scary place, full of robots, drones, and smart appliances with cameras and vision systems that will follow your dog, your child, or your face around, dutifully logging everything they see, reporting back to servers, and compiling huge datasets that can be sold to marketing companies. We’re not too keen on this view of the future, but the tech behind it – cheap cameras in everything – is very cool. [Ibrahim] is doing his part to bring about the age of cheap cameras that are easy to interface with his entry to The Hackaday Prize, the OpenMV.

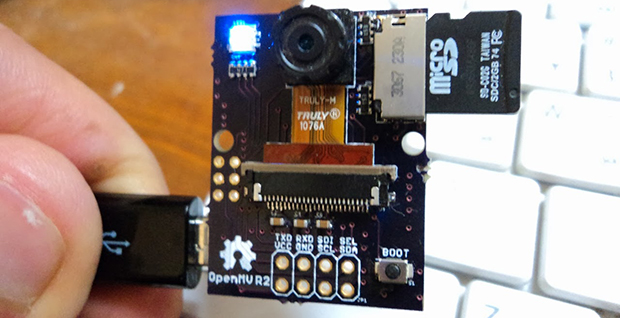
The idea of a digital camera that is easy to interface with microcontrollers and single board computers isn’t new. There are serial JPEG cameras and the CMUcam5 Pixy, but they cost somewhere around $70. It’s not something you would design a product around. [Ibrahim]’s OpenMV costs about $15, and offers some interesting features like on-board image processing, a huge amount of RAM, and even a wireless expansion thanks to TI’s CC3000 WiFi module.

Currently, the OpenMV is capable of doing face detection at 25fps, color detection at better than 30fps, all thanks to the STM32F4 ARM micro running at 180MHz. There’s support for up to 64MB of RAM on board, with IO available through serial, SPI, I2C, USB 2.0, and WiFi.

It’s an interesting project on its own, but the really cool thing about this build is the price: if [Ibrahim] can actually produce these things for $15 a pop, he has an actual product on his hands, one that could easily be stuffed inside a drone or refrigerator for whatever cool – or nefarious – purposes you can imagine.


SpaceWrencherThe project featured in this post is an entry in The Hackaday Prize. Build something awesome and win a trip to space or hundreds of other prizes.

The Hovering, Holographic, Star Wars Display

Tweetergif

While we’re still a long way off from the Star Wars telepresence holographic displays, this build over on the Projects site is the closest we’ve seen yet. Even better, it can be built in a garage for not much money.

Inside the Hoverlay are a few fans and a pair of ultrasonic atomizers that turn water into an extremely fine mist. The fans pull this vapor up through the base of the display and through simple drinking straws to create a laminar sheet of water vapor. Put a projector behind this thin sheet of vapor, and you have a display, seemingly floating in mid-air.

The base of the display can be scaled up, simply by putting several units together in a line. It’s still just a prototype – future versions will improve the stability and reduce the thickness of the fog layer – but it’s still a very cool build for a custom holographic display.

Continue reading “The Hovering, Holographic, Star Wars Display”

Designing And Printing A Custom Enclosure

enclosure

So you know how to design a circuit board, assemble the parts, and have a functional device at the end of a soldering session. Great, but if you want to use that device in the real world, you’re probably going to want an enclosure, and Tupperware hacked with an Exacto knife just won’t cut it. It’s actually not that hard to design a custom enclosure for you board, as [Glen] demonstrates with a custom 3D printed project box.

[Glen]’s board, a quad RS-422 transmitter with a PMOD connector, was designed in Eagle. There are a vast array of scripts and plugins for this kind of mechanical design work, including the EagleUP plugins that turn an Eagle PCB into a 3D object that can be imported into SketchUp.

Taking measurements from Eagle, [Glen] designed a small project box that fits the PCB. A few standoffs were added, and the board itself was imported into SketchUp. From there, all he needed to do was to subtract the outline of the connectors from the walls of then enclosure for a custom-fit case. Much better than Tupperware, and much easier than designing a laser cut enclosure.

Once the enclosure was complete, [Glen] exported the design as an STL, ready for 3D printing or in his case, sending off to Shapeways. Either way, the result is a custom enclosure with a perfect fit.


The Megascroller, For Video Games In The Round

megascroller

The folks at NYC Resistor have a thing for circular displays, it seems. Their earlier Hexascroller was a ceiling mounted display with six 30×7 displays – good enough to display the time and a few textual message in six directions. The Octoscroller bumped up the display capability with eight 16×32 RGB LED panels. Now the Megascroller, a 32-sided 512×64 display is hanging in the hackerspace, complete with 360° Mario and Pong.

The Megascroller is one of [Trammell Hudson]’s projects, constructed out of sixty-four 32×16 RGB LED matrices. That’s an impressive amount of controllable LEDs, that required a lot of processing power: namely, the BeagleBone-powered LEDscape board used in their earlier Octoscroller

As far as applications go, they naturally have Pong, but a more interesting application is the side-scrolling Mario that requires you to move around the display as you play. You can check out a video of that below.

If you’d like to see the Megascroller in person, as well as a whole bunch of other crazy blinking interactive projects, NYC Resistor is holding a an interactive show this weekend, beer provided.

Continue reading “The Megascroller, For Video Games In The Round”

The Game Boy Pocket Raspi Mod Puts All Others To Shame

There are hundreds – perhaps thousands – of builds out there on the Internet that put a Raspberry Pi in an enclosure with buttons meant solely for running emulators for old games. This one is unlike any other. Yes, it’s still basically a RetroPi emulator, but this Game Boy Pocket casemod goes beyond any remotely comparable build.

The Game Boy Pocket is incredibly small, but after sanding down the bosses on the inside of the case, gluing the battery door shut, and installing a bit of plastic over the cartridge slot, [WarriorRocker] was able to fit a Raspi inside. The buttons use the same PCB as the stock Game Boy, connected to a Teensy 2.0 board that simulates a USB keyboard.

With the two largest components taken care of, [Warrior] turned his attention to the sound, video and power. The display is a 2.5″ composite LCD that actually fits quite nicely behind the screen bezel. Audio is taken care of by a $3 audio amplifier, a new, smaller speaker, and a side-mounted pot stolen from the original Game Boy guts. There’s no chance on running this with the same 2xAAA cells the original Game Boy Pocket had, so [Warrior] somehow found space for a 2600mAh Li-Poly battery, a step-up regulator, and a charge circuit.

The result is a full-color RetroPi build capable of running for three hours before needing a recharge. All the classic Game Boy games are loaded onto the SD card along with select titles for other systems. The result is one of the best portabalized Raspi builds we’ve ever seen. Video below.

Continue reading “The Game Boy Pocket Raspi Mod Puts All Others To Shame”

The Autopilot Shield For The Raspberry Pi

Navio

In the world of drones, quadcopters, and unmanned aerial vehicles, the community has pretty much settled on AVR microcontrollers for the low end, and ARM for the high performance boards. If the FAA doesn’t screw things up, there will soon be another market that requires even more computational power, and Navio, the autopilot shield for the Pi, is just the thing for it.

Where high end multicopter and autopilot boards like the OpenPilot Revolution use ARM micros, there’s a small but demanding segment of the hobby that needs even more processing power. Think of something like the Outback Challenge, where fixed-wing drones search the desert for a lost mannequin autonomously. You’re going to need OpenCV for that, and that means Linux.

Navio is a shield for the Raspberry Pi, complete with a barometric pressure sensor, gyros, accelerometer, and compass, and GPS. It’s designed to run a more real-time version of Linux, and has the ability to do some interesting telemetry configurations – putting a 3G modem on the Navio isn’t much of a problem, and since it’s a Raspi, doing image processing of a downward facing camera is just a matter of writing the code.

The Navio team is currently running an Indiegogo campaign, with the baseline version available for $145. That’s pretty close to the price of the OpenPilot Revolution. There’s also a version upgraded with the U-blox NEO-6T that allows for on-board processing of raw GPS data.

THP Entry: A $300 Pick & Place 3D Printer

pnp

With the advent of cheap PCB fabrication, (relatively) easy to use layout tools, and a whole host of prototypes for nearly any device imaginable, the age of custom circuits is upon us. The tools to make these custom circuits, though, are usually hilariously expensive or simply unavailable to all but the most resourceful hackerspace. It would be great if every workshop in the country had a pick and place machine, and the $300 Pick and Place / 3D printer would be a great way to introduce this tech to millions of electronic tinkerers around the world. It also makes for a great entry to The Hackaday Prize.

The basic design of this machine is a delta bot. This is a wonderful choice over a Cartesian bot; deltas are faster and can have higher acceleration, a great thing to have if you want to throw together a few boards quickly. Although the configuration looks a little inverted as compared to other 3D printer delta bots, there’s a reason for this: the design was simulated with evolutionary algorithms and statistical tests to find the best geometry for the machine. The completed machine should be able to place 0201 components; anything smaller would be called dust.

The software hits all the marks, using OpenCV for image processing, ARM boards for motor control and computational tasks, and a good bit of mechanical and pneumatic work to suck up the parts. They’re even working on a 3D printed tape feeders. Now a component often overlooked when looking at the total cost of pick and place equipment is essentially free.

It’s awesome work, and even if they don’t win The Hackaday Prize, it’s still something every hackerspace should have. Now if someone would only crack the through-hole plating problem…


SpaceWrencherThe project featured in this post is an entry in The Hackaday Prize. Build something awesome and win a trip to space or hundreds of other prizes.