A One Third Scale Macintosh

minimac

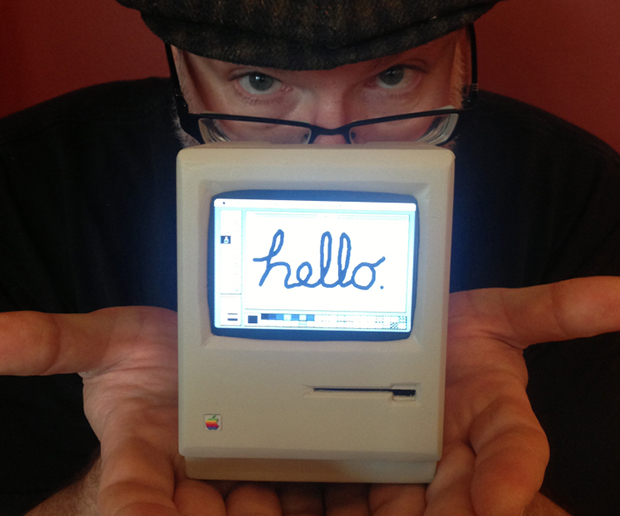
Released in 1984, the original Macintosh was a wonder – not only did it have a GUI and a mouse, it was actually one of the smaller computers of the day. Now that we’re nearly 30 years past the release of the OG Mac, it follows that a smaller version should be possible. [John] did just that by creating a 1:3 scale replica of the original 128k Mac.

As you would expect, this tiny Mac is powered by a Raspberry Pi running Mini vMac, an emulator for these olde tymie 68k Macs. The display is a 3.5″ LCD with a resolution of 300×200, not quite up to the standard classic mac resolution of 512×342. At least this version has color, though.

Also inside the carefully crafted PVC case are a WiFi and Bluetooth dongle, along with an off-the-shelf phone charger. It’s a remarkable piece of craftsmanship, and given the games and applications (i.e. Photoshop 1.0) available for these old Macs, its possibly more useful for general computing than a stock Raspberry Pi.

You can check out the video walkthrough of everything this tiny little Mac can do below.

Continue reading “A One Third Scale Macintosh”

CC3000 WiFi Driver For .NET Micros

CC3000

The Netduino and other .NET Micro boards don’t seem to get much love, but that doesn’t mean they’re not able to use one of the coolest chips we’ve seen in a while. [Valkyrie] has written a driver for TI’s new CC3000 all-in-one WiFi chip, giving any .NET micro device a very small and very cheap WiFi connection.

A while back, [Chris Magagna] created a TI CC3000 library for the Arduino. [Valkyrie] fell out of his chair when he saw that post, as it meant the .NET Micro devices such as the Netduino could finally use this device. With a TI Launchpad and a logic analyzer, [Valkyrie] recorded all the SPI commands and responses eventually reconstructing the entire library.

As for how useful this is without any hardware, There’s already a CC3000 Gadgeteer module available from GHI Electronics.

Stopping A Hackerspace From Rusting Away

steel

The illutron hackerspace in Copenhagen makes their home on a barge sitting in port. Not only is this awesome, but the members of the hackerspace also worry about corrosion to their beloved fablab. In an effort to ally some fears about rust slowly eating through the hull, [Dzl] has rigged up a cathodic protection system for their hull, essentially preserving their barge at the expense of a few old steel rails.

Cathodic protection systems are able to protect the steel of a ship’s hull by offering up a sacrificial anode made of aluminum or zinc. This can be done by either attaching a sacrificial anode directly to the hull, or with a more complex system that connects both the cathode (the ship) and the anode (an engine block) to a DC power source.

[Dzl] is converting mains voltage down to 12 VDC, then further lowering the voltage with an Arduino-controlled buck converter. The control panel allows for adjustments in the voltage, as well as a nice uptime meter to make sure it’s running.

The results are fairly impressive; in the above pic, the right piece of steel was electrically connected to the barge’s hull, while the left piece was free to rust in the North Sea. That’s only two days worth of corrosion there.

The Difference Between Bitcrushers And Sample Rate Reducers

bit

If you look around a few electronic music forums, you’ll see a lot of confusion over the difference between a bitcrusher – a filter that reduces the bit depth of an audio signal – and a sample rate reducer – a filter that does exactly what its name implies. With the popularization of 8-bit and retro synth music, this difference is obviously of grave import of concern to saints and kings alike. [Michael] is more than happy to walk us through the difference with real-time sample and bit rate adjustment with his audio hacker board.

The audio hacker board is an Arduino shield with a 12-bit DAC and a 12-bit ADC. With two 1/8″ jacks and a pair of pots, [Michael] was easily able to whip up a sketch that is able to adjust the sample rate and bit depth of an audio signal in real-time.

Contrary to nearly everyone’s opinion of what ‘8-bit’ music is, it’s actually the sample rate that makes music sound like a cassette deck jury rigged into a Nintendo Entertainment System. Reducing the bitrate just makes any audio source sound louder and worse.

Check out the excellent demo video of the effect of bitcrushers and sample rate reducers below.

Continue reading “The Difference Between Bitcrushers And Sample Rate Reducers”

Making Keys After The Apocalypse

Making keys is an amazing art with a lot of skill and technique involved. For those of you living in a post-apocalyptic world, [Dan] has a much simpler solution to the problems of having one too few keys for your locks and deadbolts – just cast them out of scrap with the power of the sun.

To make the mold of the key, [Dan] is using a two-piece plaster of paris mold. First, a thick layer of plaster is laid down in a small container and the key floated on the surface. After drying, sprues are put in with clay and the key embedded in a curing plaster block. After a few hours, a proper mold is created ready to receive molten metal.

The casting material is zinc – not as hard as the original steel key, but more than strong enough to turn a lock. This zinc is melted in a steel and plaster crucible with a gigantic fresnel lens.

As for the utility of this method of copying keys after the apocalypse, we’ll have to wonder how practical this method is. A giant fresnel lens isn’t just something you randomly find unless you’re going house to house looking for projection TVs, and finding a can of mold release after the end of the world is beyond credulity. That said, it’s a cool demonstration of metal casting that can be easily accomplished at home or at any hackerspace.

Continue reading “Making Keys After The Apocalypse”

Connecting An Old Scope To A Computer

Scope

A friend of [Michael]’s said his company was getting rid of some old lab equipment and asked him if he wanted a very large and very old digital storage oscilloscope. A ‘hell yes’ and we’re sure a few beers later, [Michael] found an old Gould 200 MHz four-channel scope on his bench. Even 20 years after its production it’s still a capable tool, but the serial ports on the back got [Michael] wondering – would it be possible to plot the screen of the scope on his computer?

The scope has three ports on the back – GPIB, miscellaneous I/O, and RS423. The latter of those ports is similar enough to RS232 that a USB to Serial converter just might work, and with the help of a null modem cable and a terminal, [Michael] was able to connect to this ancient scope.

In the manual, [Michael] found a the serial commands for this scope. The most useful of these is a command that prints out the contents of the scope’s trace memory as a series of 1-byte integers. With a short bit of PERL programming, [Michael] can create a PDF plot of whatever is on the scope’s screen. It’s formatted perfectly for Gnuplot, MATLAB, or even Excel.

Awesome work, and especially useful given these old scopes are slowly making their way to a technological boneyard somewhere.

3D Printering: Scanning 3D Models

The Makerbot Digitizer was announced this week, giving anyone with $1400 the ability to scan small objects and print out a copy on any 3D printer.

Given the vitriol spewed against Makerbot in the Hackaday comments and other forums on the Internet, it should be very obvious the sets of Hackaday readers and the target demographic Makerbot is developing and marketing towards do not intersect. We’re thinking anyone reading this would rather roll up their sleeves and build a 3D scanner, but where to start? Below are a few options out there for those of you who want a 3D scanner but are none too keen on Makerbot’s offering.

Continue reading “3D Printering: Scanning 3D Models”