The Doom computer game rendered with HTML checkboxes

Play DOOM Using Web Browser Checkboxes (Finally)

If you’ve ever felt the need to render DOOM using nothing but web browser checkboxes, [Andrew Healey] has you covered with his recent port of the first-person shooter. Naturally, this gets our tick of approval.

Yes, you read that right. You can now play DOOM in a 160 x 100 grid of HTML-generated checkboxes, much like this: ☑. The secret sauce for this project is partly derived from the fascinating Checkboxland project by fellow hacker Brian Braun, who uses HTML checkboxes to generate a variety of artistic demos.

[Andrew Healey] also made use of Cornelius Diekmann’s port of DOOM using WebAssembly, which we recently covered here on Hackaday. A smattering of code ties both projects together, and the end result is DOOM at 160×100 resolution, rendered entirely with HTML checkboxes.

The port can be played here using Chrome or Edge (other browsers may have issues if they do not support the zoom property in CSS). The source code is also available over on GitHub.

While the resolution and color palette aren’t what we have come to expect from DOOM, it’s likely that the graphics could be further improved by tinkering with the dithering and threshold settings. Higher resolutions may also be possible with further optimization.

We would be hard pressed to pick our favorite port of DOOM, as the list is becoming quite long. However for something completely different, check out our story on how DOOM was brought to Twitter.

Continue reading “Play DOOM Using Web Browser Checkboxes (Finally)”

An anemometer outside

DIY Anemometer For Projects Big And Small

When [Fab] needed an anemometer for his latest project, he was stymied by the limited range and relatively high prices of commercial options. Undeterred, his solution was an impressive DIY anemometer that rivals the off-the-shelf alternatives.

AnemoSens was designed from the ground up as a component for the ambitious WinDIY_2 Horizontal Axis Wind Turbine, however it’s just as suitable as part of your standard home weather station. The microcontroller unit uses RS485/Modbus connectivity, ensuring that data from the wind sensor is accessible across a variety of platforms. Serial-stream via USB and an SD cart slot are also available for recording data, the latter being particularly useful for long-term unsupervised monitoring. [Fab] also integrated an ESP32 for recording data over the air.

The MCU also features a location for the venerable BME280, which is a relatively accurate temperature, pressure and humidity sensor often deployed in DIY weather stations. This feels like a nice touch, as it means the anemometer package alone could feasibly serve as a rudimentary weather sensing station, or as a backup for more elaborate environmental monitoring.

The prototype currently uses a Hall effect sensor for measuring the wind speed, while a AS5048B magnetic rotary encoder does a decent job of measuring rotation (wind direction). Some calibration is likely necessary to improve the accuracy of this setup, but it’s a promising start.

[Fab] has already identified some shortcomings with the bearing, but has a plan for future iterations. He might want to check out this spare-parts anemometer that uses a bearing from an old hard drive.

Continue reading “DIY Anemometer For Projects Big And Small”

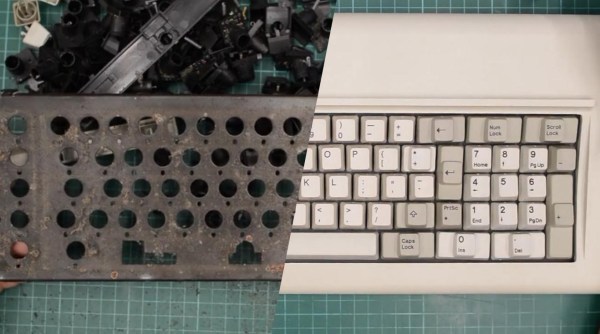
A composite of a disassembled and reassembled Model F keyboard

Model F Keyboard Restoration Goes The Extra Mile

The IBM Model F keyboard should need no introduction. Famed for its buckling spring key mechanisms, the Model F is lusted over for its satisfying typing experience and Armageddon-proof build quality. First introduced in 1981, many of these keyboards will now naturally require basic maintenance. However, [Epictronics] recently went a step further and restored a Model F to like-new condition.

Missing keycaps were the least of his worries, as both new and old replacements are relatively easy to come by. [Epictronics] was more concerned about the forty-year-old foam sandwiched tight inside the keyboard, most likely having long since degraded. Apart from being plain gross, the decaying foam has the potential to foul the buckling spring switches. After taking apart the body and removing the ‘disgusting’ foam pad, a replacement was forged from neoprene and a handy-dandy hole punch.

Disassembly of the keyboard case required the gentle touch of a mallet, and reassembly needed similarly inappropriate tools. As demonstrated in this vintage clip from IBM, keyboard assembly was (and still is) performed automatically by robots, driven by an IBM Series/1 minicomputer. These robots were equally impressive for their precision and strength. Without access to IBM’s aptly named ‘closing tool’ and various other robotic helpers, [Epictronics] had to settle for pool noodles and a comically large clamp during reassembly, mixed with sheer determination.

Other neat tricks in the video include applying heat to reform the coiled keyboard cable, and using car polish to clean the case plastics. The latter has the potential to make things worse, so a delicate hand is needed to maintain the textured plastic.

We recently covered another Model F restoration, and it’s exciting to see so many dedicated hackers keeping these keyboards clickety-clacking well into the 21st century.

Continue reading “Model F Keyboard Restoration Goes The Extra Mile”

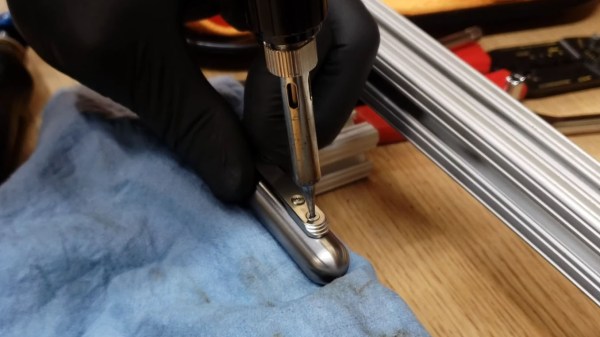
A soldering iron applied to a stuck threadlocked screw in a titanium pen

Removing Threadlocked Screws With A Soldering Iron

We’ve all been there – that last stubborn screw, the one thing between you and some real progress on a repair or restoration. It’s stuck tight with thread-locking fluid, and using more torque threatens to strip the head. Frustration mounting, drilling that sucker out is starting to seem pretty tempting. But wait! [Daniel] offers a potential solution using nothing but a soldering iron.

This tool hack is pretty simple, but all the great ones tend to be straightforward. In the video, [Daniel] is faced with a titanium Torx screw that refuses to come loose due to threadlocker, an adhesive that is applied to screws and other fasteners to prevent them coming loose. Available in a variety of strengths, thread-locking fluid is great at keeping screws where they need to be, but too much (or the wrong kind) can seize a screw permanently.

Instead of drilling out the offending screw, [Daniel] reaches for his soldering iron. By applying a significant amount of heat to the screw head, the adhesive starts to give. After heating, working the screw back and forth breaks the threadlocker, thus freeing the screw. The whole process takes just a couple of minutes, and potentially saves the repairer from destroying a screw.

The chemistry behind thermoset adhesives makes for some great bedtime reading, however the main takeaway is that threadlock fluid, while somewhat resistant to heat, will eventually become brittle enough for the screw to come loose. Unlike most adhesives, which melt under high temperature (think glue sticks), thermoset materials tend to initially harden with the application of heat, before turning brittle and breaking. While high-temperature threadlocker derivatives exist, typical Loctite-branded threadlocker (and similar products) would not appear to be able to stand the heat of a typical soldering iron.

This soldering iron hack isn’t the first we’ve featured on Hackaday – check out this method on removing enamel from magnet wire. If you’re not too squeamish, also check out our thoughts on soldering iron cauterization.

Continue reading “Removing Threadlocked Screws With A Soldering Iron”

Gopher, The Competing Standard To WWW In The ’90s Is Still Worth Checking Out

The 30th anniversary of the World Wide Web passed earlier this year. Naturally, this milestone was met with truckloads of nerdy fanfare and pining for those simpler times. In three decades, the Web has evolved from a promising niche experiment to being an irreplaceable component of global discourse. For all its many faults, the Web has become all but essential for billions around the world, and isn’t going anywhere soon.

As the mainstream media lauded the immense success for the Web, another Internet information system also celebrated thirty years – Gopher. A forgotten heavyweight of the early Internet, the popularity of Gopher plummeted during the late 90s, and nearly disappeared entirely. Thankfully, like its plucky namesake, Gopher continued to tunnel across the Internet well into the 21st century, supported by a passionate community and with an increasing number of servers coming online.

Continue reading “Gopher, The Competing Standard To WWW In The ’90s Is Still Worth Checking Out”

Examples of ZX81 computer game screens

The Labor Of Love That Is Recovering Lost Software

At the beginning of the home computer revolution, the humble compact cassette was far and away the most popular choice for microcomputer data storage, especially on the European continent. As a volunteer at the Museum of Computing, [Keith] was instrumental in recovering and archiving the early works of Roger Dymond, a pioneering developer of early computer software in the United Kingdom.

In his video, [Keith] goes to great lengths detailing the impact that Roger Dymond had on the early home computing scene. After being let go from his council apprenticeship, Roger turned his attention to developing games for the ZX81, and later the ZX Spectrum. With the help of his family, he went on to run a moderately successful mail-order games publishing venture for several years. Increasing advertising costs and a crowded development scene saw Roger’s business become nonviable by 1983, but not before developing several gambling-style games and a standout Space Invaders clone.

Fast forward to 2021, and while some of Roger’s Spectrum software had been archived, much had been marked as ‘missing’ by online archivists. After further research, [Keith] realized that another potentially important tape had been forgotten about. ‘Games Compendium’ for the ZX81 had been completely lost to time, with the only evidence that it had ever existed coming from a 1983 advert in ‘Sinclair User’ magazine. Being written for the earlier model ZX81, the compendium would undoubtedly be of interest to software archivists and game historians.

Continue reading “The Labor Of Love That Is Recovering Lost Software”

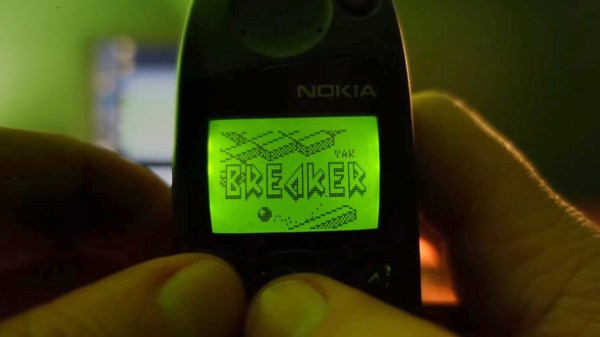
A Nokia 5110 playing a game

Firmware Modding Your Vintage Nokia Handset

These days we’re spoiled for choice when it comes to smartphone software, especially games. Official repositories for the leading handsets feature hundreds of thousands of games, and sideloading adds infinite possibilities. If you were lucky enough to be sporting a Nokia handset in the late 1990s, you probably had all of three games to choose from (and only one that was actually fun). [Janus Cycle] explores the steps needed to firmware mod your vintage Nokia phone, and how to expand on that paltry games library.

Enthusiasts have been modding their Nokia handsets since the 2000s, and the tools required now are the same as they were then. The Nokia 5110 and 6110 (as featured in the video below) use a proprietary cable and connector for communicating with PCs and other devices. Nokia’s official serial cable already opens up many possibilities for handset tinkering, including access to RAM and toggling Monitor Mode. This cable interfaces solely with the phone’s fast FBUS protocol, however firmware flashing takes place using the slower MBUS protocol over a single wire bi-directional pin.

The handset expects both serial ports to be available during firmware flashing. [Janus Cycle] demonstrates how to build a custom harness that connects both serial ports to a PC parallel port. At this point the flashing process is relatively straightforward, especially if you have an appropriately vintage computer to run the old flashing software.

Nokia owners may fondly remember changing the network name on the home screen to all sorts of inappropriate graphics, yet far more was possible with the right technology and know-how. It’s interesting to think about what may have been if softmodding was more widespread during the reign of the Nokia 5110 and its peers.

Continue reading “Firmware Modding Your Vintage Nokia Handset”