[Willem Melching] owns a 2010 Volkswagen Golf – a very common vehicle in Europe – and noticed that whilst the electronic steering rack supports the usual Lane Keep Assist (LKAS) system, and would be theoretically capable of operating in a far more advanced configuration using openpilot, there were some shortcomings in VW’s implementation which means that it would not function for long enough to make it viable. Being very interested in and clearly extremely capable at reverse engineering car ECUs and hacking them into submission, [Willem] set about documenting his journey to unlocking openpilot support for his own vehicle.
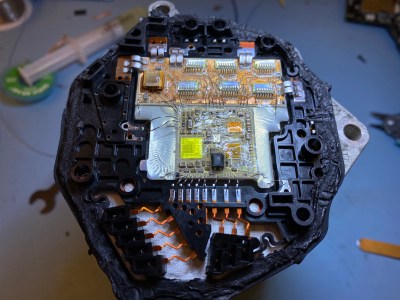
And what a journey it was! The four-part blog series is beautifully written, showing every gory detail and all tools used along the way. The first part shows the Electronic Power Steering (EPS) ECU from a 2010 Volkswagen Golf Mk6 module (which rides on the back of the three-phase steering rack motor) being cracked open to reveal an interesting multi-chip module approach, with bare die directly bonded to a pair of substrate PCBs, that are in turn, bonded to the back of the motor casing, presumably for heat dissipation reasons. Clever design, but frustrating at the same time as this makes part identification somewhat tricker!

[Willem] uses a variety of tools and tricks to power up and sniff the ECU traffic on the CAN bus, when hooked up to a SAE J2534-compliant debug tool, eventually determining it speaks the VW-specific TP2.0 CAN bus protocol, and managed to grab enough traffic to check that it was possible to use the standard KWP2000 diagnostic protocol to access some interesting data. Next was a very deep dive into reverse engineering update images found online, by first making some trivial XOR operations, then looking at an entropy plot of the file using Binwalk to determine if he really did have code, and if it was encrypted or not, After running cpu_rec, it was determined the CPU was a Renesas V850. Then the real work started – loading the image into Ghidra to start making some guesses of the architecture of the code, to work out what needed patching to make the desired changes. In the final part of the series, [Willem] extracts and uses the bootloader procedure to partially patch the code configuration area of his vehicle and unlocks the goal he was aiming at – remote control of his steering. (OK, the real goal was running openpilot.)
In our opinion, this is a very interesting, if long, read showing a fascinating subject expertly executed. But we do want to stress, that the vehicular EPS module is an ASIL-D safety tested device, so any hacks you do to a road-going vehicle will most definitely void your insurance (not to mention your warranty) if discovered in the event of a claim.
Older ECUs are a bit easier to hack, if you can pull the EPROM, and people out there are producing modules for allsorts of vehicular hacking. So plenty to tinker with!