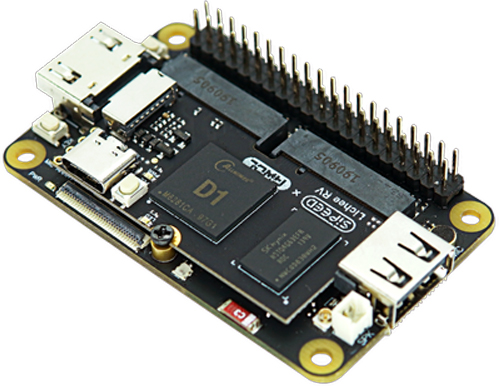
A Simple Touch Probe Made With Basic Tools

Six points of contact detect any displacement.

LinuxCNC contributor and machining enthusiast [Andy Pugh] is certainly not afraid to try making specialised tools to see how well they work out, and this time he’s been busy making a touch probe (video, embedded below) for checking the accuracy of machining operations and general measuring applications.

These things are not cheap, since they are essentially ‘just’ a switch with a long probe, But, as with anything specialised and machined with tight tolerances, you can understand why they cost what they do.

After inspecting and spending some time reverse-engineering such a unit, [Andy] then proceeded to grab some PEEK bar he had lying around and chuck it into the lathe (get it?). He notes Delrin would be more cost effective for those wishing to reproduce this, but as long as you have the ability to machine it and it’s non-conductive, there are many other options you could try.

Using no special tools other than a collet block (like this one) all the angled holes and slots were made with ease, with the help of a specially 3D-printed mount for the vise. A nice, simple approach, we think!

[Andy] tested the repeatability of the probe, mounted over his CNC-converted Holbrook lathe, reporting a value of 1 um, which seems rather good. Centering of the probe tip within the probe body was off a bit, as you’d expect for something made practically by hand, but that is less of a problem as it would seem, as it results in a fixed offset that can be compensated for in software. Perhaps the next version will have some adjustability to dial that out manually?

The whole assembly is formed from two plastic parts, a handful of ground-finished hardened steel pins, and a big spring. The only part remotely special is an off-the-shelf probe tip. During the electrical hookup, you may notice the use of a self-fluxing verowire pen, which was something this scribe didn’t know existed and has already placed an order for!

The reference 3D model for the design is shared from [Andy]’s Autodesk Drive for your viewing pleasure.

Of course, this isn’t the first DIY touch probe we’ve seen, here’s one for example, and over on Hackaday.IO, here’s an attempt to make one using a piezoelectric transducer.

Continue reading “A Simple Touch Probe Made With Basic Tools”

Improved Thermochromic Clock Uses PCB Heaters For Better Contrast

We love timepiece projects round these parts, so here we are with another unusual 7-segment clock design. Hackaday’s own [Moritz Sivers] wasn’t completely satisfied with his last thermochromic clock, so has gone away and built another one, solved a few of the issues, and this time designed it to be wall mounted. The original design had a single heater PCB using discrete resistors as heating elements. This meant that the heat from active elements spread out to adjacent areas, reducing the contrast and little making it a bit hard to read, but it did look really cool nonetheless.

This new version dispenses with the resistors, using individual segment-shaped PCBs with heater traces, which gives the segment a more even heat and limited bleeding of heat into neighbouring inactive air-gapped segments.  Control is via the same Wemos D1 Mini ESP8266 module, driving a chain of 74HC595 shift registers and a pile of dual NMOS transistors. A DS18B20 thermometer allows the firmware to adjust for ambient temperature, giving more consistency to the colour change effect. All this is wrapped up in an aluminium frame, and the results look pretty nice if you ask us.

Both PCB designs and the Arduino firmware can be found on the project GitHub, so reproducing this should be straightforward enough for those so inclined, just make sure your power supply can handle at least 3 amps, as these heaters sure are power hungry!

Got a perfectly good clock, but desperately need a thermochromic temperature/humidity display? [Moritz] has you covered. And if this digital clock is just too simple, how about a mad 1024-element analog thermochromic clock instead?

Continue reading “Improved Thermochromic Clock Uses PCB Heaters For Better Contrast”

Angel Investor Gives Open Source PnP A Massive Boost

We love it when an Open Source hardware project grows up and turns into a sustainable business, bootstrapped with nothing but hard work and great ideas, but it’s a really tough prospect to do it using your own money, ploughing the profits from any sales back into development and not taking a dime in wages whilst you do so. People obviously need an income to live off, and that time spent working on a startup is time you can’t spend earning your keep. So it’s with great pleasure that we can bring you the latest news from [Stephen Hawes] and his pick-and-place machine plans. In the year since we last checked in with the project, development has continued at a steady pace, with the guys quickly outgrowing the garage workspace, whilst they prepare PnP machine kits ready for sale.

The big news is that [Joel Spolsky], co-founder of Stack Exchange, creator of Kanban management tool, Trello, and angel investor, has made a sizable ($100K USD) investment in the company which has allowed them to take on a 3,000+ sq. ft office space, and given them the funds for stock and all that boring business overhead stuff. [Stephen] takes time to explain that [Joel] will not have any control of the company, and all hardware and software will remain fully Open Source. For those interested [Joel] implemented his investment as a SAFE note (Simple Agreement for Future Equity) and as such, [Joel] will only make a return in the form of a small share allocation, if they hit the big-time in the future. Can’t really say fairer than that!

[Stephen] did recently receive a ‘cease and desist’ notice regarding his use of the ‘Index’ name for the project, since that is already a trademarked term, defended by somebody else, the project will need change name very soon. A minor setback, but it is a bit annoying that a chunk of that investment now has to go to a lawyer to make sure that the name they do eventually choose isn’t already taken and is safe to use.

In terms of the machine itself, it is now is fully operating, with multiple automatic tape feeders, featuring up and down-facing machine vision, and all that OpenPnP goodness. It has even been demonstrated placing parts for its own custom motherboard PCB, reprap style. Nice!

We wish [Stephen] and partner [Lucian] all the success they deserve, and hope they get those kits out there, because there are people around these parts that need an affordable, hackable, desktop PnP machine ASAP, this scribe included!

Here’s the earlier story covering the machine, but it’s not the only Open Source PnP machine we’ve seen – here’s another one from a few years ago.

Continue reading “Angel Investor Gives Open Source PnP A Massive Boost”

Metal mechanoid security patrol ride-on made from scrap

Homemade Scrapyard Security Mech Gives Uncle Super Powers

[Handy Geng] is back again with another bonkers build, that we just can’t not cover. His Uncle came to visit the workshop one day and said he’d love to go there every day, and could even watch over it when [Handy Geng] was away. But being an older chap and needing a stick to get around, he would not be much use if ‘bad guys’ decided to pay a visit. The obvious solution was to build a ride-on security mech which Uncle could ride on, (video, embedded below) and use to defend the shop from bandits.

The build starts with him unloading a large pair of tracked wheel units from his truck, which caused a chuckle around these parts when we tried to imagine the scrap yard he’d just visited! The build video is more of a spot-weld-come-assembly log, with the less interesting sub assembly construction omitted. If he’d included all the details, this video would have been hours long. Though, we’d probably watch that anyway.

Features of the final construction include, but not limited to, dual motors for on-the-spot turns, night-time patrol lights, dual pneumatic fists for attack mode, dual water cannons for a more gentle approach and rear facing speakers blasting out Chinese opera for the ultimate deterrent. Practical touches include an integrated glasses case for the ready-readers, and a walking cane holder, so the mech was Uncle-ready. He seemed impressed from the grin on his face!

Continue reading “Homemade Scrapyard Security Mech Gives Uncle Super Powers”

Matrix Digital Rain On The IBM PC With A High Persistence Monitor

Unless you’ve been hiding under a rock for the last 20-odd years, you will have come across The Matrix series of movies, and the cool green ‘digital rain’ effect used frequently. This inspired [Oli Wright] to wonder what it would look like if instead of running the animation on a modern display, using a digitally produced phosphor persistence effect, it was implemented on some retro PC hardware, using an actual high-persistence phosphor Green Monochrome monitor. (Video embedded, below) As luck would have it, [Oli] owns a 40-year-old IBM PC 5150 as well as the matching IBM 5151 monitor, so it was a simple matter to implement the effect in 8088 assembler to create falling sequences of characters. The final binary is less than 256 bytes!

The IBM 5151’s long display persistence was intended to reduce the visibility of display flicker due to the low scan rate, but has the unfortunate side effect of smearing horribly when the image changes. This is exactly what [Oli] needed to implement this effect and we think it looks jolly fine.

[Oli] made use of the excellent PCjs browser-based emulator written by [Jeff Parsons] to demonstrate what the software is doing, without the effect being evident. If you like, you can try it out for yourselves, as the assembly listing is available on the project GitHub.

Of course, we’ve covered the digital rain effect many. many times before, for example, with this Arduino Library, and here’s a custom PC case side panel from way back in December 2021, if you can remember those days.

Continue reading “Matrix Digital Rain On The IBM PC With A High Persistence Monitor”

Swiss Army Knife Of Power Tool Carts

When you’re into woodworking in a serious way, you’re going to eventually want some power tools. With such efficiency of operation, things can go pear-shaped quickly, with wood dust getting absolutely everywhere. It’s not always practical (or desirable) to work outdoors, and many of us only have small workshops to do our making in. But woodworking tools eat space quickly. Centralized extraction is one solution, but all that fixed rigid ducting forces one to fix the tool locations, which isn’t always a good thing. Moveable tool carts are nothing new, we’ve seen many solutions over the years, but this build by [Peter Waldraff] is rather slick (video embedded below,) includes some really nice features in a very compact — and critically — moveable format.

By repurposing older cabinets, [Peter] demonstrates some real upcycling, with little going to waste and the end result looks great too! There is a centralized M-Class (we guess) dust extractor with a removable vacuum pipe which is easily removed to hook up to the smaller hand-held tools. These are hidden in a section near the flip-up planer, ready for action. An auto-start switch for the small dust extractor is wired-in to the smaller tools to add a little ease of use while reducing the likelihood of forgetting to switch it on. We’ve all done that.

For the semi-fixed larger tools, such as the miter and table saws, a separate, higher flow rate moveable dust extractor can be wheeled over and hooked up to the integrated plenum chamber, which grabs the higher volume of dust and chips produced.

A nice touch was to mount the miter saw section on sliding rails.  This allows the whole assembly to slide sideways a little, giving more available width at the table saw for ripping wider sheets. With another little tweak of some latches, the whole miter section can flip over, providing even more access to the table saw, or just a small workbench! Cracking stuff!

Need some help getting good with wood, [Eric Strebel] has some great tips for you! And if you’re needs are simpler and smaller, much much smaller, here’s a finger-sized plane for you.

Continue reading “Swiss Army Knife Of Power Tool Carts”

Teaching A DC Servo Motor To Act Like A Stepper

[Frank Herrmann] had an interesting idea to turn a geared DC motor into a servo motor assembly, but with a stepper motor-like interface. By stacking some small PCBs behind the motor body, it was possible to squeeze a DRV8837 DC motor driver and a pair of hall effect sensors on the first PCB layer, with the magnetic encoder nestled tightly behind it. Pin headers at the edge of the PCB connect to a second PCB bearing the microcontroller, which is based on the cheap STM32L432. The second PCB also holds an associated LDO and debug LED. Together, this handful of parts provide all that is needed to read the encoder, control the motor rotation and listen on the ‘stepper motor driver’ interface pins hooked up to the motion controller upstream. The Arduino source for this can be found on the project GitHub.

Whilst [Frank] mentions that this assembly has a weight and torque advantage over a NEMA 17 sized stepper motor, but we see no hard data on accuracy and repeatability which would be important for precise operations like 3D printing.

This project is part of a larger goal to make a complete 3D printer based around these ‘DC motor stepper motors’ which we will watch with interest.

While we’re on the subject of closed-loop control of DC motors, here’s another attempt to do the same, without the integration. If these are too small for you, then you always repurpose some windscreen washer motors.

Continue reading “Teaching A DC Servo Motor To Act Like A Stepper”