The Fridge Hacking Guide By BrewPi

brewpi-fridge-conversion-51

The team behind BrewPi are at it again! This time they have created an online guide showing how to convert a min-fridge into a Raspberry Pi & Arduino controlled fermentation chamber. In it, they describe 3 possible options:

  • Option 1: Make a simple switched power cord, without hacking into the fridge electronics.
  • Option 2: Make a switched power cord, but also override or remove the thermostat.
  • Option 3: Rip out the thermostat and fully integrate the SSRs into your fridge (which is what [Koen] and [Elco] did).

First things first though. They had to clean the fridge. And depending on where they got it or how long it has been unplugged for, the inside might have been pretty rank and disgusting from mold growing out of every corner. This took a good hour or so to clean properly lest the brewing process get infected with external grossness. This is all worth it because a well-controlled fermentation chamber results in a superior batch of beer.

They put their laser cut case on top of the fridge, holding an LCD, Raspberry Pi, Arduino and the BrewPi Arduino shield. The Arduino reads the temperature sensors inside the fridge, the beer and the ambient temperature. Then it controls the SSRs they added to switch the compressor and a heater. Then, the cables were routed through the fridge and take control of the compressor.

Continue reading “The Fridge Hacking Guide By BrewPi”

Hypno-Jellyfish Is Great For Kids (and Kids At Heart)

hjf3_blue

LED’s are fun. They are easily seen, not to hard to hook up, and produce a nice glow that can be gazed at for hours. Kids love them, so when [Jens] daughter was born, he knew that he wanted to create a device that would alternate colors depending on the object’s movement.

He utilized a mpu6050 accelerometer to detect changes in position, and wired together an Arduino Nano, a 9V battery, and a 12 LED neopixel ring from adafruit. Design requirements were jotted down beforehand ensuring that any child playing with the Hypno-Jellyfish would not be injured in any way. For example, anything that fits in a child’s mouth, will go in that child’s mouth; meaning that any materials used must be non-toxic, big enough not to be swallowed, and drool proof/water proof. The kids will pull, and throw, and drop the toy as well, so everything has to be of sturdy quality too. Epilepsy is also a concern when dealing with LED’s. But, [Jens] project hit the mark, making something that is kid-friendly while at the same time enjoyable for anyone else who likes color-changing lights.

Continue reading “Hypno-Jellyfish Is Great For Kids (and Kids At Heart)”

Solar Powered Lawn Mower Cuts The Grass So You Don’t Have To

MowerFea2

It takes a lot of power and energy to keep grass levels down to an appropriate level; especially when it’s hot out. If cool glasses of lemonade aren’t around, the task at hand may not be completed any time soon causing the unkempt blades of green (or yellow) vegetation outside to continue their path of growth towards the sun.

Instead of braving the oven-like temperatures which will inevitably drench the person in sweat, this solar powered robot has been created ready to take on the job. With the heart of an Arduino, this device shaves down the grass on a regular basis, rather than only chopping down the material when it gets too long. This helps to save electricity since the mower is only dealing with young and soft plants whose heads are easily lopped off without much effort.

Internally, the robot’s circuitry interfaces with an underground wiring system that defines the cutting zones within the lawn, and proves to be a simple, accurate, and reliable approach to directing the robot where to go. If the device travels under a shaded area, a battery kicks in supplying energy to the engine. When sunlight is available, that same battery accumulates the electricity, storing it for later.

Continue reading “Solar Powered Lawn Mower Cuts The Grass So You Don’t Have To”

The BlueOkiris Gameduino Console

3011851406903369314

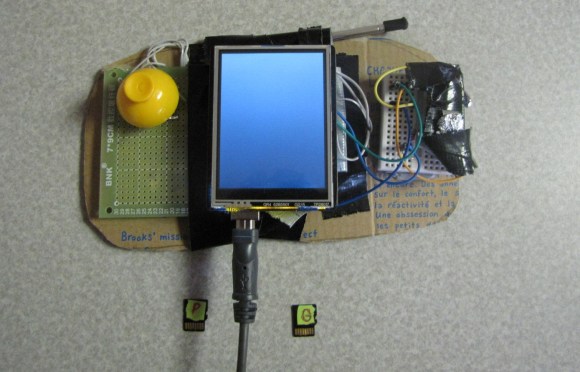
[Dylan] created an easy to make gaming console with an Arduino Uno, a makeshift button, an analog stick, and a TFT LCD touchscreen shield. Plus, he fashioned together a simple button with some duct tape.

So far, he has made 2 games. One is the infamous Pong. The other is a ‘Guess the Number’ type experience. The whole project is run within the code, and does not access the bootloader directly like you would with 2boots or a regular Gameduino adapter.

Build instructions can be found on [Dylan]’s hackaday.io project page (linked above). Essentially, all that is needed is to gather up the supplies, then take the button and analog stick and complete a circuit, fitting the open wires into the slots at digital pin 9. Solder the wires in place and connect ground to ground, 5v to 5v, x to A4, and y to A5. Add the TFT shield, insert a micro SD card, and upload a game.

To see it in action, check out the video after the break:

Continue reading “The BlueOkiris Gameduino Console”

Electricity Monitoring With A Light-to-Voltage Sensor, MQTT And Some Duct Tape

Bh6mcz_CUAAuI3V

When it comes down to energy management, having real-time data is key. But rarely is up-to-the-minute kilowatt hour information given out freely by a Utility company, which makes it extremely hard to adjust spending habits during the billing cycle. So when we heard about [Jon]’s project to translate light signals radiating out of his meter, we had to check it out.

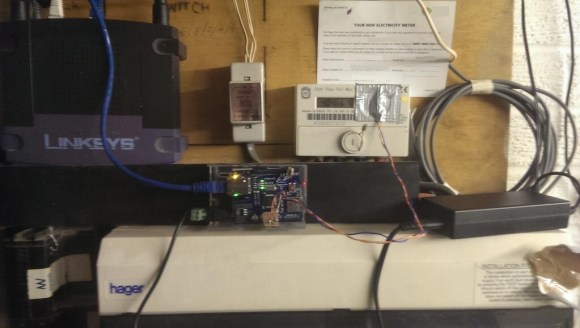
From the looks of it, his hardware configuration is relatively simple. All it uses is a TSL261 Light-to-Voltage sensor connected to an Arduino with an Ethernet shield attached. The sensor is then taped above the meter’s flashing LED, which flickers whenever a pulse is sent out indicating every time a watt of electricity is used. His configuration is specific to the type of meter that was installed by his Utility, and there is no guarantee that all the meters deployed by that company are the same. But it is a good start towards a better energy monitoring solution.

And the entire process is documented on [Jon]’s website, allowing for more energy-curious people to see what it took to get it all hooked up. In it, he describes how to get started with MQTT, which is a machine-to-machine (M2M)/”Internet of Things” connectivity protocol, to produce a real-time graph, streaming data in from a live feed.

Continue reading “Electricity Monitoring With A Light-to-Voltage Sensor, MQTT And Some Duct Tape”

A Lego Game Controller; Just For The Hack Of It

ExwDPUV

[StrangeMeadowlark] decided one day to create this badass Arduino-based gaming controller. Not for any particular reason, other than, why the heck not?!

It looks like a tiny Lego spaceship that has flown in from a nearby planet, zooming directly into the hands of an eager Earthling gamer. With buttons of silver, this device can play Portal 1 and 2, Garry’s Mod, Minecraft, and VisualBoy Advance. Although more work is still needed, the controller does the job; especially when playing Pokemon. It feels like a Gameboy interface, with a customizable outer frame.

Sticky, blue-tack holds a few wires in place. And, most of the materials are items that were found around the house. Like the gamepad buttons on top; they are ordinary tactile switches that can be extracted from simple electronics. And the Legos, which provide an easy way to build out the body console, rather than having to track down a 3D printer and learning AutoCAD.

Continue reading “A Lego Game Controller; Just For The Hack Of It”

A Cheap DIY Smoke Detector That Can Save Lives

2014-07-19-16.33.53 A faulty wire, a discarded burning cigarette, or a left-on curling iron can trigger sparks of fire to engulf everything nearby until all that’s left is brittle mounds of smoldering ash. Which is why smoke detectors are so important. They are life saving devices that can wake people up sleeping inside, well before the silent, but deadly carbon monoxide starts to kick in. But what happens if no one is home, and the alarm begins to blare? The place burns down into the ground without the owners knowing.

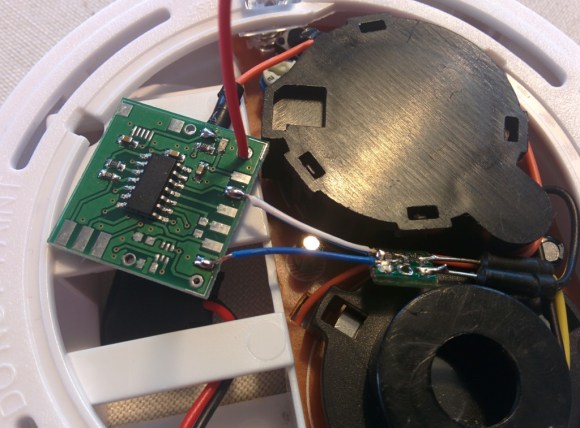
So when [Martin] purchased a battery-powered smoke detector and rigged it up to notify him exactly when the piezo siren is activated, the evolution of the automatic fire alarm continued into the realm of wireless internet-connected things.

His home automation system (a Raspberry Pi running Node-Red) links to a Funky ATTiny84-based sensor and transmits the data wirelessly, redirecting the information to his phone. SMS messages can be sent, as well as emails and pushbullet notifications. Once the piezo siren starts to sing, the system alerts him that smoke has been detected and that he should check on it as soon as possible.

The electronics fit perfectly inside the case waiting for any smoky disturbance in the room to light up. And what makes this project even better, besides the life saving capabilities and the instant push notifications, is that it was hooked up for the cheap. No need to buy a brand-new, expensive Nest protect, when all it takes it a sensor or two and a Raspberry Pi to hack the fire alarm that already sits in the house.

This video coming up after the break shows how simple it is to make. Continue reading “A Cheap DIY Smoke Detector That Can Save Lives”