Motion Controlled Reddit Vote Sign.


A little while back I attended the largest east coast gathering of folks from the ever popular social news site, Reddit.com. Those of you familiar with Reddit already know that it is all about link aggregation. Users post links to interesting websites and material, and can then vote up or vote down content based on interest or relevance. Through the magical site algorithms original and interesting content is, as implied, aggregated up to the front page.  The whimsical nature of this big DC event lead many people to furnish signs of all types based on the culture of the site, internet memes, etc… The signs that really caught my attention were based primarily on the stylistic site layout, blowing up mail icons and other Reddit specific graphics.

The concept of using site graphics gave me the idea of being able to personally vote up or down other peoples’ signs. It was far too easy to just make a cardboard arrow, and I don’t have a color printer. I happened to have a shelved coffee table project involving orange and blue LEDs. Same colors as the arrows! Sweet. To make this project work I would have to work entirely from my project pile, there simply was no time to order anything from the internet. I managed to crank out a functional up/down voting sign in 3 days leading up to the gathering (and the morning of), here is what I did:

Continue reading “Motion Controlled Reddit Vote Sign.”

Simple IR Bounce Tachometer

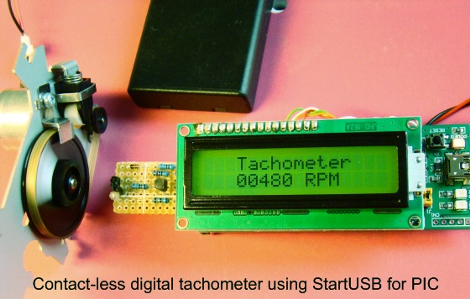
[Rajendra Bhatt] writes in to let us know about a nice simple IR bounce tachometer. The project uses a startUSB for PIC board and a 16×2 character LCD with a very basic Infrared bounce circuit.  Measuring either a reflective or non reflective spot in the rotating object, in this case a bit of white paper, the micro is supposedly capable of measuring up to 99,960 RPM (we think the paper might fly off at this point) with a resolution of 60 RPM. This is the same concept as a beam-break style tachometer but keeps all your electronics on one end of the spinning hazard.

The article also goes into detail about setting the PIC18F2550’s Timer0 register to enable 16-bit resolution.  The PIC is configured to turn on the infrared LED for one second, measure the number of pulses (through timer registers), and multiply that value by 60.  We would be more careful with the TMR0H and TMR0L counters as they have to be read and written in a certain order to preserve their values, but you’d need to be measuring upwards of 15,360 rpm to run into that error.

It is a quality writeup for anyone interested in learning about the start USB for PIC board, tachometers, or a new project. Thanks [Raj]!

Pinewood Derby Cars Have Come A Long Way

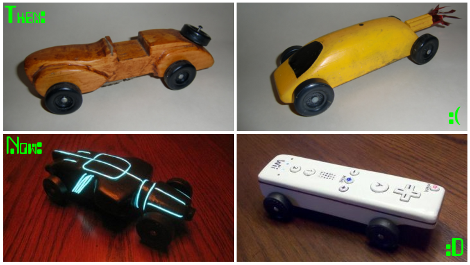
Get your graphite and hike a wheel, [Aron Hoekstra] writes in to completely embarrass us with some excellent pinewood derby cars.    In the pursuit of that extra something [Aron] consulted with his sons who came up with some cool ideas for cars, one Tron themed and the other basically a Wiimote with wheels! The official Pinewood derby rules say nothing about electronics, so as long as nothing helps the block-o-wood travel down the track faster, anything goes. This means you are free to load up whatever cool lights you want, but will have to earn your robotics merit badge some other way.

[Aron] Starts the builds by carving out the shape of the cars, each feature a hollowed out cavity underneath to accommodate the batteries and electronics. For the Tron Light Runner car, one continuous EL strip weaves in and out of the derby car’s body, and a single AAA battery runs the driver. [Aron] notes that it took around five feet of EL wire to cover the little car, which is two more than the driver is rated for. Fortunately the extra little bit of additional wire had little effect on its brightness.

The Wiimote car has detailed 3d buttons, a breadboard with a linear regulator,  and PIC 16F628 driving  blue LEDs.  For the majority of the time the PIC simply runs a chase routine for the four LEDs, but [Aron] went through the trouble to program in the Wiimote’s start-up sequence!

Shown above the [Hokestra]’s work is my older brother’s pinewood derby car (top left) and my… potato rocket… thing… (top right)  from many many years ago. I now seriously regret not considering LEDs! Although I think all that existed then was red,  green and IR.

Check out videos of the [Hoekstra] bros’ cars after the jump!

Continue reading “Pinewood Derby Cars Have Come A Long Way”

Tactical Wifi Cantenna Needs Picatinny Rails

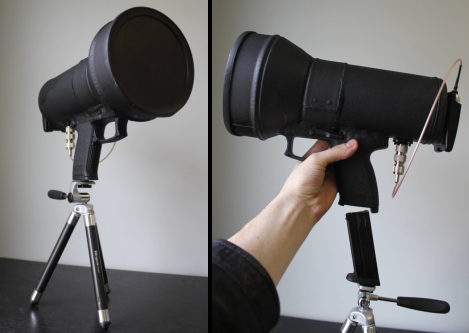
[Wes] built a cool looking Tactical Wifi Cantenna with some parts from a broken airsoft pistol. The antenna is a cookie can type with an added cone to increase performance, as seen in this tutorial. Once the antenna was built it was time to add some kind of handle, [Wes] just so happened to have such a thing on hand. After epoxy puddying the pistol’s grip to his cookie cantenna he observed that the magazine lock was still functioning. Quick thinking and the application of a  hammer in nut allows the whole rig to quickly attach to the tripod. The antenna also sports a plastic lid and textured paint finish for that ultimate tactical look and feel. A USB Alpha AWUSO36H Wifi dongle even mounts on the back of the rig. We wouldn’t go around outside pointing this at stuff attaching and detaching the tripod but the finish looks great, nicely done!

Check out some other various types of cantennas, even a rifle version if you crave more wifi goodness.

Buying A Laser Cutter From China

We here at Hackaday have been pining over these cheap laser cutters on the e-bay. They are, however, just outside of the price range to make them worth ponying up for.  [Stephen Hobley] however seems to have taken one for the team in his three part series, and is allowing us to live vicariously through is experiences.

Not surprisingly the price point leads to the potential for headaches. The units ship directly from China, and see their fair share of rough handling from package carriers. Broken/misaligned laser tubes are not uncommon (replacement tubes are prevalent). Shockingly the laser tube managed to survive the seven thousand mile journey! That only leaves a couple crucial modifications and careful cleaning and aligning to get the unit up and running. You didn’t think it would be that easy, did you?

To top off all the modifications adjustments and cleaning steps [Stephen] found (in part three) that his controller board was on the fritz. With a new one on the way from China, [Stephen] is debating either reverse engineering the included controller board or coming up with his own CNC solution. We could suggest quite a few alternate solutions ourselves.

We will be glued to [Stephen]’s blog for updates.

Stick around for a video of what we all really want to see, a laser burning stuff.

Continue reading “Buying A Laser Cutter From China”

Bolt Action Pneumatic Spud Gun

No one should ever make a potato cannon. They are wildly unsafe, powerful, and can easily shatter your neighbor’s gaudy bay window, you know the neighbor with the mean dog.

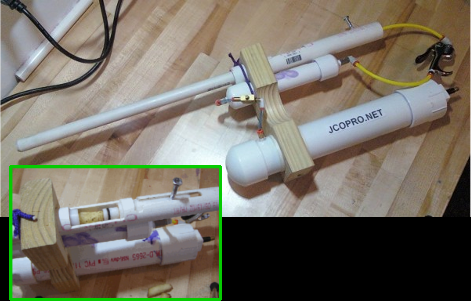
That said, [Jeremy Cook] made a minature bolt action spud gun! Using a custom machined Delrin bolt, a fitted Delrin reducer, and some PVC, the spud gun is capable of quickly loading custom shaved potatoes with the greatest of ease. Pushing the bolt (literally a bolt) forward forces the spud through the reduction coupling and into the barrel. Lock the bolt to the side, pull the trigger (an air blower) and two expansion chambers toss compressed air behind your starchy projectile. The design is reminiscent of  a common bolt action rifle, but all that Delrin reminds us of paintball markers.

[Jeremy] is writing up the project in multiple posts, so check his blog for info. We are also no strangers to the strange, dangerous and wonderful world of potato launching tech.

Stick around for a video of the launcher in action!

Continue reading “Bolt Action Pneumatic Spud Gun”

Keep Fun In Check With A Parental Count Down Timer

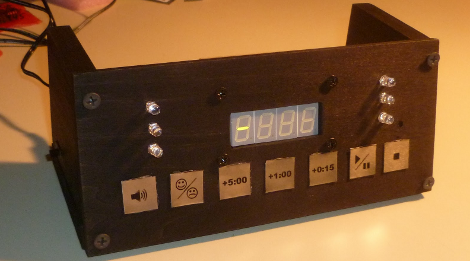
Gaming industry software engineer [Pedantite] writes in to let us know about his latest endeavor, an AVR based parental assistant timer: Good Times.   Looking for a new project that would be both useful and interesting, his wife suggested a “time out/ time’s up timer”. Like most of us [Pedantite]’s children are well studied in the arts of procrastination and mischief.  In the kids’ case this leads to time outs and break time running amok. The solution, in this case, is pretty much an advanced DIY egg timer with fun sounds.

The timer sports all of your basic countdown-timer functions including a 4 digit 7-segment LED output display, stop light style LED indicators, and controls to start/pause and stop the count down. The count down time can be input via the +5 minute, +1 minute, and +15 second buttons. There is even a happy/sad button to toggle between “time out” and “break time” modes. Two Atmel micros power the device, an AT Tiny 2313V for the capacitive touch keypad and an AT Mega 644P for the display, audio, and time measurement.  There are a lot of excellent techniques used in the build, some which we have covered here:  Four 595 Shift registers for the display; A 4 bit r2r DAC for audio output.

[Pedantite] is still in the process of writing up the project in multiple posts, and would love to know what you all want to hear about. Check out his blog for details and a quick video of the timer in action! Also, if you are interested in capacitive buttons, check out part 2 of the writeup.