Aux-in Hacking An ’04 Subaru Radio

[Jordan] writes in to show us his hacked up car stereo. [Jordan]’s 2004 Subaru, like many of our cars, does not offer any kind of auxiliary input, and aux-in/mp3 adapters tend to run on the not so cheap side of the price scale. Even a replacement head unit was too rich for his blood. So it was time to wire something to the old head unit.

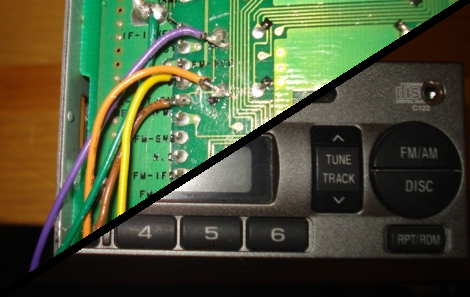
On inspecting the radio’s PCB [Jordan] managed to locate the traces that carry audio from the FM receiver to the stereo’s amplifier.  Most aux input hacks we have seen involve fooling the stereo into thinking some media is inserted, even if interfacing with the audio lines on the PCB. These require that the tape/CD functionality be altered, perhaps permanently. Even worse you may have to shlep around a blank CDR with a bunch of tracks on it! All just to fool the stereo into enabling audio output.

Instead [Jordan] targets the audio lines from the FM stereo, since radio is always enabled when active. Once the audio traces are located they are severed  and bypassed with a 1/8″ stereo plug. This setup allows the FM audio signal to pass through the connector when disconnected, and cuts off any radio audio once your mp3 player is. We have seen this same method used on a vintage stereo hack as well. Nice work!

ChipKIT Max32, An Arduino Mega Upgrade With A PIC32 Under The Hood

For those of you who are looking to put some power behind your Arduino shields,  Digilent just released their chipKIT Max32 prototyping platform. The board  features a Pic 32 microcontroller, USB programmer and all the things you would typically expect from a development board.

The PIC32MX795F512 is a  32-bit MIPS processor core running at 80Mhz, 512KB flash memory and packs 128KB of SRAM data memory. Digilent also mentions utilizing the Pic’s built in USB 2 controller, 10/100 Ethernet and dual CAN controllers, but these will require shields specific to the chipKIT Max32. The board is also fully compatible with Arduino IDE and libraries as well as MPLAB  and the PICKit3 in-system programmer/debugger.

With a price point just below the Arduino Mega 2560 this looks like a great resource for anyone looking to upgrade their Arduino webserver, or just embarrass their Arduino Arduino shield. Maybe it’ll just spawn some interesting gameduino upgrades. It can certainly cut down on extraneous Arduino usage. Either way we’ll be on the lookout to see what this performance bump can bring to table!

DIY Portal Turret Is… Looking Pretty Good.

[Ryan Palser] wrote in to tell us about his Portal Turret. [Ryan] set about making this Portal 1 style turret by first carving a Styrofoam form, bondo and waxing then casting molds of the various components. Anyone interested in mold making (like us) should check out all the pictures and comments in the stream. The turret’s camera lens style eye has some excellent detail including a laser cut aperture with text inlay. A couple LEDs behind the eye assembly provide the signature red glow and evidently [Ryan] also fitted the little guy with a red laser. An internal Arduino (Incident Resolution Chip?) takes ques from a PIR sensor mounted in one of the turret’s arms to play one of 17 sound clips through a sparkfun MP3 player shield. In order to fight repetition the sound module runs through a playlist of the 17 tracks then shuffles it before playing through again. Theme music can also be spammed by pressing a button in the back of the motion sensing arm. The turret can be battery powered or plugged into a wall socket for constant operation. All that’s missing are the Aperture-Brand Resolution Pellets. We would love to see this integrated with some similar turret projects previously featured here.

Are you still there? We have more Aperture Science stuff including a Sentry Turret, Weighted Companion Cube, and even a portal shirt. If you are interested in more model making check out the spectacular Daft Punk helmet build from a little while back.

LED Matrix Helmits Inspiried By You-Know-Who

Here is a post from [John’s Projects]. For the insane, satirical, and incredible 2011 Omaha Groundhog Prom [John] and his buddy fabricated  helmets reminiscent of our favorite robot rockers.  [John] needed something harder, better, faster, stronger than the competition and wound up creating LED matrices that mount behind aerodynamic motorcycle helmet visors.

The helmets were constructed in about a weeks time and in a similar fashion to the real helmets. [John] sourced some cheap motorcycle headgear and mounted the LEDs, their driving transistors, and ballast resistors to a 1/32″ (flexible) plexiglass sheet that sits face to face with the wearer. [John] walks through the whole process starting with a half inch grid drawn onto a paper template. The template is cut from the plexi using tin snips, then LED holes are carefully drilled in the thin plastic using various bits up to 13/64″. The 90 some odd LEDs are, one more time, fitted then hot glued in place and soldered in vertical columns to simplify things and prevent any short circuit. An Arduino Pro (via common emitter 2n2222 on/off circuits) provides some digital love to the 18 LED columns and is connected to a Velleman Sound-to-light kit which modulates the brightness of the whole visor based on da funk. Two pots are also wired to provide sensitivity and pattern selection to the human after all.

We can’t imagine the technologic setup is fresh after being subjected to the steam machine, high life, and whatever else for too long. Oh yeah, Some brighter LEDs could give the helmets night vision and make the whole thing come alive with emotion. Something about us is burnin to know what powers the helmets. Nice work [John]!

If you are looking to do some homework on these high fidelity rock’n roll outfits in the prime time of your life check out this very detailed example, a helmet construction video,  or finish the costume off with some EL wire.

Check out some videos of these superheros rollin’ & scratchin’ after the jump!

Continue reading “LED Matrix Helmits Inspiried By You-Know-Who”

3D Render Live With Kinect And Bubble Boy

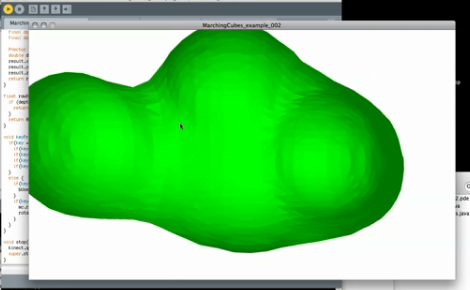
[Mike Newell] dropped us a line about his latest project, Bubble boy! Which uses the Kinect point cloud functionality to render polygonal meshes in real time.  In the video [Mike] goes through the entire process from installing the libraries to grabbing code off of his site. Currently the rendering looks like a clump of dough (nightmarishly clawing at us with its nubby arms).

[Mike] is looking for suggestions on more efficient mesh and point cloud code, as he is unable to run any higher resolution than what is in the video. You can hear his computer fan spool up after just a few moments rendering! Anyone good with point clouds?

Also, check out his video after the jump.

Continue reading “3D Render Live With Kinect And Bubble Boy”

Old Computer Parts Demonstrate How Particle Accelerators Work

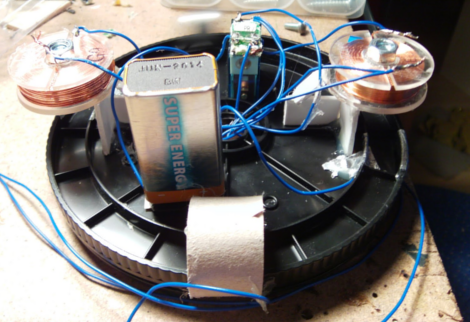
[Ameres Valentin] writes in to let us know about his DIY particle accelerator model. The model, made mostly out of old computer stuff, mimics a linear high-energy particle accelerator which use drift tubes to toss particles around. Drift tubes work by first attracting a particle (in this case, ball bearing) until it crosses a charged plate (in this case, coil), then flipping the charge polarity and repelling the particle.  In this case the accelerators function more like a multiple coil gun, as they can’t exactly push the bearing away. Regardless of the specifics the model is an excellent visual aid.

As the bearing rolls along the rails of the CD spindle it shorts bits of foil tape placed just ahead of the magnets. This (appears) to flip a relay that switches on the magnet. Once the magnet coil is energized it pulls the bearing towards its center, accelerating it. The foil stops just before the point where the magnet would pull back the bearing. We are not sure if [Ameres] is using any trickery to get the magnets to individually power, as schematics are not available. The circuit should be simple enough to figure out with a couple relays. In the video [Ameres] adds a lamp to the coils to display when they are powered. Nice work! This could make a fun distraction desk accessory, better than those clicky Newton’s cradles.

Check out [Ameres]’ site for a video of the model in action.

Build A Real-life Escher’s Waterfall

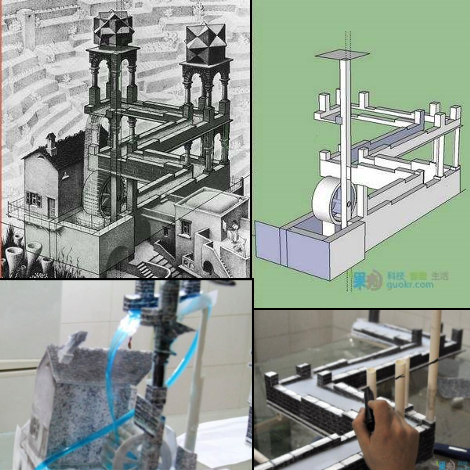
Instructables user [GuokrDIY] has provided a translation of a detailed guide on making one of our favorite Escher inspired illusions. Unlike the previous speculated solutions to Escher’s waterfall this one manages to keep the water path coherent up until the top level. The trick of the whole setup is very carefully controlling perspective to overlap the water source and outlet.  We say water but for some reason the builder is actually using “toilet detergents” as the liquid… At any rate, the liquid is allowed to flow downhill until it reaches the fourth corner, which does not exist. The liquid actually falls off the end of the table (out of sight) and into a basin. A carefully timed pump in the basin pushes liquid up to the top of the waterfall through one of the model’s pillars, where it then cascades over the wheel.

Using sketchup to model the various structural components of the waterfall the design is fashioned out of PVC and ABS plastic, then skinned with mapped textures to ensure that everything looks coherent. The visual details are fine tuned by viewing the whole setup through a camcorder.  The hardest part of the illusion seems to be modulating power to the pump in order to time it with the liquid’s flow.

We just hope that thing about toilet detergent was a mistranslation or some kind of sarcasm from the original Chinese article.  Check out the model in action after the jump!

Continue reading “Build A Real-life Escher’s Waterfall”