Popular Printers Pwned In Prodigious Page Prank

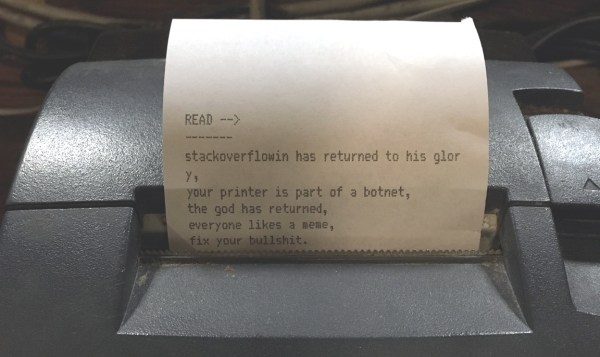
A new day dawns, and we have another story involving insecure networked devices. This time it is printers of all makes and descriptions that are causing the panic, as people are finding mystery printouts bearing messages such as this:

Stackoverflowin has returned to his glory, your printer is part of a botnet, the god has returned

Well that’s it then, you can’t argue with a deity, especially one who has apparently created a botnet from the world’s printing devices. Printer owners the world over are naturally worried about their unexpected arrival, and have appeared on support forums and the like to express their concern.

We are of course used to taking everything our printers tell us at face value. Low on ink? I hear you, my inanimate reprographic friend! But when our printer tells us it’s part of a botnet perhaps it’s time to have a little think. It is entirely possible that someone could assemble a botnet of compromised printers, but in this case we smell a rat. Only in farcical crime dramas do crooks announce their crimes in such a theatrical fashion, you might say it’s the point of a botnet not to be detected by its host. Reading some of the reports it seems that many of the affected systems have port 9100 open to the world, that’s the standard TCP printer port, so it seems much more likely that someone has written a little script that looks for IP addresses with port 9100 open, and trolls them with this message.

The real message here is one with which we expect Hackaday readers will be very familiar, and which we’ve covered before. Many network connected appliances have scant regard for security, and are a relative push-over for an attacker. The solution is relatively straightforward to those of a technical inclination, be aware of which services the devices is exposing, lock down services such as uPNP and close any open ports on your router. Unfortunately these steps are probably beyond many home users, whose routers remain with their default manufacturer’s settings for their entire lives. It’s a shame our printer troll didn’t add a link to basic router security tips.

If you want to have a little fun, some of the printed pages include an email address for ‘the god’. It would be fun to figure out who this is, right?

Books You Should Read: Making A Transistor Radio

When a Hackaday article proclaims that its subject is a book you should read, you might imagine that we would be talking of a seminal text known only by its authors’ names. Horowitz and Hill, perhaps, or maybe Kernigan and Ritchie. The kind of book from which you learn your craft, and to which you continuously return to as a work of reference. Those books that you don’t sell on at the end of your university career.

Ladybird books covered a huge range of topics.

So you might find it a little unexpected then that our subject here is a children’s book. Making A Transistor Radio, by [George Dobbs, G3RJV] is one of the huge series of books published in the UK under the Ladybird imprint that were a staple of British childhoods for a large part of the twentieth century. These slim volumes in a distinctive 7″ by 4.5″ (180 x 115 mm) hard cover format were published on a huge range of subjects, and contained well written and informative text paired with illustrations that often came from the foremost artists of the day. This one was published at the start of the 1970s when Ladybird books were in their heyday, and has the simple objective of taking the reader through the construction of a simple three transistor radio. It’s a book you must read not because it is a seminal work in the vein of Horrowitz and Hill, but because it is the book that will have provided the first introduction to electronics for many people whose path took them from this humble start into taking the subject up as a career. Including me as it happens, I received my copy in about 1979, and never looked back. Continue reading “Books You Should Read: Making A Transistor Radio”

The Gray-1, A Computer Composed Entirely Of ROM And RAM

When we learn about the internals of a microprocessor, we are shown a diagram that resembles the 8-bit devices of the 1970s. There will be an ALU, a program counter, a set of registers, and address and data line decoders. Most of us never go significantly further into the nuances of more modern processors because there is no need. All a processor needs to be is a black box, unless it has particularly sparked your interest or you are working in bare-metal assembly language.

We imagine our simple microprocessor as built from logic gates, and indeed there have been many projects on these pages that create working processors from piles of 74 series chips. But just occasionally a project comes along that reminds us there is more than one way to build a computer, and our subject today is just such a moment. [Olivier Bailleux] has created his “Gray-1”, a processor whose only active components are memory chips, both ROM and RAM.

The clever part comes with the descriptions of how the ROMs are used to recreate the different functions of the processor, through careful programming. Some functions such as registers for example use loops, in which some of the address lines are driven from the data lines to maintain the ROM at a set location. The name of the computer comes from its program counter, which counts in Gray code.

The full processor implements a RISC architecture, and there is a simulator to allow code development without a physical unit. The write-up is both comprehensive and accessible, and makes a fascinating read.

It’s safe to say this is the only processor we’ve seen with this novel approach to architecture. Some more conventional previous features though have been an effort to create a processor entirely from NAND gates, and another made from 74 logic.

Fail Of The Week: GitLab Goes Down

Has work been a little stressful this week, are things getting you down? Spare a thought for an unnamed sysadmin at the GitHub-alike startup GitLab, who early yesterday performed a deletion task on a PostgreSQL database in response to some problems they were having in the wake of an attack by spammers. Unfortunately due to a command line error he ran the deletion on one of the databases behind the company’s main service, forcing it to be taken down. By the time the deletion was stopped, only 4.5 Gb of the 300 Gb trove of data remained.

Reading their log of the incident the scale of the disaster unfolds, and we can’t help wincing at the phrase “out of 5 backup/replication techniques deployed none are working reliably or set up in the first place“. In the end they were able to restore most of the data from a staging server, but at the cost of a lost six hours of issues and merge requests. Fortunately for them their git repositories were not affected.

For 707 GitLab users then there has been a small amount of lost data, the entire web service was down for a while, and the incident has gained them more publicity in a day than their marketing department could have achieved in a year. The post-mortem document makes for a fascinating read, and will probably leave more than one reader nervously thinking about the integrity of whichever services they are responsible for. We have to hand it to them for being so open about it all and for admitting a failure of their whole company for its backup failures rather than heaping blame on one employee. In many companies it would all have been swept under the carpet. We suspect that GitLab’s data will be shepherded with much more care henceforth.

We trust an increasing amount of our assets to online providers these days, and this tale highlights some of the hazards inherent in placing absolute trust in them. GitLab had moved from a cloud provider to their own data centre, though whether or not this incident would have been any less harmful wherever it was hosted is up for debate. Perhaps it’s a timely reminder to us all: keep your own backups, and most importantly: test them to ensure they work.

Thanks [Jack Laidlaw] for the tip.

Rack server image: Trique303 [CC BY-SA 4.0], via Wikimedia Commons.

Everyone Should Build At Least One Regenerative Radio Receiver

When we build an electronic project in 2016, the chances are that the active components will be integrated circuits containing an extremely large amount of functionality in a small space. Where once we might have used an op-amp or two, a 555 timer, or a logic gate, it’s ever more common to use a microcontroller or even an IC that though it presents an analog face to the world does all its internal work in the digital domain.

Making A Transistor Radio, 2nd edition cover. Fair use, via Internet Archive.

There was a time when active components such as tubes or transistors were likely to be significantly expensive, and integrated circuits, if they even existed, were out of the reach of most constructors. In those days people still used electronics to do a lot of the same jobs we do today, but they relied on extremely clever circuitry rather than the brute force of a do-anything super-component. It was not uncommon to see circuits with only a few transistors or tubes that exploited all the capabilities of the devices to deliver something well beyond that which you might expect.

One of the first electronic projects I worked on was just such a circuit. It came courtesy of a children’s book, one of the Ladybird series that will be familiar to British people of a Certain Age: [George Dobbs, G3RJV]’s Making A Transistor Radio. This book built the reader up through a series of steps to a fully-functional 3-transistor Medium Wave (AM) radio with a small loudspeaker.

Two of the transistors formed the project’s audio amplifier, leaving the radio part to just one device. How on earth could a single transistor form the heart of a radio receiver with enough sensitivity and selectivity to be useful, you ask? The answer lies in an extremely clever circuit: the regenerative detector. A small amount of positive feedback is applied to an amplifier that has a tuned circuit in its path, and the effect is to both increase its gain and narrow its bandwidth. It’s still not the highest performance receiver in the world, but it’s astoundingly simple and in the early years of the 20th century it offered a huge improvement over the much simpler tuned radio frequency (TRF) receivers that were the order of the day.

Continue reading “Everyone Should Build At Least One Regenerative Radio Receiver”

Darth Vader, In A Nixie Tube

This may be a controversial statement, but Nixie tubes have become a little passé in our community. Along comes another clock project, and oh look! It’s got Nixie tubes instead of 7-segment displays or an LCD. There was a time when this rediscovered archaic component was cool, but face it folks, it’s been done to death. Or has it?

vadar-nixie-tube-unlit
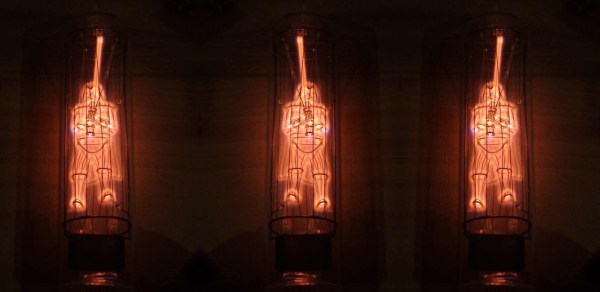
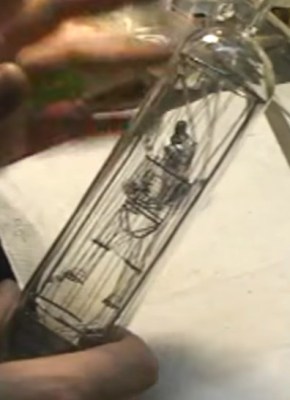
So given a disaffection with the ubiquity of Nixies you might think that no Nixie project could rekindle that excitement. That might have been true, until the videos below the break came our way. [Tobias Bartusch] has made his own Nixie tube, and instead of numerals it contains a 3D model of [Darth Vader], complete with moving light saber. Suddenly the world of Nixies is interesting again.

The first video below the break shows us the tube in action. We see [Vader] from all angles, and his light saber. Below that is the second video which is a detailed story of the build. Be warned though, this is one that’s rather long.

The model is made by carefully shaping and spot welding Kanthal wire into the sculpture, a process during which (as [Tobias] says) you need to think like neon plasma. It is then encased in a cage-like structure which forms its other electrode. He takes us through the process of creating the glass envelope, in which the wire assembly is placed. The result is a slightly wireframe but very recognisable [Vader], and a unique tube.

Continue reading “Darth Vader, In A Nixie Tube”

An Awesome Interactive LED Table

If you want to create a large display with a matrix of LEDs, it’s a relatively straightforward process. Thanks to addressable LED tape and microcontrollers it becomes more of a software issue than one of hardware. [Vincent Deconinck] had some inexpensive WS2812 strips, so he sliced into an inexpensive IKEA coffee table  and mounted them in a grid beneath an acrylic sheet. Some work with Arduino Nanos and a Raspberry Pi later, and he had a very acceptable LED matrix table.

An attractive hack, you might say, and leave it at that. But he wasn’t satisfied enough to leave it there, and so to make something rather special he decided to add interactivity. With an infra-red emitter and receiver as part of each pixel, he was able to turn an LED table into an LED touchscreen, though to be slightly pedantic it’s not sensing touch as such.

The design of the IR sensors was not entirely straightforward though, because to ensure reliable detection and avoid illumination from the LED they had to be carefully mounted and enclosed in a tube. He also goes into some detail on the multiplexing circuitry he used to drive the whole array from more Arduinos and a GPIO expander.

The write-up for this project is a long one, but it’s well worth the read as the result is very impressive. There are several videos but we’ll show you the final one, the table playing touch screen Tetris.

Continue reading “An Awesome Interactive LED Table”