Our Norwegian is pretty weak, so we struggled a little bit with the documentation for a big public LED art project in the lighthouse (translated) in Horten, Norway. But we do speak the universal language of blinkies, and this project has got them: 3,008 WS2812b LEDs ring the windows at the top of the lighthouse and create reactive patterns depending on the wave height and proximity of the ferry that docks there.
This seems to be an evolving project, with more features being added slowly over time. We love the idea of searching for the WiFi access point on the ferry to tell when it’s coming in to port, and the wave height sensor should also prove interesting data, with trends at the low-frequency tidal rate as well as higher frequency single waves that come in every few seconds. What other inputs are available? How many are too many?
It’s so cool that a group of tech-minded art hackers could get access to a big building like this. Great job, [Jan] and [Rasmus] and [everyone else]!
The eternal enemy of [James Puderer]’s pockets is anything that isn’t his smartphone. When the apartment building he resides in added a garage door, the forces of evil gained another ally in the form of a garage door opener. So, he dealt with the insult by rigging up a Raspberry Pi to act as a relay between the opener and his phone.
The crux of the setup is Firebase Cloud Messaging (FCM) — a Google service that allows messages to be sent to devices that generally have dynamic IP addresses, as well as the capacity to send messages upstream, in this case from [Puderer]’s cell phone to his Raspberry Pi. After whipping up an app — functionally a button widget — that sends the command to open the door over FCM, he set up the Pi in a storage locker near the garage door and was able to fish a cable with both ethernet and power to it. A script running on the Pi triggers the garage door opener when it receives the FCM message and — presto — open sesame.
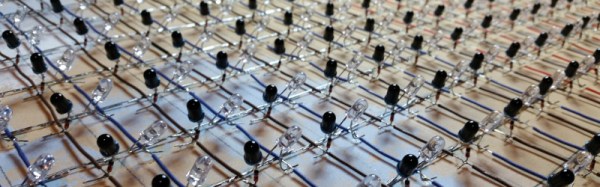
If you want to create a large display with a matrix of LEDs, it’s a relatively straightforward process. Thanks to addressable LED tape and microcontrollers it becomes more of a software issue than one of hardware. [Vincent Deconinck] had some inexpensive WS2812 strips, so he sliced into an inexpensive IKEA coffee table and mounted them in a grid beneath an acrylic sheet. Some work with Arduino Nanos and a Raspberry Pi later, and he had a very acceptable LED matrix table.
An attractive hack, you might say, and leave it at that. But he wasn’t satisfied enough to leave it there, and so to make something rather special he decided to add interactivity. With an infra-red emitter and receiver as part of each pixel, he was able to turn an LED table into an LED touchscreen, though to be slightly pedantic it’s not sensing touch as such.
The design of the IR sensors was not entirely straightforward though, because to ensure reliable detection and avoid illumination from the LED they had to be carefully mounted and enclosed in a tube. He also goes into some detail on the multiplexing circuitry he used to drive the whole array from more Arduinos and a GPIO expander.
The write-up for this project is a long one, but it’s well worth the read as the result is very impressive. There are several videos but we’ll show you the final one, the table playing touch screen Tetris.
FPV drones are a fun but often costly hobby for beginners. Opting for a smaller drone will reduce the chance of damaging the drone when one invariably crashes and the smaller props are also a lot safer if there are any innocent bystanders. YouTuber and Instructables user [Constructed] wanted a cheap FPV capable drone that they could comfortably fly in-and-out of doors, so of course they built their own.
Once the drone’s frame was 3D printed, the most complex part about soldering four small-yet-powerful 8.5 mm motors to the Micro Scisky control board is ensuring that you attach them in the correct configuration and triple-checking them. A quick reshuffling of the battery connections and mounting the FPV camera all but completed the hardware side of the build.
Before plugging your flight controller into your PC to program, [Constructed] warns that the battery must be disconnected unless you want to fry your board. Otherwise, flashing the board and programming it simply requires patience and a lot of saving your work. Once that’s done and you’ve paired everything together, the sky — or ceiling — is the limit!
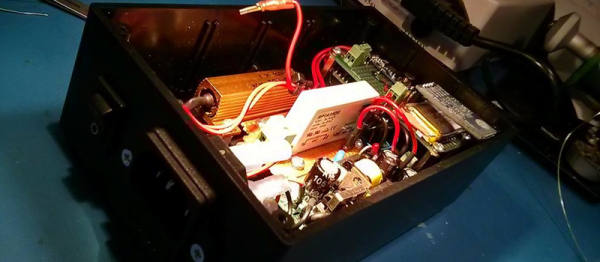
Many tools can be used either for good or for evil — it just depends on the person flipping the switch. (And their current level of mischievousness.) We’re giving [Callan] the benefit of the doubt here and assuming that he built his remote-controlled Residual Current Device (RDC) tripper for the purpose of testing the safety of the wiring in his own home. On the other hand, he does mention using it to shut off all the power in his house during an “unrelated countdown at a party”. See? Good and evil.
An RCD (or GFCI in the States) is a kind of circuit breaker that trips when the amount of current in the hot and neutral mains power lines aren’t equal and opposite, which would suggest that the juice was leaking out somewhere, hopefully not through someone. They only take a few milliamps of imbalance to blow so that nobody gets hurt. Making a device to test an RCD is easy; a resistor between hot and the protective ground circuit would do.
[Callan] over-engineers. He used a 50 W resistor where 30 W would do under the worst circumstances. A stealthy solid-state relay switches the resistor in, driven by an Uno and a Bluetooth module, so he can trip his circuit breakers from his smartphone, naturally. Continue reading “Awesome Prank Or Circuit-Breaker Tester?”→
When I first got interested in computers, it was all but impossible for an individual to own a computer outright. Even a “small” machine cost a fortune not to mention requiring specialized power, cooling, and maintenance. Then there started to be some rumblings of home computers (like the Mark 8 we recently saw a replica of) and the Altair 8800 burst on the scene. By today’s standards, these are hardly computers. Even an 8-bit Arduino can outperform these old machines.
As much disparity as there is between an Altair 8800 and a modern personal computer, looking even further back is fascinating. The differences between the original computers from the 1940s and anything even remotely “modern” like an Altair or a PC are astounding. If you are interested in that kind of history, you should read a paper entitled “Electronic Computing Circuits of the ENIAC” by [Arthur W. Burks].
These mid-century designers used tubes and were blazing new ground. Part of what makes the ENIAC so different is that it had a different design principle than a modern computer. It was less a general purpose stored-program computer and more of a collection of logic circuits that could be configured to solve problems — sort of a giant vacuum tube FPGA, if you will. It used some internal representations that proved to be suboptimal which also makes it seem strange. The EDSAC — a later device — was closer to what we think of as a computer. Yet the ENIAC was a major step in the direction of a practical digital computer.
Cost and Size
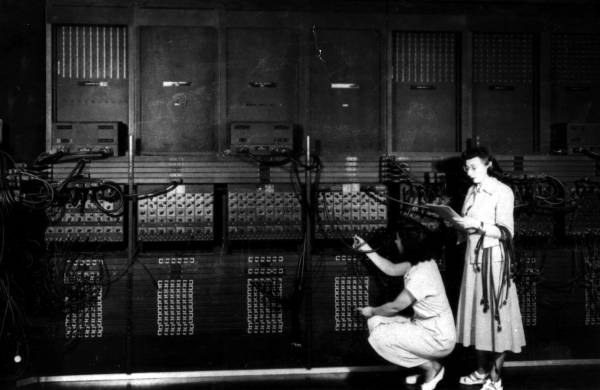
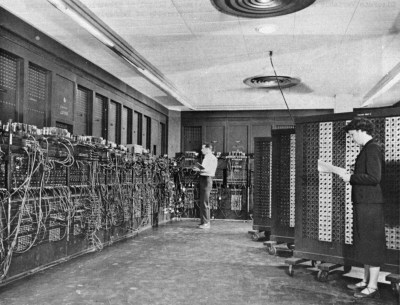
Programming the ENIAC in 1951 (±4 years) [Image Source: Public Domain]The size of ENIAC is hard to imagine. The device had about 18,000 tubes, 7,000 diodes, 70,000 resistors, 10,000 capacitors, and 6,000 switches. There were 5 million hand-soldered joints! ([Thomas Haigh] tells us that while this is widely reported, the real number was about 500,000.) Physically, it stood 10 feet tall, 3 feet deep, and 100 feet long. The tube filaments alone required 80 kW of power. Even the cooling system consumed 20 kW. In total, it took 150 kW to run the beast.
The cost of the machine was about $487,000. Almost a half-million dollars in 1946 is plenty. But that’s nearly seven million dollars in today’s money. What was worth that kind of expenditure? The military built firing tables for shell trajectories. From the [Burks] paper:
“A skilled computer with a desk machine can compute a 60-second trajectory in about twenty hours…”
Keep in mind that in 1946, a computer was a person. [Burks] goes on to say that a differential analyzer can do the same job in 15 minutes. ENIAC, on the other hand, could do it in 30 seconds and with a greater precision than the differential analyzer.
Perching on surfaces happens electrostatically. The team used an electrode patch with a foam mounting to the robot. This allows the patch to make contact with surfaces easily even if the approach is a few degrees off. This is particularly important for a tiny robot that is easily affected by even the slightest air draft. The robots were designed to be as light as possible — just 84mg — as the electrostatic force is not particularly strong.
It’s estimated that perching electrostatically for a robot of this size uses approximately 1000 times less power than during flight. This would be of great use for surveillance robots that could take up a vantage point at altitude without having to continually expend a great deal of energy to stay airborne. The abstract of the research paper notes that this method of perching was successful on wood, glass, and a leaf. It appears testing was done with tethers; it would be interesting to see if this technique would be powerful enough for a robot that carries its own power source. Makes us wonder if we ever ended up with tiny flyers that recharge from power lines?