I’m BatBot

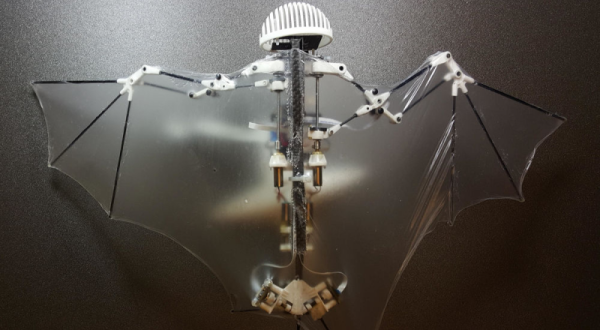
How would you like a bat bot for your next pet drone? Researchers from the University of Illinois at Urbana-Champaign’s Coordinated Science Laboratory and from the California Institute of Technology, created a bat drone. This is not your regular drone; it’s not a styrofoam, bat-shaped, four-propeller kind of drone. It’s a drone that mimics not only the shape but the movement of the bats wings to achieve flight.

The biomimetic robotic platform, dubbed Bat Bot B2, is an autonomous flying robot. The wing mechanics are controlled by a brushless DC motor for the wing flapping along with four wings actuators to provide linear motion that allows the wings to further change shape in flight. The wings are made of a 56-micron, silicone-based membrane (thinner than an average condom), which for sure helps with their elasticity as well as reducing overall weight, which is only 93 grams.

The bat has only made twenty flights so far, ranging up to 30 meters with some rough landings. It’s not much yet, but the prototype looks pretty slick. We covered another bat bot back in 2012 but the original information is no longer available, and we don’t know what happened to that project. There was also no video. In contrast, you can watch Bat Bot B2 glide.

Continue reading “I’m BatBot”

The Ultimate FPV Cleans House

With much of the world in the doldrums of the winter, hackers are getting a bit stir crazy. [Notamed Closed] would much rather be outside flying his First Person View (FPV) quadcopters. Sure there are indoor drones, but [Notamed] wanted to keep grounded. He grabbed his R/C equipment, his Roomba, and of course an Arduino to build the ultimate FPV experience.

There aren’t many details on this build, but it’s not too hard to deduce what [Notamed] has done. He’s using a standard R/C transmitter and receiver. Instead of driving servos, the receiver plugs into an Arduino Uno. The Uno translates the PPM R/C signals to serial commands. Most Roomba’s include a serial port made especially for hackers. [Notamed] simply sends the proper iRobot Serial Command Interface (SCI) messages, and the robot is his to control.

The FPV side of things is a bog standard FPV camera and transmitter, sending standard definition video to his goggles. A GoPro is along for the ride to capture high-quality video.

Sure this is a quick hacked together build. All the parts are taped on to the Roomba. We’re sure this is on purpose. When the weather warms up, the R/C equipment goes back in the air, and the Roomba becomes just another vacuuming robot – once again a danger to pet messes everywhere.

Check out the video after the break.

Continue reading “The Ultimate FPV Cleans House”

Robot Leaps Uncanny Valley On Backward Knees

We’ve covered a ton of Boston Dynamics robots but this is the second one in a row that has shown a departure from what a lot of people’s notion of an ‘advanced’ robot should look like. It’s a cellphone camera clip of a video played at a conference, but at least it isn’t vertical video — kudos to [juvertson]. At about 3:40 seconds into the video you get a good look “Handle” at a four-limbed robot with backwards joints and wheel.

This design makes a lot of sense and it’s good to see Boston Dynamics thinking about unique robot kinematics alongside the realities of motion. The result is something that appears neither human nor animal — it’s definitely not natural. Despite the presenter’s assertion that this will be nightmare-inducing, we think it’s the opposite, since it doesn’t tweak that string in your brain that cries “predator”.

Obviously this is what we’d call a self-balancer. But two-wheels-plus-rigid-frame it is not. The articulated lower limbs allow it to shift its mass over the wheels. The upper limbs play their part in balancing, at one point acting in the same way a figure skater’s arms would during a spin. And its dexterity in hopping over an obstacle is only made better by [juvertson’s] commentary. This is a really good balance between purely wheeled and purely humanoid designs and a nice addition to the evolution of robotics.

Continue reading “Robot Leaps Uncanny Valley On Backward Knees”

Jamming WiFi By Jumping On The ACK

As we fill our airwaves with more and more wirelessly connected devices the question of what could disrupt this systems becomes more and more important. Here’s a particularly interesting example because the proof of concept shows that you don’t need specialized hardware to pull it off. [Bastian Bloessl] found an interesting tweak to previous research that allows an Atheros WiFi card to jam WiFi by obscuring ACK frames.

The WiFi protocol specifies an Acknowledgement Frame (ACK) which is sent by the receiving device after error correction has been performed. It basically says: “yep, I got that data frame and it checks out”. This error correcting process turns out to be the key to [Bastian’s] technique as it provides time for the attack hardware to decide if it’s going to jam the ACK or not.

The jamming technique presented by [Mathy Vanhoef] at the end 2014 outlined both constant and selective jamming. The selective part involved listening for data packets and analyzing them to determine if they are headed to a MAC the attacker wishes to jam. The problem is that by the time your commodity hardware has decoded that address it’s too late to jam the packet. [Bastian] isn’t trying to jam the data frame, he’s jamming the ACK that the receiver sends back. Without that acknowledgement, the sender will not transmit any new data frames as it assumes there is a problem on the receiving end.

Handmade Keyboards For Hands

There were some truly bizarre computer keyboards in the 1980s and 90s. The Maltron keyboard was a mass of injection-molded plastic with two deep dishes for all the keys. The Kinesis Advantage keyboard was likewise weird, placing the keys on the inside of a hemisphere. This was a magical time for experimentations on human-computer physical interaction, the likes of which we haven’t seen since.

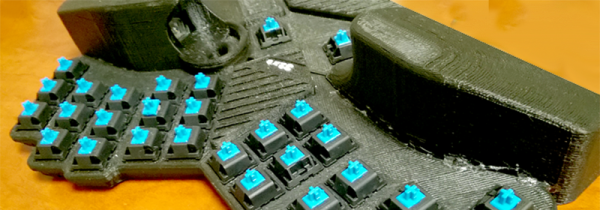
Now, though, we have 3D printers, easy to use microcontrollers, and Digikey. We can make our own keyboards, and make them in any shape we want. That’s what [Andrey]’s doing. The 32XE is an ergonomic keyboard and trackball combo made for both hands.

The keyboard has curved palm rests, a trackball under the right thumb, and is powered by the ever popular DIY mechanical keyboard microcontroller, the Teensy 2.0. This keyboard is equipped with a trackball, and that means [Andrey] needed a bit of extra electronics to handle that. The mouse/trackball sensor is built around the ADNS-9800 laser motion sensor conveniently available on Tindie. This laser mouse breakout board is built into the bottom of the keyboard, with enough space above it to hold a trackball… ball.

Since this is a very strange and completely custom keyboard, normal mechanical keyboard keycaps are out of the question. Instead, [Andrey] 3D printed his own keycaps on an FDM printer. Printing keyboard keycaps on a filament-based printer is extremely difficult — the tolerances for the connector between the switch and cap are tiny, and nearly at the limit of the resolution of a desktop filament printer. [Andrey] is taking it even further with inlaid keyboard legends. He’s created a keycap set with two color legends on two sides of the keycaps. If you’ve ever wanted to print keycaps on a 3D printer, this is a project to study.

Creating A PCB In Everything: Upverter

For the last five months, I’ve been writing a series of posts describing how to build a PCB in every piece of software out there. Every post in this series takes a reference schematic and board, and recreates all the elements in a completely new PCB tool.

There are three reasons why this sort of review is valuable. First, each post in this series is effectively a review of a particular tool. Already we’ve done Fritzing (thumbs down), KiCad (thumbs up), Eagle (thumbs up), and Protel Autotrax (interesting from a historical perspective). Secondly, each post in this series is a quick getting started guide for each PCB tool. Since the reference schematic and board are sufficiently complex for 90% of common PCB design tasks, each of these posts is a quick how-to guide for a specific tool. Thirdly, this series of posts serves as a basis of comparison between different tools. For example, you can do anything you want in KiCad and most of what you want in Eagle. Fritzing is terrible, and Autotrax is the digital version of the rub-on traces you bought at Radio Shack in 1987.

With that introduction out of the way, let’s get cranking on Upverter.

A little bit about Upverter

Upverter was founded in 2010 as an entirely web-based EDA tool aimed at students, hobbyists, and Open Hardware circuit designers. This was one of the first completely web-based circuit design tools and Upverter’s relative success has been a bellwether for other completely web-based EDA tools such as circuits.io and EasyEDA.

I would like to take a second to mention Upverter is a Y Combinator company (W11), which virtually guarantees this post will make it to the top of Hacker News. Go fight for imaginary Internet points amongst yourselves.

Upverter is a business after all, so how are they making money? Most EDA suites offer a free, limited version for personal, hobbyist, and ‘maker’ projects, and Upverter is no exception. The professional tier offers a few more features including CAM export, 3D preview, an API, simulation (coming soon), BOM management, and unlimited private projects for $125 per seat per month, or $1200 per seat per year.

To give you a basis of comparison for that subscription fee, Eagle CAD’s new license scheme gives you everything – 999 schematic sheets, 16 layers, and unlimited board area – for $65 per month, or $500 per year. Altium’s CircuitStudio comes in at $1000 for a one-year license. There are more expensive EDA suites such as Altium Designer and OrCAD, but you have to call a sales guy just to get a price.

Upverter is positioning itself as a professional tool at a professional price. There are better tools out there, of course, but there are thousands of businesses out there designing products with tools that cost $500 to $1000 per seat per year. In any event, this is all academic; the Hackaday crowd gravitates towards the free end of the market, whether that means beer or speech.

A big draw for Upverter is their Parts Concierge service. You’ll never have to create a part from scratch again, so the sales copy says. Apparently, Upverter is using a combination of very slick scripts to pull part layouts off a datasheet and human intervention / sanity check to create these parts. Does it work? We’re going to find out in the review below.

Continue reading “Creating A PCB In Everything: Upverter”

Valentine’s Heart With Awesome Animations

January has drawn to a close, and for many of you that means: “Oh no! Less than two weeks’ time until Valentine’s day.” But for us here at Hackaday, it means heart-themed blinky projects. Hooray!

[Dmitry Grinberg] has weighed in with his version of the classic heart-shaped LED ring. It’s hard to beat the BOM on this one: just a microcontroller, five resistors, and twenty LEDs. The rest is code, and optionally putting the name of your beloved into the copper layer. Everything is there for you to download.

Continue reading “Valentine’s Heart With Awesome Animations”