The Raspberry Pi Infinity+ Is A Fully Functional Huge Raspberry Pi

It wasn’t an easy weekend for the rest of the world’s hackers and makers, that of the Bay Area Maker Faire. Open your social media accounts, and most of your acquaintances seemed to be there and having a great time, while the rest were doing the same at the Dayton Hamvention. Dreary televised sports just didn’t make up for it.

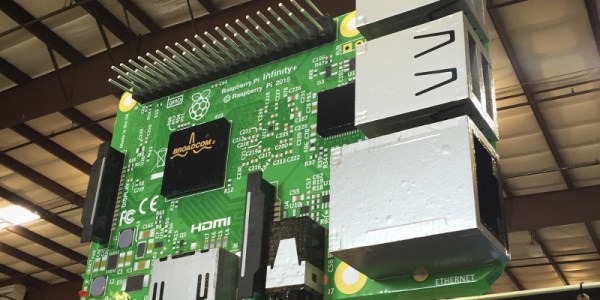
MCM Electronics had the Maker Faire booth next to that of the Raspberry Pi Foundation, and since they needed both a project to show off and a statement item to draw in the crowds, they came up with the idea of a 10x scale reproduction of a Raspberry Pi above the booth. And since it was Maker Faire this was no mere model; instead it was a fully functional Raspberry Pi with working LEDs and GPIO pins.

The project started with a nearly faithful (We see no Wi-Fi antenna!) reproduction of a Raspberry Pi 3 in Adobe Illustrator. The circuit board was a piece of MDF with a layer of foam board on top of it with paths milled out for wiring and the real Pi which would power the model, hidden under the fake processor. The LEDs were wired into place, then the Illustrator graphics were printed into vinyl which was wrapped onto the board, leaving a very two-dimensional Pi.

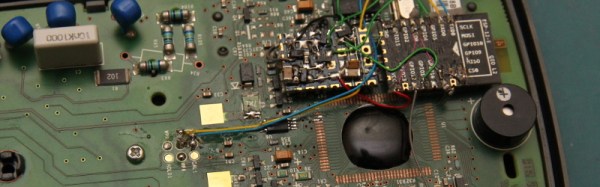
The integrated circuits and connectors except for the GPIO pins were made using clever joinery with more foam board, then wrapped in more printed vinyl and attached to the PCB. A Pi camera was concealed above the Broadcom logo on the processor model, to take timelapse pictures of the event. This left one more component to complete, the GPIO pins which had to be functional and connected to the pins on the real Pi concealed in the model. These were made from aluminium rods, which were connected to a bundle of wires with some soldering trickery, before being wired to the Pi via the screw terminals on a Pi EZ-Connect HAT from Alchemy Power.

Is the challenge now on for a range of compatible super-HATs to mate with this new GPIO connector standard?

We previously covered the 2012 Maker Faire exhibit that inspired this huge Pi. The Arduino Grande was as you might well guess, a huge (6x scale) fully functional Arduino. In fact, the world seems rather short of working huge-scale models of single board computers, though we have featured one or two working small-scale computer models.

Thanks [Michael K Castor] and [Christian Moist] for sharing their project with us.

New CNC Machine? DIY Machinable Wax!

The folks at Leeds Hackspace have built themselves a shiny new C-beam based CNC mill. As you might expect everyone wants to try the machine out, but there’s a problem. A CNC machine presents a steep learning curve, and a lot of raw materials (not to mention cutting bits) can be used in a very short time. Their solution is simple: mix themselves some machinable wax from LDPE pellets and paraffin wax, then easily recycle their swarf and failed objects back into fresh machinable wax stock.

Making the wax recipe is not for the faint-hearted, and involves melting the LDPE pellets and wax to 130 degrees Celcius in a cheap deep-fat fryer. They bought the cheapest fryer they could find at the British catalogue retailer Argos, you really wouldn’t want to risk an appliance you cared about in this exercise.

Colouring came from an orange wax crayon, though they note recycling of mixed colours will inevitably result in a muddy brown. The finished mixture was poured into Tupperware lunchboxes to set, and the resulting blocks were trimmed to square on a bandsaw. The Tupperware proved not to have a flat bottom, so later batches were cast in a loaf tin which proved much more suitable.

We’ve mentioned the machinable wax recipe before here at Hackaday, but it’s worth returning to the topic here with a description of it being used in the wild. Having watched other environments get through learning materials at an alarming rate with very little to show for their effort, we can see it makes a lot of sense as a training material.

Reverse Engineering Hoverboard Motor Drive

The must-have toy of the moment last winter was the “Hoverboard”. We all probably secretly wished them to be the boards from the Back to the Future series of films made real, but the more achievable reality is a self-balancing scooter somewhat akin to a miniature Segway. It seemed every child wanted one, schools banned them, and there was a media frenzy over some of the cheaper models that lacked protection circuitry for their li-ion batteries and thus had a tendency for self-incineration.

[Drew Dibble] is interested in the Power Racing Series (PRS), in which toy electric cars are souped up for competition. Casting around for a source of cheap and relatively powerful motors he lit upon the self-balancing scooters, and waited on Craigslist for the inevitable cast-offs. His resulting purchase had two 350W brushless hub motors and all the associated circuit boards for motor control, gyroscope, and oddly a Bluetooth speaker. The motor control board received an unknown two-wire digital feed from the scooter’s control board, so he set to work investigating its protocol. His write-up of how he did it is an interesting primer in logic line detective work.

Hooking up his logic analyzer he was quickly able to rule out the possibility of the control signal being PWM because all signals followed the same timing. Both lines had data so he was able to rule out I2C, for in that case one line would carry a clock. He was therefore left with a serial line, and taking the 38 microsecond timing interval, he was able to calculate that it had a rather unusual bitrate of 26315 BPS. Each packet had a multiple of 9 bits so he either had 9-bit or 8-bit with parity, and trying all possible parity schemes resulted in parity errors. Therefore the boards used a highly unusual 9-bit non-standard bitrate serial port. Some experimentation led him to an Arduino library, and he was able to get some movement from his motors. Some clever timing detective work later and he could make them move at will, success!

All his code for the project is on GitHub, for his 9-bit SoftwareSerial library and a motor control sketch.

If you want a real Back to the Future hoverboard then you may have to wait a while longer. We have featured a replica made as an unrideable floating artwork though, and a working board that is more of a personal hovercraft.

Continue reading “Reverse Engineering Hoverboard Motor Drive”

An Atari ST Rises From The Ashes

We’ve all made rash and impulsive online purchasing decisions at times. For [Drygol] the moment came when he was alerted to an Atari 1040STe 16-bit home computer with matching monitor at a very advantageous price.

Unfortunately for him, the couriers were less than careful with his new toy. What arrived was definitely an ST, but new STs didn’t arrive in so many pieces of broken ABS. Still, at least the computer worked, so there followed an epic of case repair at the end of which lay a very tidy example of an ST.

He did have one lucky break, the seller had carefully wrapped everything in shrink-wrap so no fragments had escaped. So carefully applying acetone to stick the ABS together he set to work on assembling his unexpected 3D jigsaw puzzle. The result needed a bit of filler and some sanding, but when coupled with a coat of grey paint started to look very like an ST case that had just left the factory. Adding  modern SD card and USB/Ethernet interfaces to the finished computer delivered a rather useful machine as you can see in the video below the break.
Continue reading “An Atari ST Rises From The Ashes”

Metalized Gift Wrap Saves A Classic Keyboard

What do you do when you decide that running CP/M on a Commodore 128 with a 5.25″ drive “Isn’t CP/M enough”? If you are [FozzTexx], you reach for your trusty TRS-80 Model II, with its much more CP/M-appropriate 8″ drive.

There was one small snag with the TRS-80 though, its keyboard didn’t work. It’s a capacitive device, meaning that instead of each key activating a switch, it contains a capacitive sensor activated by a piece of aluminized Mylar film on a piece of foam. Nearly four decades of decay had left the foam in [FozzTexx]’s example sadly deflated, leaving the keys unable to perform. Not a problem, he cast around for modern alternatives and crafted replacements from a combination of foam weather strip and metalized gift wrap.

Care had to be taken to ensure that the non-metalized side of the gift wrap faced the capacitive sensor pads, and that the weather strip used had the right thickness to adequately fill the gap. But the result was a keyboard that worked, and for a lot less outlay and effort than he’d expected. We would guess that this will be a very useful technique for owners of other period machines with similar keyboards.

What is CP/M, I hear you ask? Before there was Linux, Windows, and MacOS, there was DOS, and before DOS, there was CP/M. In the 1970s this was the go-to desktop operating system, running on machines powered by Intel’s 8080 and its derivatives like the Zilog Z80 in the TRS-80. When IBM needed an OS for their new PC they initially courted CP/M creators Digital Research, but eventually they hired a small software company called Microsoft instead, and the rest is history. Digital Research continued producing CP/M and its derivatives, as well as an MS-DOS clone and the GEM GUI that may be familiar to Atari ST owners, but were eventually absorbed into Novell in the 1990s.

We’ve featured a few capacitive keyboards here at Hackaday before, including this similar repair to a Compaq from the 1980s, and this look at a classic IBM terminal keyboard.

AM, The Original Speech Transmission Mode

Here’s a question: when did you last listen to an AM radio station? If your answer is “recently”, chances are you are in the minority.

You might ask: why should you listen to AM? And you’d have a point, after all FM, digital, online, and satellite stations offer much higher quality audio, stereo, and meta information, and can now be received almost anywhere. Even digital receivers are pretty cheap now, and it’s by no means uncommon for them to not even feature the AM broadcast band at all. Certainly this has driven an exodus of listeners to the extent that AM radio has been in slow decline for decades, indeed it’s disappearing completely in some European countries.

Continue reading “AM, The Original Speech Transmission Mode”

Hacking A Fluke Multimeter To Serve Readings Over WiFi

Your multimeter is probably your most useful instrument if you work regularly with electronics. It goes with you everywhere, and is your first port of call in most cases when you are presented with a piece of equipment. And when you think about it, it’s a pretty amazing instrument. Multimeter technology has advanced to the point at which even an inexpensive modern device has functions that would have required a hefty budget a few decades ago.

There is still one thing affordable multimeters remain unable to do: they can’t log their readings for analysis on a computer. They’re an instantaneous instrument, just as they always have been.

Lord of Hackaday [Sprite_TM] decided to hack his multimeter to serve its readings over Wi-Fi. Rather than start with a throwaway meter from the bargain bin, he did it with a Fluke. The meter he chose was a Fluke 15B+, the company’s budget offering for the Indian and Chinese markets, since he had one spare.

Opening up the 15B+, he was presented with its processor concealed under a blob of epoxy and thus unidentifiable. Armed with the knowledge that other similar Flukes contain Fortune Semiconductor parts, he investigated as many data sheets as he could find from the same company and finally identified it as an FS98O24 one-time-programmable microprocessor. Sadly this chip has no serial port, but he did find an I2C EEPROM which he correctly guessed held calibration settings. Removing this chip gave him a meter with slightly off calibration, but also gave him a serial port of sorts.

Further detective work allowed him to identify the baud rate, and supplying random commands delivered him some that returned data packets. Eventually he identified a packet containing the states of the LCD’s segments, from which he could derive its displayed value. Connecting an ESP8266 module with appropriate software left him with a Wi-Fi connected multimeter. There was a little more refinement to his hack, he created a power management board to activate the ESP when needed, and a neat hack to display its IP address on the screen.

Multimeter hacks have featured several times here at Hackaday. We’ve had another serial port hack, or how about a remote display for another Fluke on a Gameboy Advance?