For many in the RC community, blowing up an Electronic Speed Controller (ESC) means one thing: throwing it away and buying another one. However, if you’re regularly pushing the limits or simply hate waste, fixing failed units is an option. To assist in this task, [LouD] built an ingeniously simple ESC tester.
The board is designed to be wired in parallel with a brushless DC motor when hooked up to an ESC. The board packs two LEDs per phase, wired in opposite directions. Thus, current flow in both directions can be visualised on a phase-by-phase basis. If everything is operational, the red and green LEDs on each phase should glow evenly as the throttle is ramped up. However, if there are problems, it will be readily apparent as the blinking becomes erratic or one or more LEDs fails to light at all.
The audio cassette was the first music format that truly championed portability. It was robust, compact, and let people take music on the go to soundtrack their very lives. It was later supplanted by the higher-quality CD and then further digital technologies, but the format remains a nostalgic highlight for many. It also inspired this excellent lamp build from [Fab].
The lamp consists of 8 clear cassettes assembled into a rough cube-like shape on a 3D printed frame. The cassettes are edge-lit from below by a set of WS2812B LEDs, letting them glow in full-color splendour. The real magic of the lamp is the interface, however. A pencil can be inserted to turn the tape reels, just like rewinding a real cassette. However, in this case, they’re attached to a pair of rotary encoders, which are used to vary the color of the LEDs. As a bonus, the entire lamp runs off a Wemos D1, making it possible to update the lamp remotely over the Internet.
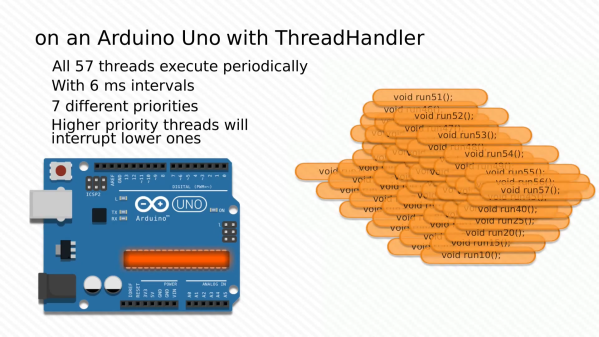
When one thinks of the Arduino Uno, one thinks of a capable 8-bit microcontroller platform that nonetheless doesn’t set the world alight with its performance. Unlike more modern parts like the ESP32, it has just a single core and no real multitasking abilities. But what if one wanted to run many threads on an Uno all at once? [Adam] whipped up some code to do just that.
Threads are useful for when you have multiple jobs that need to be done at the same time without interfering with each other. The magic of [Adam]’s ThreadHandler library is that it’s designed to run many threads and do so in real time, with priority management as well. On the Arduino Uno, certainly no speed demon, it can run up to 57 threads concurrently at 6ms intervals with a minumum timing error of 556 µs and a maximum of 952 µs. With a more reasonable number of 7 threads, the minimum error drops to just 120 µs. Each thread comes with an estimated overhead of 1.3% CPU load and 26 bytes of RAM usage.
While we struggle to think of what we could do with more than a handful of threads on an Arduino Uno, we’re sure you might have some ideas – sound off in the comments. ThreadHandler is available for your perusal here, and runs on SAMD21 boards as well as any AVR-based boards that are compatible with TimerOne. We’ve seen other work in the same space before, such as ChibiOS for the Arduino platform. Video after the break.
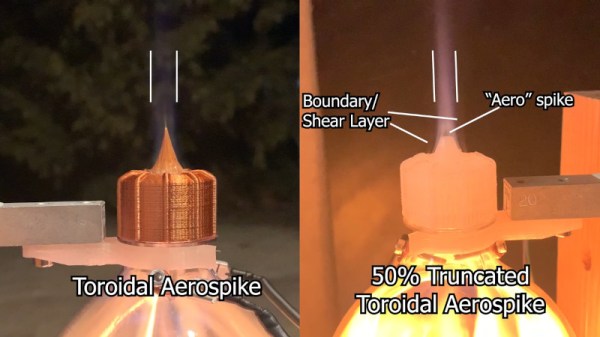
The video starts with an amusing analogy about nozzle design based on people fleeing a bad pizza. From there, [Sciencish] 3D prints a wide variety of nozzle designs for testing. The traditional bell nozzle is there, of course, along with the familiar toroidal and linear aerospikes and an expansion deflection design. Of course, 3D printing makes it easy to try out fun, oddball geometries, so there’s also a cowbell nozzle , along with the fancy looking square and triangular aerospikes too. Testing involves running the nozzles on a test stand instrumented with a load cell. A soda bottle is filled with rubbing alcohol vapour, and the mixture is ignited, with each nozzle graded on its thrust output. The rockets are later flown outside, reaching heights over 40 feet.
[Sciencish] notes that the results are a rough guide only, as the fuel/air mixture was poorly controlled. Despite this, it’s a great look at nozzle design and all the science involved. It also wouldn’t be too hard to introduce a little more rigour and get more accurate data, either. However, if solid fuels are more your jam, consider brewing up some rocket candy instead.
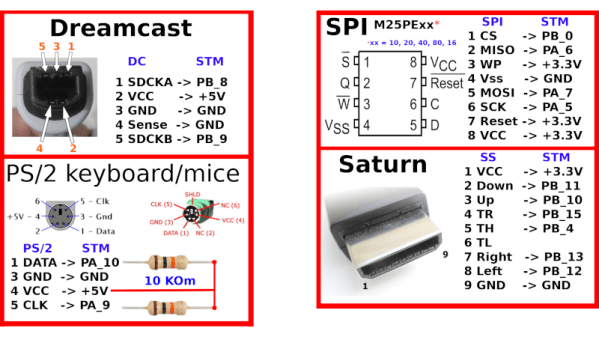
PC gamers have the benefit of a broad ecosystem of peripherals built to serve their gaming pleasure. As a bonus, if there’s something out there that doesn’t work with the platform, someone is likely already selling an adapter for it. Console gamers aren’t so lucky, and the vast majority stick with the factory standard controller. [megavolt85] isn’t one of them however, and spun up a multi-adapter for the Sega Dreamcast.
The adapter lets the player use a huge variety of controllers with the Dreamcast. There’s support for both PS1 & PS2 controllers, including vibration support, as well as MegaDrive & Saturn pads, too. PS/2 mice and keyboards can be used as well, and up to 16 VMUs can be hooked up as well. The adapter uses the STM32F103C8T6 microcontroller, which runs at up to 72MHz, giving it plenty of grunt to emulate the Dreamcast’s Maple controller interface.
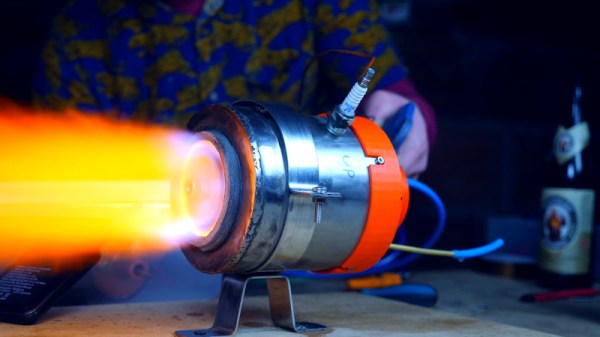
The development of the turbojet engine was a gamechanger in aviation, as no longer would aircraft designers have to struggle with ever larger and more complex piston engines, nor would propellers keep planes stuck below the speed of sound. However, the turbojet is an exacting device, demanding the utmost of materials in order to work successfully. [Integza] discovered just this in his quest to build one at home.
Unlike most home jet engine builds, this one doesn’t use a turbocharger or go with a simpler pulse jet design – though [Integza] has built those, too. This is a proper radial-flow turbojet design. The build uses a 3D-printed compressor, which is possible as it doesn’t have to deal with much heat. However, for the turbine, [Integza] realised that plastic wouldn’t cut it. After experiments with ceramic resins failed too, a 3D printed jig was instead built to allow sheet metal to easily be crafted into a workable turbine. Other internal components were made out of concrete for heat resistance, and a combustion chamber welded up out of steel.
The engine did run after several attempts, albeit for just ten seconds before components started to melt. While the engine is a long way off being flight ready, it goes to show just how hard it is to build even a bench-running turbojet. Even major world powers have struggled with this problem over the years. Video after the break.
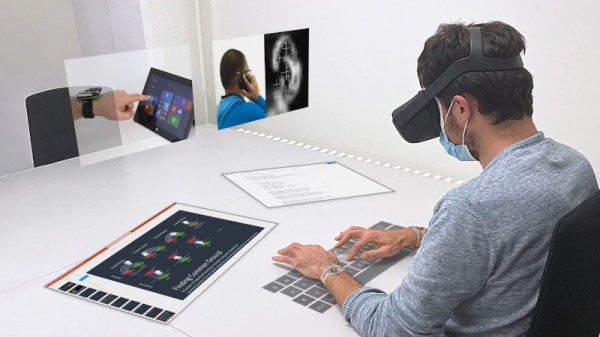
Virtual reality is becoming more of a thing, now that we have high quality headsets and the computing power to generate attractive environments. Many VR systems use controllers held in mid air, or camera-based systems that track limbs and hands for interaction. However, productivity scenarios often require prolonged interactions over a long period of time, which typically necessitates working at surfaces that allow the body to rest intermittently. To help facilitate this, a group of researchers at ETH Zurich developed TapID, including a preprint paper (PDF) that will be presented at IEEE VR 2021 later this month.
TapID consists of a wristband that carries two motion sensors, with one worn on each wrist. This allows TapID to detect taps from each of the user’s fingers individually, thanks to a machine learning algorithm that analyses the unique vibrations through your skeletal system. This is demonstrated as being useful for VR environments, where the user can type into a virtual keyboard, or interact with virtual objects on a surface, using their fingers as they would in the real world. This is a sensor fusion with the features of modern VR headsets that include hand tracking. The TapID wristbands deliver granularity and detection of small motions that is not nearly as accurate through headset-mounted senors and camera-based detection.
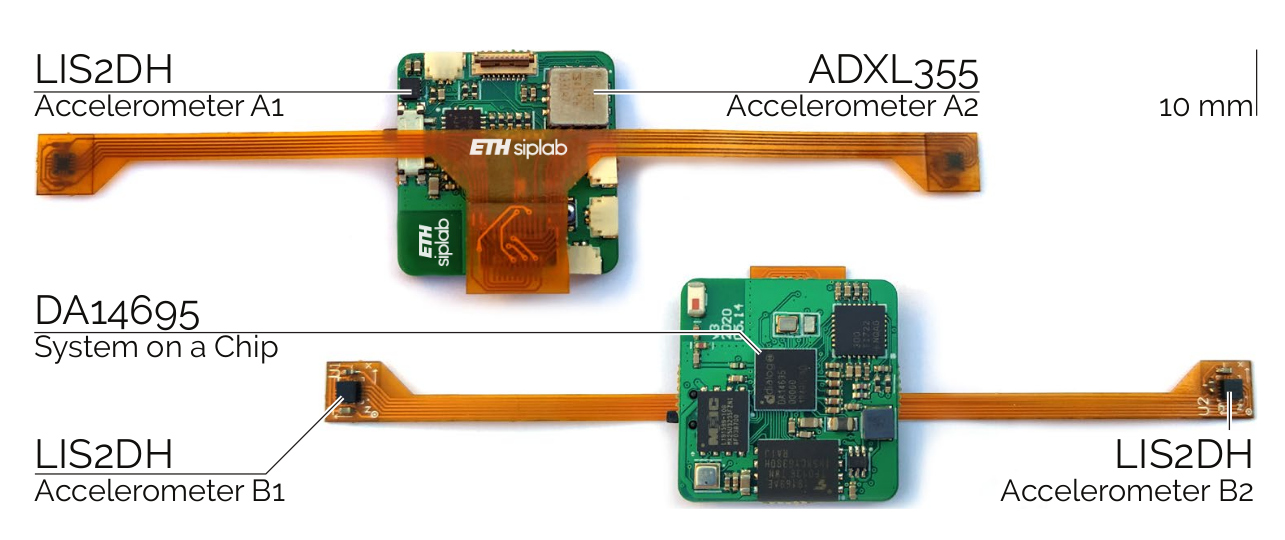
Test hardware includes 4 accelerometers. Two on flexible PCBs are the sensing hardware used by the system, the other two on the rigid PCB are used as a baseline during testing but do not contribute to the tap detection.
We’re not entirely convinced of the utility of sitting down in a virtual environment to type at a fake keyboard when monitors and real keyboards are more tactile and cheaper. However, having a device that can accurately determine individual finger interactions is sure to have applications in VR. And whether or not the demonstrated use cases are viable, the technology does indeed work.
It’s exciting to see the wrist-band form factor. It brings to mind the possibility of improving tap interactions in smart watches for non-VR uses. We envision chorded keyboard type gestures that detect which fingers are tapping but don’t need positional accuracy.
Those experimenting in VR interfaces may find it useful to reverse engineer what’s already out on the market, as we’ve featured before. Or, you can simply build your own! Video after the break.