Ever Buy Music From Apple? Use Linux? You Need This Tool

Sure, you’re a hardcore superuser, but that doesn’t mean you don’t enjoy the finer things in life — like shiny squircles and getting every new app first. But, what’s an OS-indiscriminate person like yourself going to do when it comes time to purchase music? That’s where the recover_itunes tool shines, and if you’re a Linux user with an iPhone, it might just be your new best friend.

Continue reading “Ever Buy Music From Apple? Use Linux? You Need This Tool”

UV Laser Projector Shines With Glow-in-the-Dark Vinyl

Mirror galvanometers were originally developed in the 17th century to precisely measure very small changes in current. Unlike other instruments of the day, a mirror galvanometer could clearly show minute current variations by translating tiny movements of the mirror into large movements of the light reflected off of the mirror. Before clean electrical amplification became possible, this was the best means of measuring tiny differences in current. True mirror galvanometers are very sensitive instruments, but hobby servos can be used as a low-fidelity alternative, like with this project on Hackaday.io created by [robives].

Using a mirror galvanometer is by far the most common technique for laser projection shows – it’s really the only way to move the laser’s beam quickly enough to create the visual illusion of a solid line in real time. A mirror galvanometer works by using coils to attract magnets attached to the mirror, allowing the angle of the mirror to change when current is applied to the coils. This movement is extremely small, but is amplified by the distance to the projection surface, meaning the laser’s beam can move huge distances in an instance. If you’ve ever seen a laser show, it almost certainly used this technique. But driving galvos requires a beefy DAC, so we can’t blame [robives] for wanting to keep it digital.

[robives’s] project side-steps the need for galvanometers by using glow-in-the-dark vinyl and a UV laser. The result is a laser beam trail which lasts much longer, which means that solid lines are visible without the need for high-speed galvos. A build like this lets you experiment with laser projections without dealing with sensitive mirror galvos, and instead use components that you probably already have sitting on your workbench.

Continue reading “UV Laser Projector Shines With Glow-in-the-Dark Vinyl”

Thorough Macbook Charger Teardown Reveals Some Complex Circuitry

Apple has a reputation in the tech world as being overpriced, and nowhere is that perception more common than in the Hackaday comments. The standard argument, of course, is that for a device with equivalent specs, Apple charges a lot more than its competitors. That argument is not without its flaws, especially when you consider factors other than simple specs like RAM and processor speed, and take into account materials used and build quality. But, as this teardown by [Ken Shirriff] shows, Apple’s attention to detail extends beyond simply machining Macbook bodies out of aluminum.

In his teardown, [Ken Shirriff] thoroughly investigates and describes all of the components and circuitry that go into the ubiquitous Macbook charger. Why does it cost $79? Other than the MagSafe connector, what makes it any better than the charger that came with your Toshiba Satellite in the ’90s? Isn’t it just a transformer to convert AC power to DC?

components1

[Ken Shirriff] answers all of this and more, and you may be surprised by what he found. As it turns out, the Macbook charger isn’t just a transformer in a plastic case with a fancy magnetic connector. There is a lot of high-quality circuitry involved to make the power output as clean and stable as possible, and to avoid potential damage to your Macbook that could be caused by dirty power or voltage spikes. Does it justify the costs, even with so many reported failures? That’s for you to decide, but there is no questioning that Apple put more thought into their chargers than simply converting AC to DC.

Control Your HTPC With Scavenged IR Parts

If you’ve built yourself a home theater PC, one of your highest priorities is probably coming up with a convenient control solution. The easiest way to do this is to simply use something like a wireless keyboard and mouse. But, that’s not very conducive to an enjoyable home theater experience, and it feels pretty clunky. However, if you’ve got the right components lying around, [Sebastian Goscik] has instructions and an Arduino sketch that will let you control your HTPC with any IR remote control.

There are a number of ways you could control your HTPC, and we’ve featured more than one build specifically for controlling XBMC over the years. Unfortunately, most of those methods require that you spend your hard earned money (which is better spent on popcorn). [Sebastian’s] setup can be replicated with things you probably have on hand: an Arduino, an IR remote, and a scavenged IR receiver. The IR receiver can be found in many devices, like old stereos or TVs that themselves were controlled via an IR remote.

It starts with an Arduino Sketch that lets you can see on the serial monitor what code is being generated by the button presses on your remote. These are then scripted to perform any task or function you like when those buttons are pushed. The most obvious use here is simple directional control for selecting your movies, but much more complex tasks are possible. Maybe someone can program a T9 script to type using the number buttons on most remotes?

Full-Color Edge-Lit Laser Cut Acrylic

Edge-lit art has been around for a very long time, and most people have probably come across it in a gift shop somewhere. All it takes is a pane of transparent material (usually an acrylic sheet) with the artwork etched into the surface. Shine a light into the sheet from the edge, and refraction takes over to light up the artwork. However, this technique is almost always limited to a single pane, and therefore a single color. [haqnmaq] wanted to take this idea and make it full-color, and has written up a great Instructables tutorial on how to accomplish this.

If you want to make something like this yourself, the only thing you really need is a laser cutter and some basic electronics equipment. The process itself is so straightforward that it’s surprising that it isn’t more common. You start by taking a photo of your choice and use an image editor to break it up into three photos, one for red, one for green, and one for blue. Each of those photos is then etched into an acrylic pane with a laser cutter. When the panes are positioned in front of each other and edge-lit with their respective LEDs, a full-color image comes to life.

This isn’t the first edge-lit artwork project we’ve featured, but it definitely has the highest fidelity. Because [haqnmaq’s] technique uses three colors, you can use his tutorial to reproduce any photo you like. You could even take this a step further and create animated photos by adding more panes and lighting them up in the correct sequence!

The Most Drool-Worthy Pip-Boy To Date Can Be Yours

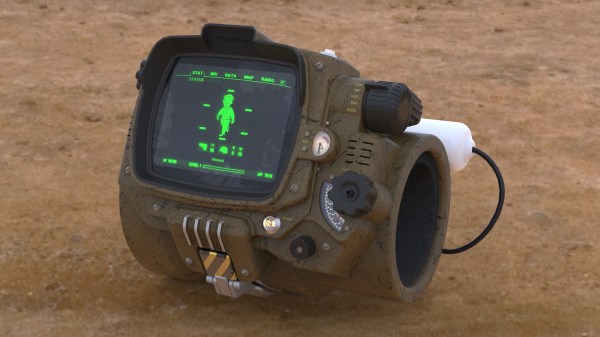
Pip-Boy props are nothing new in the maker world, especially since the availability and prices of 3D printers have made the undertaking more straightforward. Something about bringing a piece of the Fallout universe into the real world is just incredibly appealing – so much so that Fallout 4 collector’s editions included a Pip-Boy phone case. However, because of practical limitations these props are usually just plastic shells that house a cell phone. [zapwizard] wasn’t satisfied with a purely aesthetic prop, so he has decided to design his own Pip-Boy 3000 Mk4 from scratch, while retaining as much of the functionality as possible.

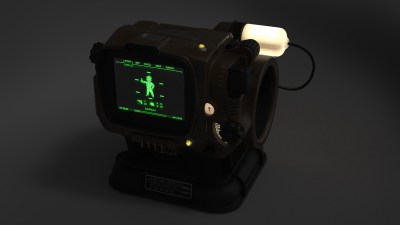
For the few of you who are unfamiliar, the Pip-Boy is a wrist-mounted computer from the Fallout series of games. From a gameplay standpoint, it’s used to manage your character’s inventory, stats, quest data, and so on. Because of how often you interact with the Pip-Boy throughout the game, it has become very near and dear to the hearts of Fallout fans, which has driven it’s popularity for prop-making.

21855003754_ea47ec269b_h

It’s no wonder, then, that we’ve featured a number of builds here on Hackaday in the past. All of these builds have been impressive, but [zapwizard] is taking it to a whole other level. As a product engineer, he certainly has the experience necessary to bring this to life, and he’s not skipping any details. He’s starting by modeling everything up in CAD, using Solid Edge. Every knob, button, dial, and latch has been reproduced in meticulous detail, and will be functional with completely custom electronics. [zipwizard] is still in the design phase, but he should be close to getting started on the actual build. He’s also considering offering a limited run of units for sale, so be sure to get in touch with him if that tickles your fancy!

[thanks Daniel Kennedy]

Print Your Own Vertices For Quick Structural Skeletons

3D printing is great for a lot of things: prototyping complex designs, replacing broken parts, and creating unique pencil holders to show your coworkers how zany you are. Unfortunately, 3D printing is pretty awful for creating large objects – it’s simply too inefficient. Not to mention, the small size of most consumer 3D printers is very limiting (even if you were willing to run a single print for days). The standard solution to this problem is to use off-the-shelf material, with only specialized parts being printed. But, for simple structures, designing those specialized parts is an unnecessary time sink. [Nurgak] has created a solution for this with a clever “Universal Vertex Module,” designed to mate off-the-shelf rods at the 90-degree angles that most people use.

uvm_configurations

The ingenuity of the design is in its simplicity: one side fits over the structural material (dowels, aluminum extrusions, etc.), and the other side is a four-sided pyramid. The pyramid shape allows two vertices to mate at 90-degree angles, and holes allow them to be held together with the zip ties that already litter the bottom of your toolbox.

[Nurgak’s] design is parametric, so it can be easily configured for your needs. The size of the vertices can be scaled for your particular project, and the opening can be adjusted to fit whatever material you’re using. It should work just as well for drinking straws as it does for aluminum extrusions.