That’s Not Beer! A Biofuel Fermentation Controller Project

biofuel-fermentation-controller

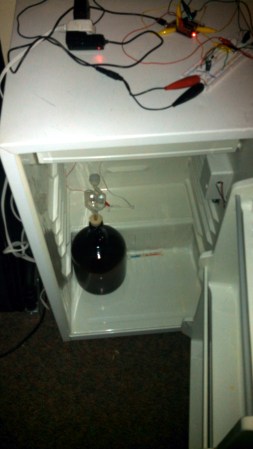
Any home brewer will recognize the setup pictured above as a temperature controlled fermentation chamber. They wouldn’t be wrong either. But you’re not going to drink what results. This project is aimed at providing a temperature controlled environment for fermenting biofuel.

[Benjamin Havey] and [Michael Abed] built the controller as their final project in his microprocessor class. The idea is to monitor and control the mini-refrigerator so that the strain of Saccharomyces Cerevisiae yeast produce as much ethanol as possible. An MSP430 microcontroller was used. It monitors a thermister with its analog to digital converter and drives a solid state relay to switch mains power to the fridge. At 41 degrees Fahrenheit this is down below what most lager yeasts want (which is usually in the low fifties). But the nice thing about using a microcontroller is you can set a schedule with different stages if you find a program that gives the yeast the best environment but requires more than one temperature level.

Who knew all that beer making was getting you ready to produce alternative fuels?

Retrotechtacular: Fluid Coupling

retrotechtacular-fluid-coupling

We realize the transmission fluid of an automobile’s automatic transmission is used to transfer the power from the engine to the drive shaft. But after watching this Department of Defense video from 1954 we now have a full understanding of the principles involved in fluid coupling. Like us, you probably have seen a diagram of a transmission which shows the fan-like blades that are affected by the moving fluid. But it’s worth watching the 12-minute clip after the break to understand how that liquid is moving and why that matters so much in the design. The motion of the rotors, along with the design of the enclosure, causes the fluid to move in a continual corkscrew —  the shape of slinky whose ends have been attached to each other. This type of illustration leads to an intuitive understanding of how it’s possible to facilitate an efficient power transfer using a liquid.

Check out some of the comments left in the Reddit thread regarding this film. We agree with [Runxctry]; there’s something about the format of the presentation that makes these informative and engaging to an almost addictive level. But maybe it’s just the engineering geek deep inside that’s cause these feelings?

Continue reading “Retrotechtacular: Fluid Coupling”

Ice Record Single Needs Six Hours In The Deep Freeze Before You Can Listen

ice-record

This delightful marketing ploy requires the listener to fabricate their own record out of ice. The band Shout Out Louds wanted to make a splash with their newest single. So they figured out how to make a playable record out of ice. The main problem with this is the grooves start to degrade immediately when the ice begins to melt. So they shipped a mold of the record and a bottle of water to a select few listeners (just ten in all). Hear the result in the video after the break.

Now if you want to make something like this for yourself we can help you out just a bit. The mold is made of silicone and it wasn’t so long ago that we saw a guide for those new to mold making. The raw material isn’t that hard to find either. The project above tried several different approaches and found the best results can be attained with plain old distilled water. No, the one hard part is figuring out how to make your own master. If you’ve got a way of doing this in the home lab, please tells us about it!

Continue reading “Ice Record Single Needs Six Hours In The Deep Freeze Before You Can Listen”

Wave That Roman Candle Around Without Risking Your Digits

fun-with-fireworks

Some people don’t mind missing a finger or two, but we’re quite attached to all of ours. That’s why we’ve never held on to the fireworks after lighting the fuse. [Dzl] and his son wanted to be (at least somewhat) safe while still having that kind of fun. So they built this rig which lets you wave around a roman candle from a safe distance. It’s not strictly limited to one type of firework either. You can see there is a PVC barrel which will send a bottle rocket off in whichever direction the thing is pointed. As you’ve guessed, a test run is shown off in the video after the jump.

The rig is build from laser cut nylon parts. Don’t fret if you lack the equipment to automatically reproduce this. It’s not that hard to fabricate these types of parts by hand. And the motors that make it go are just hobby servos rigged for continuous rotation. [Dzl] did add external potentiometers for position feedback.

This is a tame way to celebrate the New Year, which is nice if yesterday’s project was a bit too hard-core for you.

Continue reading “Wave That Roman Candle Around Without Risking Your Digits”

Make Your Own Plastic Friction Welder

[Fran] shows us how to build a plastic friction welder. It’s a method of connecting plastic pieces. While it’s new to us, apparently this type of tool was given to kids about forty years ago to use with craft project (when plastic was all the craze).

The tip of the friction welder is a styrene rod. If it’s spun fast enough the friction will cause the material to heat to the melting point, depositing a bead of styrene into the joint. The tool seen here is a cheap DC rotary tool acquired from Harbor Freight. It really did a horrible job, but [Fran] discovered that it was the power supply that was under-rated. When she replace the wire that feeds it and used her bench supply it spit out 16,000 rpm without any trouble. The welding rods can be found at the craft store and fit the chuck of the tool quite nicely. You can see her demo in the video after the break. The seam she’s working on comes out very strong, surviving a slew of violent whacks on the workbench.

We’ve seen a few other methods of welding plastic. One used a tool much like a soldering iron, the other depends on ultrasonic waves and clamping pressure.

Continue reading “Make Your Own Plastic Friction Welder”

Bluetooth Hack For Serioux Panda Speakers

bluetooth-powered-panda-speakers

[Bogdan] received this set of Serioux Panda speakers as a gift. I turns out that they sound very good and he decided to make them more useful to him by converting them to work as Bluetooth speakers.

To begin with he bought the cheapest A2DP device he could find. This is the protocol that identifies a Bluetooth audio device. The unit is designed to provide a Bluetooth connection for a set of headphones. He patched into the headphone port on that board, but also wanted to keep the option of using the Panda speakers’ line-in. To do this he added a 1k resistor to each of the audio channels. A connection was made from the 5V rail of the speakers to power the Bluetooth module rather than leaving it with its own battery.

Speaking of batteries, the Panda speakers can run from three AAA cells. This battery compartment was a perfect place to mount the add-on hardware. But the speaker can still be powered from a USB connector. Above [Bogdan] is using a portable USB power supply.

Toner Transfer For Resist And Silk Screen Using Printable Vinyl

This toner transfer method uses a different material than we normally see. The red sheet being peeled back isn’t toner transfer paper. It’s printable vinyl used for both the resist and the silk screen.

The application process is almost the same as any other toner transfer PCB fabrication material. The printable vinyl stick is first adhered to a piece of paper before feeding it through a laser printer. It is acceptable to clean the vinyl with alcohol before printing if you think there may be a finger print or other oil on its surface. After printing it is carefully aligned with the board and ironed on.

[Mincior Vicentiu] thinks there are a few big benefits to this material. It seems that as you heat the toner it expands and hardens, but the vinyl actually softens to make room for this. We can imagine that this helps alleviate the smudging that sometimes occurs when ironing toner that is simply printed on paper. The other advantage is that the vinyl peels off quite easily after ironing, where as you need to soak paper in water and carefully massage it off of the toner.

[via Dangerous Prototypes]