The Folly Of Adding An Auxiliary Audio Input To A Hyundai Sonata

Why auxiliary audio inputs haven’t been standard on automotive head units for decades is beyond us. But you can bet that if you’re looking at a low-priced sedan you’ll need to buy an entire upgrade package just to get an audio jack on the dash. [Jon W’s] Hyundai Sonata didn’t have that bells-and-whistles upgrade so he decided to pop his stereo out and add his own aux port.

A big portion of this hack is just getting the head unit out of the dash. This is made difficult on purpose as an anti-theft feature, but [Jon’s] judicious use of a butter knife seemed to do the trick. He lost some small bits along the way which were recovered with a Shish Kebab skewer with double-stick tape on the end.

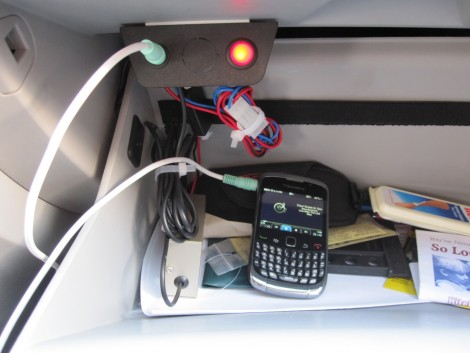
With the head unit out, he opened the case and plied his professional Electrical Engineering skills to adding the input. Well, he meant to, but it turns out there’s no magic bullet here. The setup inside the unit offered no easy way to solder up an input that would work. Having done all of the disassembly he wasn’t going to let it go to waste. [Jon] grabbed a nice FM transmitter setup. He wired it up inside the dash and mounted the interface parts in the glove box as seen here.

It’s nice to know we’re not the only ones who sometimes fail at achieving our seemingly simple hacking goals. At least [Jon] was able to rally and end up with the functionality he was looking for.

Look, It’s A Helicopter! It’s A Plane! It’s A Rolling Robot!

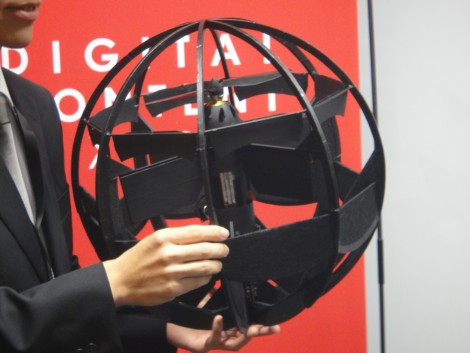
The helicopter-plane-ball-bot sounds like a creation [Homer Simpson] would come up with, but it’s a fairly accurate description of what this machine can do. It was developed by researches at Japan’s ministry of defense. The single propeller lets it operate much like a helicopter. But when it needs to get somewhere quick, the body repositions itself with the propeller at the front, while those black panels function as wings. Finally, the spherical body lets it travel along surfaces, vertical or horizontal. It can even roll along the ground.

After the break you can see a flight demo video from the 2011 Digital Contents Expo. It makes us wonder about the control interface. Which part of this is the front side, and how does it know which direction the operator intends to steer it? Perhaps there is feedback on the cardinal orientation of the control unit? We don’t have the answers to these queries, but we think there’s something very Sci-Fi about it. It brings to mind the Dog Pod aerostatic defensive grid from Neal Stephenson’s novel The Diamond Age.

Continue reading “Look, It’s A Helicopter! It’s A Plane! It’s A Rolling Robot!”

Second Run At Taser Gloves Uses Bug Zapper Parts

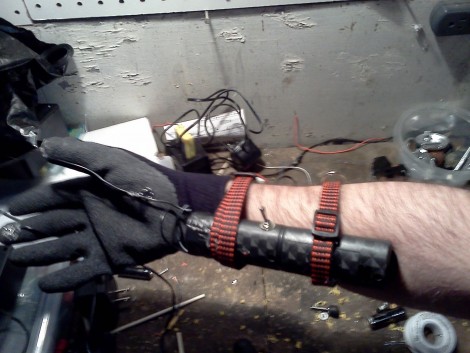
[Jair2k4] ditched the Altoids tins and found a new voltage source for this latest rendition of his taser gloves. Regular readers will remember his first iteration which used wrist-mounted enclosures containing the flash circuitry from disposable cameras to shock the wits out of someone with the laying on of hands. This one is a complete rework but it follows the same concepts.

The new shock circuitry is from a bug zapper in the shape of a fly swatter. We’ve seen these handheld devices before and dismissed them as a gimmick, but [Jair2k4] got his hands on a couple of them and found out they can put out a spark of up to 2300 volts. He set to work by getting rid of the tennis-racket-style grid at the top of the handle. He soldered on some contacts which reach to the tip of his middle-finger and thumb on some rubberized work gloves. The original handle was kept as it’s a nice battery holder and works well strapped to his forearm.

Does it work? You bet – even singing his arm hair and leaving welts on his skin. See for yourself after the break. And yes, this goes on the list of hacks you should recreate!

Continue reading “Second Run At Taser Gloves Uses Bug Zapper Parts”

Using WebSocket With PIC Microcontrollers

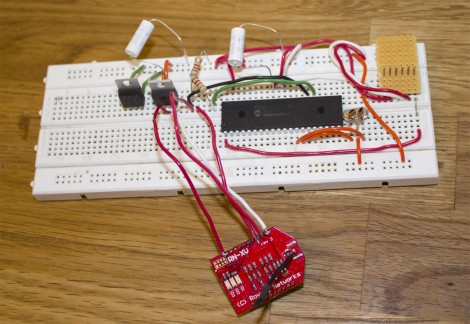
[Blaise Jarrett] has been grinding away to get the WebSocket protocol to play nicely with PIC microcontrollers. Here he’s using the PIC 18F4620 along with a Roving Networks RN-XV WiFi module to get the device on the network. He had started with a smaller processor but ran into some RAM restrictions so keep that in mind when choosing your hardware.

This project was spawned after seeing the mBed feature a few days back which combined that board along with a WebSocket library and HTML5 to pull off some pretty amazing stuff. [Blaise] doesn’t have quite as much polish on the web client yet, but he has recreated the data transfer method and improved on that project by moving to the newer version 13 of WebSockets. The protocol is kind of a moving target as it is still in the process of standardization.

The backend is a server called AutoBahn which is written in python. It comes along with client-side web server examples which gave him a chance to get up and running quickly. From there he got down to work with the WebSocket communications. They’re a set of strings that look very much like HTML headers. He outlines each command and some of the hangups one might run into with implementation. After reading what it takes to get this going it seems less complicated than we thought, but it’s obvious why you’ll need a healthy chunk of RAM to pull it off.

TV-B-Gone Can Double As A Camera Remote Control

[Christopher] found a way to get a bit more mileage out of his TV-B-Gone kit. The little device is intended to turn off every television in range with the push of a button. But at its core it’s really just a microcontroller connected to some infrared LEDs. Instead of sending codes to shut of televisions, you can rewrite the firmware to send a camera remote shutter release code.

It doesn’t take too much to pull this off. You need a way to flash new firmware to the device, and you need to know the new code timing that you want to send. Since the firmware is open source it’s easy enough to make code changes, and there are several easy methods of flashing AVR devices (like the tiny85 used here), including using an Arduino as an ISP.

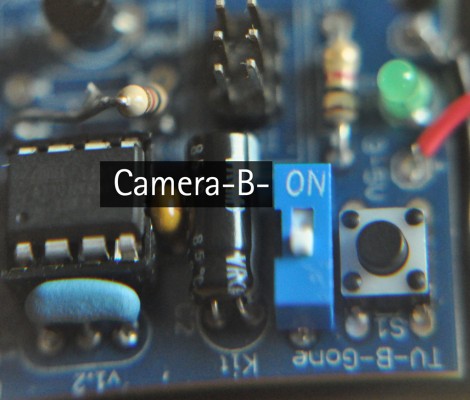
But [Christopher] did more than just add the Nikon code for his camera. He realized that there’s a jumper to select between European or American television codes. Since he wasn’t using the foreign option, he replace that pin header with a switch that selects between normal TV-B-Gone operation and camera shutter release modes. Nice.

Time Twister Is An Ingenious Lego Clock

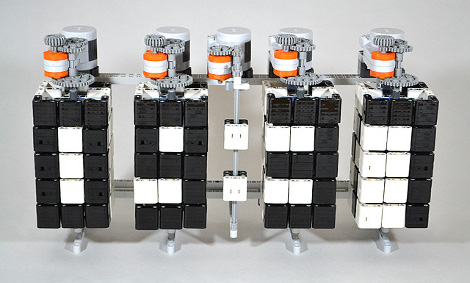
Here’s an interesting take on a Lego clock, it uses rotating squares to change the orientation of the black and white tiles to display the needed number. As we see one of the digits cycling to the next number in the video after the break, a couple of different things pop into mind. This seems very much like a 1-dimensional Rubik’s Cube, and it also has a hint of a very large ePaper display. Those use magnetic fields to swivel microspheres that are black on one side and white on the other.

The timepiece, which was built by [Hans Andersson], is limited to displaying numbers only. If you think about it, each row is three pixels but you don’t need to have every combination of those pixels available in order to display the digits. Four sides provide enough room for the necessary combinations. This would not be true if you were trying to scale it up to include all alpha-numeric characters.

The tick of this thing certainly sounds interesting, huh?

Continue reading “Time Twister Is An Ingenious Lego Clock”

Using Your Existing Hardware To Automate Scanning And Filing

This one must have been fun to come up with because it’s got it all. There’s hardware, firmware, networking, and server scripts all working together to create a filing, scanning document center for your business. The best part is that [Janis Jakaitis] was tasked to do this as part of his job (we’re sure there’s a bunch of IT guys shaking their heads at this statement, but it sounds like fun to us!).

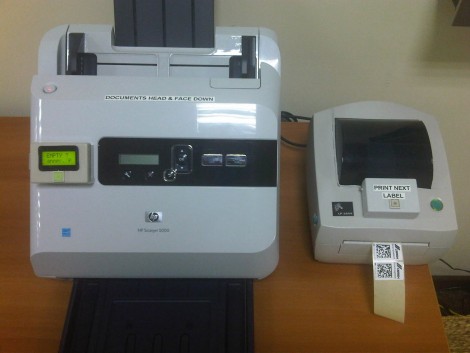
The goal was to use an existing document scanner to create PDFs which are then stored in a filing system on the network. Of course it needed to be automatic. The first big issue was that the scanner was USB only, and when connected to a USB-to-LAN bridge the buttons on the device no longer functioned. [Janis] put together an Arduino circuit that added that button, as well as a display to show the status of your scan job.

The next issue is getting the filing system to recognize the document as a unique file. The solution here is to generate a unique barcode label that can be affixed to the page before scanning. Since this is a standalone setup, it was tricky to get the label printer to spit out a unique label. He already had the Arduino working with the scanner, so [Janis] decided to use it to drive this barcode job as well. It calls to a Lua script running on the server, which then pushes the next unique code to the printer.

Tie it all together and you get the demo video after the break.

Continue reading “Using Your Existing Hardware To Automate Scanning And Filing”