3-phase Jacob’s Ladder

Two sparks are better than one, a sentiment that was never more blindingly illustrated than with this three-conductor Jacob’s Ladder. The build centers around three-phase power, which uses a trio of alternating current sources sharing the same frequency, but offset by 1/3 from one another. If we’re reading the schematic correctly, [Jimmy Proton] is using normal mains as a power source, then connecting three transformers and a capacitor to set up the different phases. Two of the transformers, which were pulled from microwave ovens, are wired in antiparallel, with their cores connected to each other. The third transform is connected in series on one leg of the circuit.

The video after the break starts with the satisfying hum of power, only to be outdone by the wild sparks that traverse the air gap between conductors of the ladder. After seeing the first demonstration we kind of expected something to start on fire but it looks like all is well. We’ll probably stick to a less complicated version of Jacob’s Ladder.

Continue reading “3-phase Jacob’s Ladder”

Full-featured Battery Tester Puts Them Through Their Paces

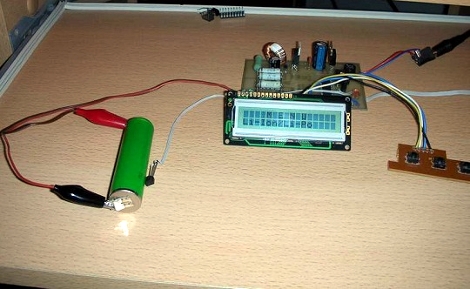
When working on battery-dependent projects you want accurate performance information where a datasheet may not be available. [E. Lelic] set out to build a device that would meter internal battery resistance but ended up with a bench tool that can do much more than that.

A PIC 16F88 microcontroller takes center stage on the meter, taking voltage level readings, monitoring a DS1820 temperature sensor, and controlling an LM2575 step-down regulator. The components provide functionality for measuring Lithium Ion, Lithium Polymer, Nickel Cadmium, Nickel Metal Hydride, and Alkaline batteries. It is capable of fully discharging and fully charging the batteries, measuring time and power consumption during this cycle, and monitoring temperature changes for the NiMH and NiCad versions.

Look for the little red ‘Download’ icon at the bottom of the post linked above. That archive includes a schematic (which we’ve also embedded after the break), board layout in .LAY format, and a HEX firmware file.

If you enjoyed this build you might want to look at this other battery capacity tester.

Continue reading “Full-featured Battery Tester Puts Them Through Their Paces”

Reversible Relay-based Motor Controller

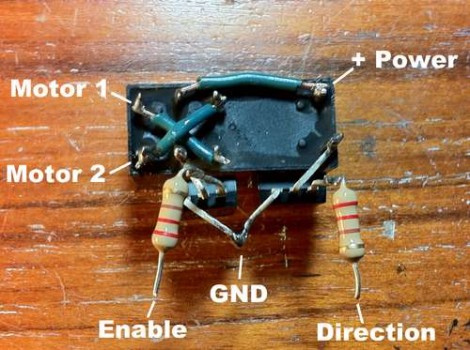
[Nothinglabs] built this motor controller as an alternative to using an H-bridge. They call it the RAT controller which stands for “Relay and Transistors”. You can see above that two Darlington transistors along with their base transistors allow logic signals to switch the relay on and off, driving the motor in one direction or the other based on the open or closed state of the relay. See it working in the video after the break.

It’s a nice little workaround with few parts, but because the relay is mechanical there will be a short lifespan when compared to solid-state motor controllers. That’s okay, because the motivation here was lack of parts on hand, rather than an increase in performance. It’s also worth mentioning that all of these parts can be purchased at your local Radio Shack when you don’t want to wait for component orders by mail. We certainly appreciate that it takes far few components than [David Cook’s] H-bridges. His designs are our favorite – we’ve used them in our own projects – but for quick and dirty you can’t beat five components and the short assembly time needed when using this type of dead-bug style soldering.

Continue reading “Reversible Relay-based Motor Controller”

Analog Scope Stands In To For Laser Light Show

[Joey] likes to dabble in laser projection, building his own hardware and writing the software that drives it. One way that he tests his setup is by replacing the laser assembly with an analog oscilloscope. This allows him to ensure that the driver board is receiving data from the software, and translating it into the correct electrical signals to drive the motors controlling the mirrored redirection of the laser beam.

In the video linked above [Joey] walks us through this process. It starts by connecting scope probes to the digital-analog-converter card that outputs image data for the projector. From there the XY mode is used to map the two channels perpendicular to each other; the motors that these signals are meant to control have mirrors that also move perpendicular to one another. After adjusting the scale and the timebase you will see the pattern the laser dot is meant to trace.

[Joey] entered this in a Tectronix contest. There’s plenty of other interesting entries to browse though. If have an entry that you’d like to see featured, or if you come across any other interesting stuff, don’t forget to tip us off.

Building An Electric Kiln

[EmcySquare] is delving into some hobby-blacksmithing by making his own knives. He needs a furnace to heat the metal, and after trying out a few different forge designs he decided to attempt an electric kiln build. The final project seen above is a box within a box. The outer shell is reclaimed using old computer cases and metal shelving brackets. Inside you’ll find a box made from fire brick, with stone-wool insulation to keep the heat where it’s supposed to be.

He cut the bricks to the right size to build the inner box, then added grooves on the inside edge witch will host the heat coils. This cutting was done with an angle grinder and [EmcySquare] notes that it kicks up an extraordinary amount of brick dust to make sure you’re wearing a respirator and goggles. Once the enclosure was ready he set out to fabricate the heat coils. Twelve meters of Kanthal A1 wire was used, shortened to a neat length by shaping coils around a 1 cm diameter wooden dowel. This prototype works but future improvements plan to add automatic temperature control through a thermocouple and a relay.

CNC Mill Built From Junk And Hardware Store Parts

[Csshop] is setting a new bar for building an inexpensive CNC mill. Not only did he complete his build at a very low cost, but it seems to work quite well too. Check out the video after the break to see the device cut out thin wood parts for a toy plane.

The majority of the build uses scrap wood for the body of the mill. The business end of the device is a flexible rotary attachment for a Dremel tool which takes a lot of the weight and bulk out of the gantry assembly. Old flat bed scanners were gutted for the precision ground rod and bearings, as well as the three stepper motors used to drive the axes. An Arduino board controls the device, commanding the stepper motors via EasyDriver boards.

Once the hardware is assembled there’s still a fair amount of work to do. [Csshop] builds his designs in Google Sketchup, but some conversion is necessary to arrive at code that the Arduino will understand. He’s got a second project write-up that covers the software side of things.

Continue reading “CNC Mill Built From Junk And Hardware Store Parts”

RSA SecurID Two-factor Authentication Comprimised


SecurID is a two-factor hardware-based authentication system. It requires you to enter the number displayed on a hardware fob like the one seen above, along with the rest of your login information. It’s regarded to be a very secure method of protecting information when users are logging into a company’s secure system remotely. But as with everything else, there’s always a way to break the security. It sounds like last month someone hacked into the servers of the company that makes SecurID.

You’ll need to read between the lines of that letter from RSA (the security division of EMC) Executive Chairman [Art Coviello]. He admits that someone was poking around in their system and that they got their hands on information that relates to the SecurID system. He goes on to say that the information that the attackers grabbed doesn’t facilitate direct attacks on RSA’s customers.

We’d guess that the attackers may have what they need to brute-force a SecurID system, although perhaps they have now way to match which system belongs to which customer. What’s you’re take on the matter? Lets us know by leaving a comment.

[via Engadget]